Welcome to the Soccer Awareness Coaches Corner. Browse through soccer drills, small sided games, tactical thoughts, full sessions and a variety of resources. Posts marked “Training Center Exclusive” are for members only.

Playing in 5 Corridors and 3 Zones Using the 3-3-1-3 for Attacking and Defending Team Shape
Using Corridors is a great way to work out individual and collective field positioning as a team both offensively and defensively and it also gives players real a “focal point” to work off. We use “Corridors” width wise and then introduce “Zones” lengthwise later. These “focal points of reference” I believe are a great way to really teach players to understand the differences between attacking and defending team shapes both widthwise and lengthwise. A great session to help players identify positional variations, the 4 lines are used as a clear guide widthwise.
The following is part of a 60 page presentation on the 3-3-1-3 that can be found in the recently added 3-3-1-3 System of Play page in the Soccer Awareness Training Center. Soccer Awareness Training Center provides unlimited access to Wayne Harrison's Soccer Awareness systems, training sessions, drills and more. Wayne's system helps develop world class youth soccer players and teams in a systematic and imaginative manner that guarantees performance at the highest level of competition. Whether you’re a beginning coach who needs help getting started or someone who wants to add some variety to their training sessions, the Soccer Awareness Training Center offers a wide variety of drills to choose from. Join Today
You can use this method of teaching with any system you like.
We divide the field up into Corridors and Zones to help players understand the major differences in spacing between attacking and defending team shape. We call them Corridors Widthwise and Zones Lengthwise. Below are some parameters to work off in my opinion. We first discuss the use of the Corridors.
Team Attacking Shape: Based on the 5 corridors width-wise we want all 5 corridors to have players in them. Based length–wise we want a maximum of 2 of 3 zones filled; with the exception of the keeper.
Team Defending Shape: Based on the 5 corridors width-wise we want a maximum of 3 corridors filled with players preferably 2.5 if possible.
Based length-wise we want a maximum of 2 of 3 zones filled preferably the whole team is condensed into 1.5 zones or at most half a field.
Playing in 5 Corridors Using the 3-3-1-3
Using Corridors is a great way to work out individual and collective field positioning as a team both offensively and defensively and it also gives players real a “focal point” to work off.
We use “Corridors” width wise and then introduce “Zones” lengthwise later.
These “focal points of reference” I believe are a great way to really teach players to understand the differences between attacking and defending team shapes both widthwise and lengthwise.
Particularly in defensive set ups (in my opinion); it shows players how to mark in zones and how much tighter it should be than they will likely imagine and especially shows those players furthest from the ball defensively how important zonal marking is.
Example, the balls is on our left with the other team and our right back is marking the opponents opposite side winger far too wide, by having designated lines this becomes much clearer to understand.
The Theme is positioning OFF the ball as a team
A great session to help players identify positional variations, the 4 lines are used as a clear guide widthwise.
Using such a fluid system of play as ours; putting the lines in as a condition is a great help.
Example if (7) goes outside (2) has to be inside (Phase 2 to Phase 3)
Defining lines also force players to play at angles to each other thus improving their peripheral vision and their preferred side-on body shape.
Divide the field in thirds lengthways also for attacking and defending principles to be worked on.
High pressing is vital to allow us to push many players forward so if we lose the ball in the attacking third we don’t let them out.
This is our starting position of 3-1-3-3. The keeper wins the ball and we change shape completely. This is Phase 1 of our 5 phases of play.

This is our defending position of 5-4-1 possibly after recovering back and playing more defensively.. The keeper wins the ball and we change shape completely.

Here we have a good balance with players positioning at angles to each other. This is Phase two of the 5 phases of play are wide and long.

Here we have a good balance with players positioning at angles to each other. This is Phase three of the 5 phases of play where (7) and (11) cut inside to overload in and around zone 14.

Get the rest of this 60 page presentation and much more on the 3-3-1-3 in the Soccer Awareness Training Center. We have just added 9 presentations on this very fluid system of play. Check it out.




Developing Attacking Play in the Opponents Defending Third
The attacking team has the ball. This is the start position of the game situation.
The idea is to have this phase, being the attacking one, and working on various ideas of movement, rotation and interchange to try to score.
You can focus on this until success is achieved from an attacking point of view.

The following is the beginning of Soccer Awareness eBook 31: Developing the Four Phases of the Game.
The game is really all about 4 Phases of Play. It can be divided up further into sub phases but the essence of the game are these 4. This eBook is what one of my main training sessions is based on. We actually train very often with this precise game situational model as it totally mirrors what I expect my team to do in the actual games. In doing so, we practice the same ideas over and over until they become AUTOMATIC when it matters.
The attacking team has the ball. This is the start position of the game situation.
The idea is to have this phase, being the attacking one, and working on various ideas of movement, rotation and interchange to try to score.
You can focus on this until success is achieved from an attacking point of view.
The starting point of the session: attacking team shape in a “Phase of Play”

Starting position of the attacking team. We can begin with an overload to get things moving positively in an attacking sense by not including (7) and (11) on the defending team. 16 players.
Attacking team shape in a Phase of Play: Using the full width of the field

To begin, our advantage is in wide areas where we have 2 v 1s on each side of the field. Draw defending fullbacks a Little wider in the process.
Wide attackers (7) and (11) cut inside to attack the inside áreas of the field


(7) And (11) cut inside to support (9) and draw defenders in to créate space wide for (2) and (3) to attack in.
(8) and (10) pull away from their markers to get free. Here we must attack through the wide areas of the field.
Defending fullbacks stay wide

Defenders (2) and (3) are distracted by the runs of the attacking (2) and (3). Now (7) and (11) overload the central área in front of the two center backs. This is the área we must attack now.
Attacking wingbacks cut inside

Defenders (2) and (3) are distracted by the runs of the attacking (7) and (1). Now (2) and (3) overload the central área in front of the two center backs. This is the área we must attack now, this is a less predictable movement by the attacking team.
Movement OFF the shoulder of defender (4)

Striker (9) moves off the shoulder of defender (4) in the build up to get free for a pass into the open channel from (3).
Attacking wingback (2) cuts inside to score

(9) Drags defender (4) short thinking he is receiving to feet and (2) exploits the space left in behind defender (4). This kind of move is a rarity because not many teams teach wingbacks to get into central shooting areas like this.
Get the rest of this session and more like it in Soccer Awareness eBook 31: Developing the Four Phases of the Game

Attacking Team Shape And Off The Ball Movement For 9 v 9
Use this session to work on team shape, movement in wide areas, use of one word commands and more in a 9 v 9 set-up playing a 3-1-3-1 system.
Wayne Harrison was the Technical Director for Youth for the Al Ain Football and Cultural club in the United Arab Emirates in the Middle East. In his time in Charge the youth teams won SEVEN National Champions at Youth Professional Level in the United Arab Emirates in 2 years. The most successful professional academy in the country. 6 Finishing Championship Runners up. The academy was Voted the Top Professional Academy in the UAE by Marco Monte of Inter Milan the Consultant for the Abu Dhabi Sports Council in 2011. Also beating teams such as Inter Milan, Valencia, Atletico Madrid and Raja of Morocco in tournaments at U15 and U16.
Here is the second example of some Coaching Clinics he taught to the 40 plus full time coaches he oversaw; all entirely relevant to what is being taught today.
Contents:
- Passing And Moving Warm Up
- Defensive Team Shape
- Attacking Team Shape
- Coordinated Movements In Wide Areas
- Shadow Play Rehearsal
- High Pressure On The Ball
- Low Pressure On The Ball
- Team Shape Defensive Positions
- A Comfort Zone Game Developing Width In The Play
- Using Four Zones To Teach Team Depth In A 9 V 9
- One Word Commands For Team Shape And Movement
Session Plan Preparation And Progressions
- 9 A Side Playing A 3-1-3-1 System
- Two shapes with cones attacking and defending (exaggerate this difference) have them run through this a few times. Different colored pinnies
- Warm up: pass and move through the attacking team shape, standing still to receive, then coming to receive and pass; and then checking away to check back, but with everyone moving through the team with several balls going. Two touches. Now give and go at each station
- Now one ball and 9 players passing through the team with the coaches commands as to where the ball should go. Players stay on the cones in their positions
- Now movement forward through the field and scoring on goal in a shadow play
- 2nd ball for defensive team shape (using the defending cones as a guide as to where to recover to)
- You can have an offside line as a guide; even though no offside (to keep the distances between units correct)
- Encourage the full use of width
- Use whistle to signal the players to pass backwards
- Can bring in the wide players to let fullback’s get forward (visual cue when the center midfielder gets the ball). We do not do this at all in games
- Bring in opponents: increasing the numbers as we improve until eventually a 9 v 9. Defenders win it pass to coach, then recover into defensive set up and play from keeper again
- Show when their striker is pushed up and offside, let him go when we have the ball and we push up and leave him (ok they win it play a long ball and score, so what)
- Show areas where the ball is and who has it as to what we do at the back. for example, we have it, we push up and leave them behind us; as soon as they win it we drop back immediately to pick them up. the distance the ball travels if they try a long ball gives us time to recover
- They have it in their defending third, we press and stop the delivery, so we push players up, especially if we win possession
- We have possession moving forward so we all move forward as a team and maintain distances between units
- We have possession in the attacking third (even if they leave someone behind us) and tell the keeper to be the sweeper; encourage to push up to the half way line at all times
- Play a game with half way line rule (all players over the half way line before they can score)
- Emphasize as we push up and have possession, in their half we outnumber them because they may have one or two cheaters behind us, so we could be 8 v 6
- Emphasize when we win the ball defending short and tight, keep immediate possession with low risk play to give us time to get wide and long when we attack and change our shape from defending to attacking.
- Can do 4 zones so all players have to be in three zones only (except keeper). set this up first. can explain this idea at the end when we have a game
PASSING AND MOVING WARM UP

- Pass and follow in the team shape. You can do this for any team size, 6 v 6, 8 v 8, 9 v 9 or 11 v 11
- Change the routines.
- Several balls going at once and everyone moving.
- Develop: Have players check to the ball to receive.
- Develop: Have players check away to check back to the ball.
- Play one and two touch.
- This is getting the players to check and receive the pass. Check away to come back into the space created.
- Follow the pass, lots of repetition. Two touch plays, receive and move the ball into space with a turn with one touch and pass with the second touch.
- Pass to the back foot of the player or behind them to move them. Player receiving can point to where they want the pass to go.
- Develop: Give and go, 1-2 with the player passing to you.
- Pass with the outside of the front foot.
- Now playing give and go’s, to develop the play and get lots of touches for all the players.
- So (1) passes to (2) who checks to an angle to receive, (2) passes back to (1) who has checked off at another angle to receive, who passes into the path of (2) running towards (3) to pass to (3) and the cycle continues AT EACH STATION.
- Players pass and run to the next position.
- Several balls should be going at once and everyone is moving.
- Try different shapes with the players.
Make sure players check off at angles to receive the pass so they are side on and can go forward, to the side, and back with a run or a pass. You can start play from the keeper.
DEFENSIVE TEAM SHAPE

ATTACKING TEAM SHAPE FOR 9 v 9

Players transition from a defensive shape to an attacking shape on the coach’s command.

COORDINATED MOVEMENTS IN WIDE AREAS

Wide players cut inside to create space outside for fullbacks to overlap or to receive to their feet running at the defense.
Have the players pass the ball around and then when it arrives at (6) that is the VISUAL CUE for the coordinated movements wide to make it easier for the players to understand when and where to make the runs.

These two diagrams show both sides going at the same time but realistically it is better that one goes only to ensure we have stability at the back should the move break down.
When we go to an 11 v 11 with this system of play both fullbacks can go; as will be shown. So, we are preparing the players for these types of movements at a younger age so when they progress to the 11 v 11 they are already educated and trained in this.
SHADOW PLAY REHEARSAL

Here the coach could dictate the movements to help the players more easily understand what to do. So, he could instruct the players to pass from (4) to (3) to (6) to (10) to (7) to (9) to shoot on goal. At the same time, he will have shown the players the interchanging movements to make to ensure this phase of play is developed correctly.
Once the players are comfortable with this they can then make their own movements and own decisions on where and when to pass.
HIGH PRESSURE ON THE BALL

Here (11) has pressure on the ball. (A) Cannot pass the ball forward, and this allows (2), (3) and (4) to push up to the half way line and condense the play from the back. Leave the opponents in an offside position (even though we do not play offside at 9 v 9).
If (2), (3) and (4) take their defensive shape off (C) and (B) and drop back then our team shape is wrong in this situation.
HIGH PRESSURE

Let’s say (9) is close enough to close (D) as the ball travels to him. This is the BEST SOLUTION if it is possible to implement it quickly. High pressure close to the opponent’s goal may result in a quick shot on goal on regaining possession.
High pressure like this also saves a lot of recovery runs for the rest of the team, instead they push up and close down the spaces in front of them and do not worry about the ball in behind them because the delivery has been stopped by (11) and (9) at the source.
LOW PRESSURE

Here, just as an example (because (9) would or should have closed down (D) already) we have (D) free and as the ball is played to him there will then be no pressure on the ball, so the opponents can play it forward. As the ball is travelling (2), (3) and (4) have to anticipate long balls to unmarked (B) or (C) that are free. Practice: “When and where to Drop”
By the time the ball arrives forward they should have enough time to recover back into position. The rest of the team can use this situation of a long forward pass to recover back too for the next phase on play.

TEAM SHAPE DEFENSIVE POSITIONS

Players drop back into position to avoid the ball being played in behind them.

Here we have possession and are moving forward and (6) has passed to (10) who is now in a shooting position.
Use a CONDITION that the team cannot score unless all the team (expect the keeper) are over the HALF WAY LINE. This teaches the team to push up from the back; as if they score the goal is disallowed if they are not up over the half way line. This also trains any defenders you may have who mentally switch off and do not push up or are just lazy to do the right thing and get up as a unit.
As they move to the 11 v 11 game and offside is applied, this will be a good education, IN ADVANCE for them on pushing up and leaving players offside and forcing them to work back (something strikers do not like to do).
A COMFORT ZONE GAME DEVELOPING WIDTH IN THE PLAY

GAME OBJECTIVE: TO ENCOURAGE PLAYERS TO USE WIDTH AND OFFER AN AREA TO PLAY WITHOUT PRESSURE
- If a player breaks wide into the outside channel on either side of the field and is in possession of the ball this player cannot be tackled. Defenders are not allowed into the channel.
- The players on the team in possession of the ball can run the ball into the channel or have it passed to them into the channel.
- This condition plants the seed in the mind of the players to immediately play with width when in possession. Numbers for this game can be 3 v 3 and upwards.
- Our offensive team shape to begin. Four players give us width in attack.
Develop: The wide areas can be used to practice certain moves the players have been taught, especially at the younger ages where they need to be able to practice them without pressure. This allows for them playing in a game but also doing the move without pressure.
Coaching Points:
- Create space wide when in possession of the ball
- Building play from the back
- Using width to attack
- Developing Overlap runs

Both fullbacks (2) and (3) push forward. They interchange with the wide attacking players (7) and (11). (7) And (11) cut inside forming an offensive three in attack with (9).
This is a big overload from both sides of the field so (6) needs to sit in and cover for this should the opponents win possession and counter attack.
Players make movements off each other. Overlapping fullback (2) Gets the ball and has options in front of him, he can play a team mate in or run the ball to get into a crossing position.
Alternatively it could be the fullbacks (2) and (3) cutting inside and the midfield players (7) and (11) staying wide.

An alternate way to play is have both fullbacks break wide initially to offer to receive the pass in the buildup.
Once the side to attack down has been established we can then have our opposite side players adjust as shown, (11) still attacking but (3) dropping back in to cover in case of a counter attack. This gives more freedom to (6) to support the attack.
Here we see the continued movements of the players in the attacking phase of play. We are compact from the back as the players move up the field to get up to the half way line as their guiding position.
INTRODUCE OPPONENTS

Introduce 5 players to give an overload for the team you are coaching to give them the opportunity to have initial success.
Opponents can only “shadow” the outside players and cannot enter the outside comfort zone.
Players can only stay outside in the channel with the ball for a few seconds then must make their move inside either passing it in or dribbling it in or it becomes too false a set up.
Building the session up using an overload situation to gain success.
Gradually increase the number of opponents until you finish with a 9 v 9 game situation. Building the numbers up as opponents should ensure a progressive situation where each stage of development is successful.
USING FOUR ZONES TO TEACH TEAM DEPTH IN A 9 v 9

DEFENSIVE TEAM SHAPE: The team maintains its shape by only occupying three of the four zones.
Short and tight. If we are ultra defensive and playing low pressure it may be only two zones we occupy.

OFFENSIVE TEAM SHAPE: Now we have our offensive shape and the team pushes up with them all still in three out of four zones (except the keeper).
Wide and Long.
ONE WORD COMMANDS FOR TEAM SHAPE AND MOVEMENT

Just a one-word signal can organize a back four defense so everyone knows what to do and reacts together as a unit. Also, midfield players close by can react off the call too.
One-word calls ensure everyone will know quickly and effectively what they should do as a unit and as a team.
Hence the back players (and the keeper) can organize their movement as a unit (and therefore influence those in front of them) from five one-word commands. The momentum is triggered from the back and runs forward through the team to the strikers.

Game situation
The Opponents have the ball and pass it back towards their own goal for example or we pass the ball forward maintaining possession.
The coach can move around the field with a ball and the team can take their shape from that also.
All the movements are without a ball to begin.
Here in the game the players move up the field only up to perhaps five yards in distance (it may be only one or two yards), edging out waiting to see if we win the ball then they can apply the OUT call.
Also it can be when we pass it forward and move up as a team.
Units move up together maintaining the same distance between each other. They move up a short distance then reassess the situation (and reorganize) depending where the ball is.
If it goes back again (we force them to play it back as a team) we can move a short distance up again.
If they pass it a long distance back then as the ball travels back we travel forward too and it can be the OUT call instead (see next slide).

Game situation
We have the ball and have played it forward into the attacking third for example and kept possession (or not, maybe just played it behind the opponent’s defense and it takes time for them to get the ball and turn and pass it forward again). It can be a big movement forward of the team.
At Practice: The coach can move around the field with a ball and the team can take their shape from that also.
The team sprint out together on the OUT word until you say sit or stop in the practice, they then stop moving and sit down and you assess their spacing between players and between the three units.
As they get good at this, speed up the commands until they are moving around the field quickly and efficiently with correct spacing. Eventually you can say the different words and all they do is stand still not sit on the stop command (in practice) so you can move them around the field at a faster pace working the transitions.

Game situation
Holding the line at the back of the defense and staying in the same place. The back defenders neither drop nor push up. This could be when the opponents have the ball but there is pressure on the ball so can’t play it forward.
The two opponents are included to show how this situation works; you wouldn’t necessarily use them in this practice though it may help the players to understand it better. This is a tricky situation to identify for the players and relies on good officiating plus positive direction from the player in charge.
This can occur even if the opponents have the ball and are facing forward with it but the defending pressing player or players prevent the forward pass effectively.
Decisions have to be instant here.
Our team lets the opponent’s strikers run off side. Players can also use the UP call too in this one, just pressing a little to work the opponents’ strikers if there is pressure on the ball to prevent the forward pass. This makes it even more obvious the opponents have run offside as the distance between them and the back four is greater.

Game situation
They have the ball and are moving forward with it playing left to right; we are playing right to left.
Here the team drop back together recovering back to the goal.
Again, it isn’t all black and white here as to when this happens but a situation could be when they have the ball and are moving forward and there is no pressure on the ball so the player on it can pass it forward and maybe in behind our back players for their strikers to run onto.
To avoid this we drop back as a team behind the ball but in the game the closest player would go to the opponent on the ball delaying the forward pass to allow others more time to drop and get back behind the ball.
For ease of practice to highlight the movement here we work all the players together to get the point across.
More attention to detail shows that you can break the situation down further to the player on the ball facing forward;
- Do they have their head up and hence can see a forward run and play the ball in quickly and therefore the back four must drop, or:
- Has the player got the ball at their feet and are facing forward still but their head is down and hence they do not see a potential run and in fact delay the forward pass long enough for us to actually DROP; HOLD the line or even press up with the UP call.
This delay may just give enough time to the closest player to the ball on our team to be able to apply pressure and thus stopping the forward pass.
Another variable, if the furthest striker is alongside the deepest defender, if that defender recognizes the moment quickly enough then that player can push up and play offside (and call UP) even with the opponent facing forward and ready to pass.
We rely on good officials to catch this!!

Game Situation
Here the opposition has played the ball into a very wide area and we all move across the field.
Slide can be used when the opponents are taking a goal kick so there are players around the area where the ball is to be kicked.
Moving across the field, don’t take it literally at 90 degrees it could be diagonally in a game (45 above) but for our practice you could have them moving across the field like this just to get the idea across.
In the game the ball may have been passed wide in the opponent’s possession and we move across the field as a team to close all the spaces around the ball to try to win it back.

Ultimately move the players around the field with the various commands keeping them in motion. You can introduce other players to pass or run the ball around the field and they must adjust off where the ball is. The team can only intercept passes not make tackles as we want them to move around the field off the ball.
Once they intercept it they can attack the goal and try to score as a reward. Introduce this method into an 11 v 11 game situation as the final progression.
USING ALL COMMANDS
The team need to learn that the shout is SLIDE one second; then within a moment it changes to UP (maybe they passed it back), and within another moment the call is DROP (as they line up to pass it forward), then it may be the OUT call within another second or two because we won the ball and passed it forward quickly giving us valuable time to get out.
Train the players to be able to makes these decisions quickly and effectively, offer lots of situations where this happens and have them practice it.
Mistakes are expected, so we must correct them, and the time to make them and correct them is in training.

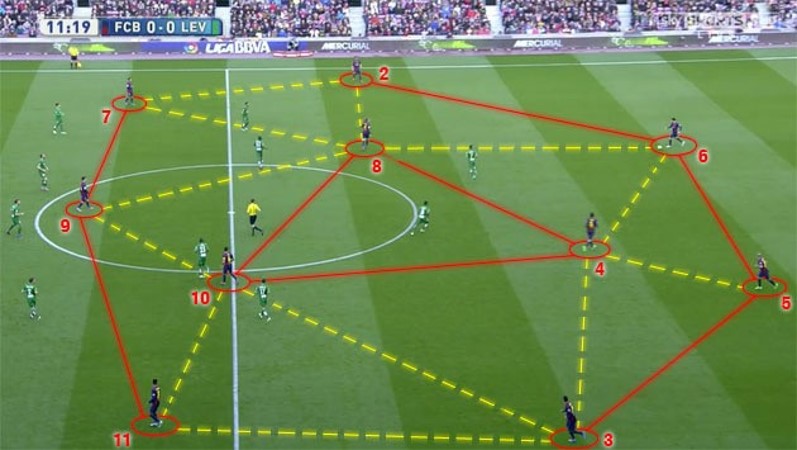



Back Four Defending and Attacking Team Shapes
In the practices illustrated here both back fours operate on defensive and attacking aspects of their game in the same practice. The coach may choose to work with one of the back fours specifically or may work with both back fours in the same practice.
Wayne Harrison was the Technical Director for Youth for the Al Ain Football and Cultural club in the United Arab Emirates in the Middle East. In his time in Charge the youth teams won SEVEN National Champions at Youth Professional Level in the United Arab Emirates in 2 years. The most successful professional academy in the country. 6 Finishing Championship Runners up. The academy was Voted the Top Professional Academy in the UAE by Marco Monte of Inter Milan the Consultant for the Abu Dhabi Sports Council in 2011. Also beating teams such as Inter Milan, Valencia, Atletico Madrid and Raja of Morocco in tournaments at U15 and U16.
Here is the first example of some Coaching Clinics he taught to the 40 plus full time coaches he oversaw; all entirely relevant to what is being taught today..
Different Ideas on the Development of Play from the Back and Positioning
In the practices illustrated here both back fours operate on defensive and attacking aspects of their game in the same practice. The coach may choose to work with one of the back fours specifically or may work with both back fours in the same practice.
INITIALLY HAVE A FIELD 25 YARDS OF THE HALF WAY LINE THEN BOX TO BOX, NARROW FIELD
- ALL SHADOW PLAY UNTIL GET TO 7 v 7 (4-2-1)
- 4 v 4 POSITIONING AND MOVEMENT
- 5 v 5 (4-1) CM drops in CB BRINGS OUT
- 6 v 6 (4-2) SAME IDEA WITH 2 CM’S
- 6 v 6 (4-1-1) STRIKER IN. SHADOW PASSING STILL BETWEEN ALL THE UNITS THEN PASS TO OTHER TEAM. HOW DO WE GET OUT? CB BRINGS OUT AND SWITCHES; OR N6 DROPS IN AND THEY SPREAD
- 7 v 7 (4-2-1) as above: HOW DO WE GET OUT AGAINST 1 STRIKER? ADD KEEPERS AND NOW IT IS LIVE
- 8 v 8: 4 v 2 / 2 v 2 / 4 v 2: HOW DO WE GET OUT AGAINST A 2? THRU FB’S OR CREATE A 3 AT THE BACK WITH A CM
- 9 v 9: 4 v 3 / 2 v 2 / 4 v 3: HOW DO WE GET OUT AGAINST A 3 THRU FREE CB OR FB’S PUSH ON AND TAKE WINGERS WITH THEM; CB’S SPLIT, CM DROPS IN, 3 v 1 IN CENTER.
- 3 TEAMS: SP: GK TO BACK 4: HEAD OUT TO CENTRAL TEAM (BALLS IN EACH GOAL) 4 v 5 v 4 (defending)
- AN 11 v 11: FULL FIELD: 4-2-3-1: build up from back. DO IT AS A SHADOW PLAY LIKE THE BEGINNING TO START IF CB BRINGS OUT SHOW MOVEMENT IN FRONT TO CS
- So, focus on attacking from the back then get to other back four and defending regaining the ball and attacking back and forth.

No goalkeepers are needed in this practice to begin; which is sited around the edge of the middle third of the pitch - marked by cones.
- The Coach start the practice by serving the ball into any player of the back four
- When the ball arrives at a full back it is delivered some 30 yards forward to the opposite fullback. As the ball is delivered from one side to the other the back four pushes forward to compact the play.
- On receiving, transfers the ball across the back four and the team 'changes the play' to the other side, and the left back then delivers to the right back on the other team for the process to begin once more.

Technical content of the practice
Coaching Points:
Attacking
- 'Changing the play' across the field
- Shape of the back line, distances from each other.
- Quickly with minimum touches (one or two touches if possible), possibly 'missing out' a centre back in the process.
- Awareness of others positioning prior to receiving the ball.
- Pass quality - along the back line - Pass forward to the other group.
- Supporting the forward pass - pushing forward - When? - How far?
- Distances between players and role as the ball is moved across the field.
Defending
- 'Sliding' defense across the pitch as opposite back four transfers the ball across their line
- Positioning off other players in the back four - ahead, behind, distances.
- Depth of the back-line and awareness of other movements.
- 'Spreading' quickly as a back four player receives the incoming pass - Where, how, speed etc?

The ball can be transferred across 2 or 3 players for greater speed.

Introduce one central midfield player (or two if the team operates with two central midfield players} to each team. The central midfield player (6) can now combine his play with the back four players. The four central backs on both teams can now receive passes and run with the ball into the midfield area.

Should this action take place, then (6) replaces the center back going forward with the ball and becomes an integral part of the back line and the centre back now operates as a midfield player. The three movements are in numbered order of 1 to 3.
Also, on receiving the ball at the back, the right center back may choose to play a "cross-pass" with the left back as he comes out of the back line.
Once into the midfield area, our central back now distributes the ball into the opposite back-line and the entire process can be repeated.
Technical content of the practice
Attacking
- 'Changing the play' across the field - all factors from the previous practice
- Combining with central midfield players - Wall passes - Feints to pass to central midfield
- Running with the ball from base line and adjustments of position from other defenders
- Involving the central midfield player in changing the play.
- Pass quickly - Across the back line - To and from the central midfield player - Distribution from the central back in midfield areas
- Central midfield operating in the back line
- Central back operating in midfield
- Spreading and supporting any pass receiver - Where? - When? - How?
- Central midfield positioning distances as back four arranges the play.
Defending
- 'Sliding' defense as the ball is changed across the opposition back line.
- Positioning off other players in the back four.
- Depth of the back-line and awareness of other movements.
- 'Sliding' of central midfield player as opponents change the play, etc.

Additionally, the back four may choose to involve the central midfield player in changing the play across the back, as illustrated here.
Alternatively have the passing back four stay wide and not condense across the field so their shape has to change very quickly to adjust to the other team receiving the ball.
Add a 2nd central midfield player.

Two more players are introduced with the practice. Both number (9) strikers operate to disrupt the flow of the play across the back line and to act as targets for forward passes from the back players in possession.
The central midfield player (or two central midfielders) still operates ahead of the back line but now chooses his positions according to the movements of the striker opposing the back-line players (preventing forward passes to him by getting in the passing lane).
Striker (9) moves according to the flow of play and where appropriate, is a receiver of the ball from his own back line and if he does receive the ball he plays it to the other team and the cycle continues.
However, back players may still pass to their opponents back line if (9) cannot make a logical and suitable position to receive.
Should the striker (9) receive a pass from a back player he could lay the ball off to the central midfield player moving to support him or feed any other member of the back line moving forward to support him. The receiver from (9) now plays the ball into the back four of the other team and they initiate play at the back once again.
Technical content of the practice
Attacking
- As in previous practices here.
- Back four players supporting striker receiving the ball.
- Quality of passes to striker's feet for ease of lay off.
- Positioning and movement of central midfield player supporting the receiving striker.
Defending
- As in previous practices
- Who marks striker (9) receiving forward passes?
- How is the striker marked?
- Is the back four defense to be organized as a zonal back four or man-for-man marker on the striker and a free back?

Further players can be introduced and the field lengthened.
Two wingers and two more midfield players are added to the practice, which commences when either coach or an opposition player (here it is player G) plays the ball to the goalkeeper.
The back four positions to play out from the back and attempts to do so introducing midfield players if necessary. Play is free with the intention to score past the opponent's goalkeeper. Play is from penalty area to penalty area and goals and goalkeepers now introduced.
Technical content of the practice
Attacking
- Back four 'shape' to receive from the goalkeeper against three opponents.
- Awareness, controlling, touch and decision to pass, run the ball or combine with other players to progress the play from the back.
- Support and positioning of midfield players to assist any back player coming out from the back with the ball.
- Positioning of forward players in central and wide positions to receive passes from back players.
- Interchange of positions between back and midfield players; (6) CAN DROP IN TO COVER.
- Distribution over short and longer ranges from back players.
- Operating as a midfield player on coming forward from the back etc.
- Roles of midfield players on forwards receiving passes from the back.
- Alternatively, the defensive midfielder (6) can drop in and start the moves off if the opponents only have two strikers pushed on the back four.
Defending
- Roles and responsibilities of a zonal back four, or man-for-man and free back roles.
- Showing 'infield' or 'outside' by full backs.
- Marking, challenging, blocking and defending against crosses.
- Back four distances from the ball when play is with opposition back four.
- Back four and goalkeeper understanding.
In the practices illustrated both back fours operate on defensive and attacking aspects of their game in the same practice.
The coach may choose to work with one of the back fours specifically or may work with both back fours in the same practice.
Concentration - Defending from Central attacks (Transition)

Now place another team in the middle of the field.
This practice takes place on half a pitch with the flanks coned off, so the field is not too wide. The back four stays compact and narrow. They must stay alert always on both sides.
The practice can be quite exerting and frequent rests should be given. This is a squad practice using eight defenders. Central midfield players could and should be given practice in the defending positions.
Start Position: The goalkeeper (GK) starts the move by throwing or kicking a ball long into the opposing back four, it is headed out by a defender. The striker and midfield players pick up the loose ball (or he can pass it into the middle team).
Striker (9) can receive and attack the goal or lay the ball off to a supporting midfield player. The defenders must defend the action.
If the defenders win the ball they hit the other striker (in this case 10) in the other half and the opposite back four begin to defend.
If the move breaks down in any other way the GK starts the practice again. The key to the practice is that the midfield trio can change the direction of attack at will so both sets of defenders must be prepared. This will also involve being ready to push on to players in midfield. Something back four players can be reluctant to do this. This is also an excellent practice for coping with playing against one up front.
Develop: Passing to the number (9) or (10) challenges the center of defense but also pass to the wide players to affect the fullbacks too.
11 v 11 THE FINAL GAME SITUATION

A final progression could be made to play an 11 v 11 on a full-size pitch adding a midfield player to each team. Here it is a 4-3-3 but you can use any formation to suit your needs.
DO A SHADOW PLAY FIRST SUCH AS IN THE BEGINNING OF THE SESSION WHERE TEAMS PASS AND MOVE, THE OPPONENTS SHADOW THEM; AND THEN THE TEAM IN POSSESSION GIVES THE BALL TO THE OTHER TEAM AND SO ON.
Show how to develop play from the back against a single striker, two strikers; and then three strikers, and different formations.

- Here center back (4) brings the ball out of defense.
- Midfielder (6) drops in the cover should possession be lost in a bad area of the field.
- Midfielder (8) clears the path in front of (6) by taking his marker (F) out of the space and wide.
- Wide striker (7) clears the space for (8) to move into by pushing forward and thus pushing defender (D) back also.
- If possession is lost in this phase of play then (4) drops back into the defensive midfield position and (6) stays at center back until they can switch back into their regular positions.
WIDE PLAYERS CUTTING INSIDE

This is an opportune moment when attacking centrally (it can be a midfield player also) for the two wide strikers to make OUTSIDE TO INSIDE runs to position between the fullbacks and center backs.
(K) can close (4) who can either try to beat him or time the pass into any of the three front players before getting closed down, thus taking (K) out of the game.

(K) Blocks the pass to (9) but it is open for either (11) or (7).
If (11) can receive the ball through good timing of his run to go with a perfect timing of the pass and attack between the defenders this is a wonderful way to create a 1 v1 situation in front of goal, he may even get a quick shot off before the defender reacts to his movement.
Coaching Points:
- Timing, accuracy and weight of the pass (TECHNIQUE)
- Timing and angle of the run
- Decision Making (SKILL), choosing the correct option
- Finishing with a shot
- Following in for rebounds

Developing Play with a Defending Back Four
The session is designed to show how to work on team shape building up from a back four only. Side cones are 25 to 30 yards apart as are the defenders and the coach. The coach moves with the ball and the defenders mirror the movement maintaining the distances between them.

- The session is designed to show how to work on team shape building up from a back four only. Side cones are 25 to 30 yards apart as are the defenders and the coach. The coach moves with the ball and the defenders mirror the movement maintaining the distances between them.
- You can use the signal words UP, OUT, HOLD, DROP, and SLIDE, to determine the movement. Eventually we need to work up to an 11 v 11 situation showing how to work a team as individuals, as units and ultimately a team.

- Here the coach moves to the outside and the whole back four adjust their positions across the field (slide) to compensate for this movement, (2) being the player to apply immediate pressure on the ball.
- Re-emphasize the idea that the players are tied as links in a chain and so have to move together as links of a unit or even tie them up so they feel how it is when they move together. Coach moves back up the field the back four condense up also based on the position of the ball.
Introduce Attacking Opponents

- Players with the ball pass it across in front of the defenders. Defenders adjust their positions to mirror this movement. This is working on marking zones and marking players and distinguishing between the two depending on where the ball is.
- Pass across to the next player and hold the ball there, check the defenders positions, then move the ball again.
- Use the side cones as guides to distancing between units as they are introduced.
- The ball has been passed inside and the defenders adjust closing down the player on the ball and closing down the spaces around the ball.
- This is continued using all the players sometimes missing a player out with a pass so it goes across two players to test the defenders and how they adjust. Once they have grasped this concept you can move the players to the next progression. In the next phase of the session have extra balls ready in the center circle to keep the flow of the session going.

- The coach now has players to pass the ball to (opponents).These players initially must be in static positions to check the set up. You can us a rope to tie the four defenders together to get the idea of moving as a unit. Players maintain an open stance so they can see opponents as well as the ball. When the ball is at (C) or (D) the back four take positions with regard to (A) and (B) and do not get drawn to the ball. Defending team can win back the ball only with interceptions of passes not with tackles to allow us to look at the shape they achieve.
- Here we see how the back four should look once the ball has been passed wide and defender (2) has closed the ball down.
- Notice the back four is NOT flat but like angled links between each player with the central defender (5) the deepest player. This player can effectively be called the sweeper. When the ball is at (B) on the other side, (4) becomes the sweeper.
- The second center back is the deepest player and the two center backs share this responsibility depending on which side of the field the ball is positioned.

Teaching Changes in Team Shape in a 1-4-3-3 Incorporating Developing Angles and Timing of Support
In this presentation we are working on moving and passing into HALF SPACES between opponents positioning. Players position so they are AT LEAST side-on improving their PERIPHERAL VISION at ALL times on the field of play. This presentation concludes with attacking in the final third opening to 5 corridors.
Presentation Focus
This presentation also works on intelligent runs OFF the ball and player body positioning to receive and improve their peripheral vision.
1. Attacking: Based on the 5 corridors width-wise we want all 5 corridors to have players in them.
Based length–wise we want a maximum of 2 of 3 zones filled; with the exception of the keeper.
2. Defending: Based on the 5 corridors width-wise we want a maximum of 3 corridors filled with players; preferably 2.5 if possible.
Based length-wise we want a maximum of 2 of 3 zones filled; preferably the whole team is condensed into 1.5 zones or at most half a field.
3. Angles and Timing of Passes and Runs: Moving and passing into HALF SPACES between opponents positioning.
4. Teaching Side on Positioning: Players position so they are AT LEAST side-on improving their PERIPHERAL VISION at ALL times on the field of play.
Phase One: Playing in 5 Corridors from a 1-4-3-3 Widthwise
Defensive Shape Start Position

Playing in 5 corridors and 3 zones to help anddefine the positioning of players. This is our starting position of 1-4-3-3. The keeper wins the ball and we change shape from defensive to attacking shape.
Phase Two: Too Spread Out From Goal To Goal

Team is too big with too much space to allow for a counter attack. So even when attacking we have to think about if we lose it what do we do. Players are spread out in 3 Zones. On the other hand if you don’t want to risk being caught high defensively with a ball in behind you then you may set up deeper like this.
Join the Soccer Awareness Weekly Email Newsletter mailing list below to get this FREE 21 PAGE Presentation

Pressure: When, Where and How as a Unit in the Attacking 1/3rd
The majority of goals in the game of soccer are results of mistakes and most mistakes occur when players are put under pressure, especially in dangerous areas. When you are attacking and you lose possession your first goal should be to regain possession. You will be surprised the number of times your opponent will give the ball away in front of the goal when your team closes them down in an organized fashion.
The majority of goals in the game of soccer are results of mistakes and most mistakes occur when players are put under pressure, especially in dangerous areas. When you are attacking and you lose possession your first goal should be to regain possession. You will be surprised the number of times your opponent will give the ball away in front of the goal when your team closes them down in an organized fashion.
Activity #1: Warm Up
Set Up: Players move on a half pitch with a partner as shown below. Partners pass and move freely.

Explanation: Players pass and move - on coaches command - one player sprints to "pressure" his opponent. This pressure can be passive at first and progress to full pressure as the warm-up continues.
Coaching Points:
- Speed of pressure
- Angle of pressure
- Tenacity to win ball
Activity #2: 5v5 Game
Set Up: One team has 5 field players (Yellow): the other team has 4 field players and a goalkeeper (Red) as shown below. Three mini-goals are created using flags as shown.

Explanation: Play starts with a pass from the goalkeeper to any of his teammates. Emphasis is placed on the defensive shape and responsibilities of the "defensive" (Yellow) team. The "attacking" team (Red above) must attempt to score in any of the three mini-goals near the half-way line. If the "defensive" team gains possession of the ball they must attack quickly and attempt to score in the full-size goal. Play is continuous until a goal is scored. In the Diagram above, the "defensive" unit has adjusted their positions to try to win the ball - Player (A) is forcing the play inside; Player (B) has stepped to ball-side on Red (G). Players (C) and (D) have moved to confine the playing area. The 4 "attacking" players get the ball on every re-start.
Coaching Points:
- Defensive team must work as a "UNIT"
- Communicate at all times.
- "Read the Game" - try to intercept passes etc.
- Move as the ball moves - positioning in relation to teammates, opponents, ball.
- Speed of counter-attack after winning possession.
- Use the man advantage to maintain possession if a quick counter-attack is not possible.
Activity #3: 7v7 + Goalkeepers
Set Up: Two-thirds of a pitch is used as the playing area. A half-way line is created using cones. Two teams of 7 players are organized within the playing area as shown below.

Explanation: Play starts with a pass to the Yellow attacking team. One team is designated as the "attacking" team (Yellow above) and the other team is designated as the "defending " team (Red above). Both teams compete for possession of the ball and attempt to score in their opponent’s goal. The offside law is in effect. Emphasis is placed on the defensive responsibilities and shape of the Red team. The "defensive" team are encouraged to create pressure areas / pockets in certain areas of the pitch in order to win possession of the ball. All re-starts go to the Yellow "attacking" team.
See Diagram below - the Red "defensive" team has created a "pressure pocket" on one side of the pitch making it very difficult for the Yellow team to maintain possession - this may force a turn-over in an advanced area of the pitch. Player (A) has stepped to put immediate pressure on the ball as well as force the opponent inside towards the pressure; Players (B) and (C) have stepped to the ball-side shoulder of their opponents in anticipation of intercepting any potential pass. Player (D) has moved to deny a passing option for the wide Yellow player. Players (E), (F), (G) have all adjusted their positions to squeeze the space and make the pitch more compact while still providing adequate cover and balance.

Progression: Have the players play "low pressure" at first and switch to "pressing" at coaches command or on certain visual cues - bad pass, back-pass to goalkeeper etc. This can help develop an understanding of the right moments to apply pressure and in what areas.
Coaching Points:
- Move as a "UNIT"
- Communicate at all times.
- Read the game - anticipate the play.
- Counter-Attack quickly if possible.
- Force the attacking team into tight areas - dictate what the opponents do!

A Short and Simple Explanation on How to Defend
Attacking: Based on the 5 corridors width-wise we want all 5 corridors to have players in them.
Based length–wise we want a maximum of 2 of 3 zones filled; with the exception of the keeper.
Defending: Based on the 5 corridors width-wise we want a maximum of 3 corridors filled with players preferably 2.5 if possible.
Based length-wise we want a maximum of 2 of 3 zones filled preferably the whole team is condensed into 1.5 zones or at most half a field.
Get more like this in Soccer Awareness eBook 19: The Principles of Defending for U8 to U14.
This book takes you through simple individual beginnings to more complex unit and team ideas on defending. We address all the important facets of defending such as pressure on the ball and how to tackle or delay, immediate supporting positions, covering positions beyond the support player, the importance of recovery runs to get back goal side of the ball (which many players don't like or want to do), the need for players to track back individual opponents so they do not overload areas against us; and ultimately how we must develop compactness as a team.
Attacking to Defensive Team Shape
Attacking: Based on the 5 corridors width-wise we want all 5 corridors to have players in them.
Based length–wise we want a maximum of 2 of 3 zones filled; with the exception of the keeper.
Defending: Based on the 5 corridors width-wise we want a maximum of 3 corridors filled with players preferably 2.5 if possible.
Based length-wise we want a maximum of 2 of 3 zones filled preferably the whole team is condensed into 1.5 zones or at most half a field.
Dividing the field into fifths widthwise and thirds lengthwise: The Offensive Set Up

Playing in 5 Corridors widthwise to help define the positioning of players. Also playing in 3 thirds from goal to goal lengthwise (lets call these ZONES FOR CLARITY). Here we have a good balance with players positioning at angles to each other. Must get the team into 2 thirds only, except for the keeper, both offensively and defensively.
Shadow Play: The Defensive Set Up

Play without opponents and show our basic attacking shape then offer alternatives for pressing as a group and have them do it as fast as possible. Use different color cones to represent where we lost the ball then organize the team around this defensive starting point having the players decide where they think they should be and why.
Can extend this back to the middle third also

We lose it wide in the middle third; purple cone; try to press them inside still to where our strength is with numbers. Wing full backs have to be brave and stay in midfield but condense in. (3) delays, shows inside to (10), the rest condense. (10) cuts off passing lane forward as does (11) inside or back.. It will NEVER be this picture perfect but all the same it shows what we should strive for. Pivot (6) is the key for cover.
Playing a Pressing game comes from the back

If we want to play a pressing game then we must have the back four as high as possible (essentially a back 3 now) and then the responsibility of the front players is to press asap when we lose it to stop a counter attack. Same in midfield where we now have our wing fullbacks positioned.
Pressing in attacking third condensing to 3 corridors

Condensing the spaces close to the ball. (11) forces (A) inside to the support and blocks the pass to (I). (3) is already up there and so is the next pressing player. Don’t worry about (D) and (G) and (4) already has covered the space should (A) be able to play the ball long. Defending just inside our own half.

5 Phases of Play for 4-2-3-1
- This is a very simple way to show how the team movement works. The system changes as we advance.
- Players can interchange positions as we develop the play.
- We offer great dynamics and fluidity to the players to allow them to express themselves on the field moving to a very attacking 3-1-3-3.
- With this we can show the discipline also involved when we lose the ball and recover back.
- Teams will develop their style of play within these frameworks, it will never be as picture perfect as this due to the nature of the game. It is more a guide. We teach this from U11 to U18.
- How we do it per team will be determined by the level of play.
- We strive to enable all teams at all levels to be able to master the attacking and defending defining team shapes of 1 and 2.
- This is a very simple way to show how the team movement works. The system changes as we advance.
- Players can interchange positions as we develop the play.
- We offer great dynamics and fluidity to the players to allow them to express themselves on the field moving to a very attacking 3-1-3-3.
- With this we can show the discipline also involved when we lose the ball and recover back.
- Teams will develop their style of play within these frameworks, it will never be as picture perfect as this due to the nature of the game. It is more a guide. We teach this from U11 to U18.
- How we do it per team will be determined by the level of play.
- We strive to enable all teams at all levels to be able to master the attacking and defending defining team shapes of 1 and 2.
54 Pages
We want to stay with our own game plan as closely as possible; based on what we practice and to keep it simple for us; as we dictate to our opponents; and we impose OUR WAY on them.
But there will be many occasions where we must change the system of play and we may have to adjust to suit the opponents.
Here are some ideas for you to consider for your team starting with the 13313 and 14231 systems of play.