Welcome to the Soccer Awareness Coaches Corner. Browse through soccer drills, small sided games, tactical thoughts, full sessions and a variety of resources. Posts marked “Training Center Exclusive” are for members only.

Interaction of Wide Players in 3-1-3-3 - Training Center Exclusive
The Movement Off the Ball Interactions of 2 and 7, and 3 and 11
We want 7 and 11 to cut inside to do two things:
To get in a good position to receive the ball themselves
To create space of overlapping Wing Full Backs 2 or 3.
Timing this movement correctly is vital, players must not come inside too soon and be easily marked. Resulting position is a player facing BACK to the ball. Timing of this movement has to be LATE and FAST. The correct resulting positioning will be shown in this post.
Subscribe to the Soccer Awareness Training Center to get access to all premium Training Center Exclusive articles.
The Movement Off the Ball Interactions of 2 and 7, and 3 and 11
We want 7 and 11 to cut inside to do two things:
To get in a good position to receive the ball themselves
To create space of overlapping Wing Full Backs 2 or 3.
Timing this movement correctly is vital, players must not come inside too soon and be easily marked.
Resulting position is a player facing BACK to the ball.
Timing of this movement has to be LATE and FAST. The correct resulting positioning will be shown in these following slides.
Alternatively 2 and 3 can cut inside and 7 and 11 stay wide.
The timing will show that staying touchline wide will affect the opponents fullbacks position drawing them wider creating more space between themselves and their center backs; which is the space we want to attack.
If the timing of the run and pass are correct; 7 or 11 will receive the ball facing FORWARD not back and be running at the defenders at pace with the ball in front of them.
Current Movements: Its all about TIMING
(7) Has Cut inside FAR TOO early to receive the pass and takes fullback (D) with them. (8) passes the ball to (7) who has to receive with their back to the defender (D) facing backwards. (E) tracks (2). We still have possession but it could be better.

Getting in too early
(7) In far too early; the SPACE to pass into is too tight. That said maybe we can get (2) in because of it.

Preferred Movements: TIMING
Lets say (D) reads it well and tracks (7) and closes up the space, we may still get (2) in who runs into the space left by (7)s run.. Again, TIMING is the key. As (7) moves inside this is the CUE for (2) to overlap at the same time, both LATE and FAST. We wont always catch (E) like this but if (E) is ball watching then (2) may get in on their blind side.

Preferred Movements
As the ball is traveling (7) moves wide and draws (D) slightly wider; creating space inside between (D) and (C). (D) IS STILL marking SPACE INSIDE; but may slide across as shown whilst hopefully (9)’s position will keep (C) away. (9) must stay out of that space or even move AWAY from it.

Alternative and unexpected
(7) Clears the space inside and wing full back (2) makes the outside to inside run and has a shooting chance on goal.

Preferred Movements
Here (7) makes a “late and fast” outside to inside run hopefully catching (D) off guard to receive the ball at pace facing forward to attack the goal. This is a far better situation than the previous one when (7) moved inside too early.

Creating 2 v 1’s in vital areas outside the box across the opponents back four
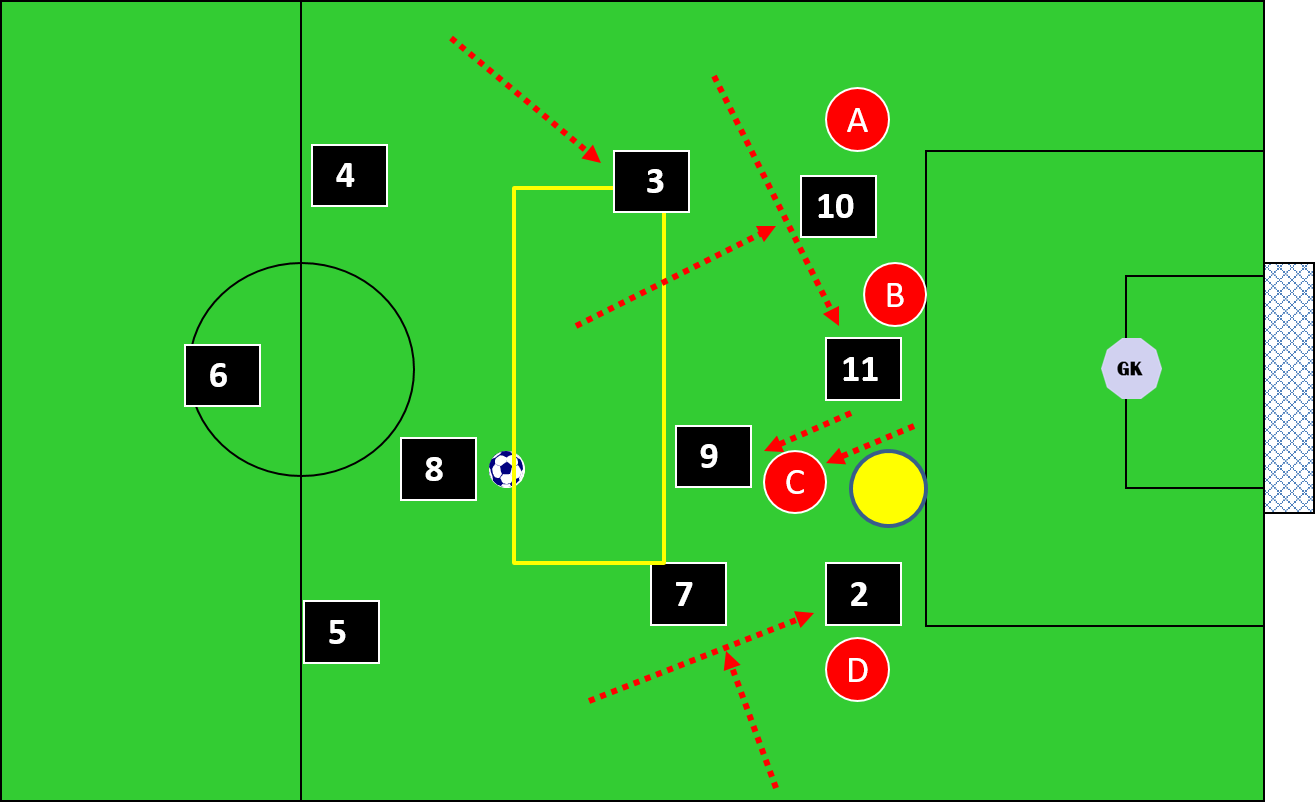
Now we have an active 2 v 1 against (D) thru (2) and (7). (7) and (9) have an active 2 v 1 against central defender (C). (11) comes inside and (A) doesn't track inside worried about (3); so (9) and (11) have an active 2 v 1 situation against central defender (B).

Now we have an active 2 v 1 against (D) thru (2) and (7). (7) and (9) have an active 2 v 1 against central defender (C). (11) comes inside and (A) doesn't track inside worried about (3); so (9) and (11) have an active 2 v 1 situation against central defender (B).

Spaces we are trying to exploit in yellow and between defenders. What we do will depend on how the opponents position and defend.

Over-load centrally now with (7) and (11) attacking the inside spaces between defenders. Fullbacks can attack inside or stay wide to effect the positioning of (A) and (D).

Cutting inside to attack the central spaces
2 v 1s created across the back four. Appreciate opponent midfield players will track back but if this is well rehearsed by us in training we may catch them unawares in the game and their reactions may be too late to stop it. Even bigger overloads when (2), (3) and (10) join in.

Interchanges of Attackers
Interchanges of players now. I am leaving the back four intact here; but likely defenders may track opponents and leave spaces open. What will (D) do with (2) or (7)? Will (B) and (C) go short with (9) leaving a big space centrally?

Exploiting a central space created by off the ball movement by (9)
Just one defender tracking one player; in this case (C) tracking (9) short; will create a central gap for (11) or (2). If (C) doesnt track (9) then (9) can receive to feet side on; turn; and attack in a 2 v 1 with either (2) or (11) against (C).
Another idea
As an example: Into the feet of (9) and (7) and (11) cut inside to support behind or one can make a run in front for the next phase of play. (8) into (9) who lays off to (7) who plays it forward to (11).

Another idea
End Product, a Third Man Run from (11)

Another idea
End Product, a shot on goal


Spatial Awareness Passing Game - Training Center Exclusive
With cones / mannequins for development in training for movement off the ball
The objective is this session is to improve movement off the ball by providing mannequins to act as opponents to fill important space.
Here you see so much one touch play that needs to be practiced with lots of one touch training (but in overloads to gain success initially). We focused on two touches and beyond but the ultimate way to practice this is one touch; but we are not ready to do that yet. It makes wonderful viewing and is a fantastic visual support tool for raising awareness.
Subscribe to the Soccer Awareness Training Center to get access to all premium Training Center Exclusive articles.
With cones / mannequins for development in training for movement off the ball
Getting into passing lanes to help each other

We can use many upright cones to represent opponents rather than mannequins.
We set the cones up in triangles and diamonds.
We ask players to position between the cones in the best space available.
Try to balance their position to find the best space in the middle of the triangle or diamond of cones (opponents)
Players beyond the ball try to position in triangles and diamonds of support also.
OBJECTIVE: To improve movement off the ball by providing mannequins to act as opponents to fill important space

A non-directional training practice
Mannequins represent opponents on the field. They fill important spaces so the players need to pass and move around and between them. This ensures players move off the ball to help the player on the ball have as many options as possible for a pass. The goal of the players is to find as much space as they can between the mannequins to give themselves as much space as possible to play in.
Every now and again stop the practice and see where the players are positioned. Are they in free space? Are they too close to a mannequin and hence in a game situation not available for a pass? If they are then ASK THE PLAYERS to SHOW you a better position to be in.
Possible problems here are the positioning of players behind opponents so the player on the ball cannot see them to pass to.
Develop: Restrict the number of touches on the ball to 3 touches, two touches then one touch; if it is on to do so. To enable one touch to be possible movement off the ball has to be intelligent, fast and into space to help the passer play one touch. Thinking AHEAD of the ball arriving is paramount here otherwise one touch play cannot be performed successfully. Try to think two moves ahead.

Increasing the number of balls being used to two, then three.
More footballs means more decisions to make as to which ball to support, this should improve peripheral vision.

(1) passes to (4) who has moved between the mannequins to the biggest and most open space possible to receive. (6) Moves between the mannequins also to receive the next pass. Show the difference between the timing of (6)’s move and how it will effect (4) in terms of potential possession and number of touches on the ball.
Show when (4) receives the pass and looks for the next pass (6) then moves and then show the difference when (6) moves as the ball is being passed to *(4) or even when (1) shapes up to pass depending on the distance (6) has to move to get free to receive.
Therefore; (6) should be moving as the ball is being passed to (4); or even before, so the ball can be moved more quickly. The other players also are looking to find the best space to be in to offer options for the next pass.

Here we show the end initial movement of the other players to support (6) and offer him as many options as possible. Each player has attempted to find the biggest and best space possible to receive the pass.

Bring in more footballs to increase the intensity of the practice and offer more decisions to make on passing and support and movement off the ball to receive.
With more balls the players now have to avoid and keep free from the mannequins but also the other players.
Passing in threes

Now we have three groups of three passing and moving. 1, 2 and 3, 4, 5 and 6, and 7, 8 and 9. Emphasize the movement off the ball especially by the third player who should be moving to receive based on the ball being in possession with the first player and ready to pass to the second player.
Equate this to ‘THIRD MAN RUNS” off the ball.
Watch Barcelona and how they play, the players are always moving off the ball to find space and to get between opponents to receive, plus they do it “at least” two moves ahead.
Now competitive
Need peripheral vision to know, where opponents are; where cones are (representing opponents too); and where own players are and being in the best space they can be to receive the ball..
We also set up triangles of pinnies to represent areas of freedom to receive a pass (opponents cannot tackle you in them) we can move into that also represented goals being scored.
Different colors in each three

Color identification now becomes a factor. Not only are they looking for their teammate but they are looking for a different color to pass to. These changes are all designed to challenge the players quick thinking, passing and movement off the ball.

Here showing possible passing routes with each group of three players also showing how they get free and into as much space as possible, based on the positions of the mannequins who act as opponents filling spaces.
Game Situation

Have players passing in two teams to begin as a warm up, with a ball each team, then two and three balls each team. Then they pass to opposite colors only.
Now play a 6 v 6 (or any number you like) and make it a possession game. Mannequins make it more difficult by filling spaces so players have to play around them as well as their opponents. This should improve them playing in tight situations.
Use a 2 player overload if required initially until they get really good; then make it equal numbers each team, you dictate this based on the ability of your players. Of course change the numbers of touches on the ball decreasing the number as they become proficient to increase the difficulty.
THIS IN TRAINING
Here you see so much one touch play that needs to be practiced with lots of one touch training (but in overloads to gain success initially).
We focused on two touches and beyond but the ultimate way to practice this is one touch; but we are not ready to do that yet.
Related to this below: (think early/move early/play early) that should be a major focus of our training
It makes wonderful viewing and is a fantastic visual support tool for raising awareness of:
Patterns/shapes - particularly the importance of triangles / diamonds and thinking in shapes
Early good decision-making and the TMP principle (think early/move early/play early)
Anticipation and awareness
Playing early and easy - play the way you're facing
Support play
Creating good options
Switching play quickly and safely
Movement OFF the ball by others is paramount here also otherwise the person receiving the pass will not be able to play one touch successfully.
Play the Numbers Game: 1 passing to 2, 2 to 3, 3 to 4 and so on. Increase the number of balls being used.
Two teams playing in the same area with a ball each. Now players need to avoid the other team AND the mannequins to find space to receive the pass.
Coaching Points:
Thinking and looking before receiving of the receiving player so they have assessed their options before receiving and in advance of the ball
Ability to play ONE touch if possible for speed of play
Movement OFF the ball of teammates to help the player on the ball
Movement INTO spaces between and around the mannequins to enable this to happen using the mannequins as guides.
Thinking TWO moves ahead to support.
Playing in triangles of support offering several options for the player on the ball in many directions.
1. An exaggerated situation but this shows what happens when players do not move to space to help the player on the ball; and do not open up the angle for a pass, instead standing behind an opponent and not being free to receive. How many times do you see this? 2. To defeat this problem; the player on the ball can pass to a space hoping that this will force the receiver to move to that space to receive the ball. Then the weight; timing and accuracy of the pass has to be particularly good; but this is not ideal. 3. Whilst players can still be successful with later movement off the ball of supporting players; if the player on the ball has time on it to take more touches; it is always better to provide options of a pass as early as possible to increase speed of play and give opponents less time to work out their movements.
Develop: Add goals within the area that are both FREE zones and goals. Players can move into them and not be tackled.
Players must arrive in the goal as the ball arrives for timing, not stand in there and wait and be marked in a game situation.

Defensive Rotational Recovery Positions - Training Center Exclusive
Due to our attacking rotations players are often out of position defensively when we lose the ball. Here we show how players position to help each other and eventually work themselves back to their own natural positions on the team.
If they can learn this approach and understand how to cover for each other immediately this then really gives the team a wonderful means of attacking freedom and expression.
Due to our attacking rotations players are often out of position defensively when we lose the ball.
Here we show how players position to help each other and eventually work themselves back to their own natural positions on the team.
If they can learn this approach and understand how to cover for each other immediately this then really gives the team a wonderful means of attacking freedom and expression.
We are in attacking mode: both wing fullbacks attacking
This is our attacking set up we are attacking in numbers, we have players in different positions from their traditional ones because we allow freedom of rotation. But here (8) passes to (10) but the ball is intercepted by opponent's player (A). Not enough room to put all opponent's players in but you get the idea.

We attack and lose the ball
We lose the ball to player (A) who plays it forward to player (E). Now showing the start positions for the recovery and changing of positions depending on where the ball is played. This shows their positions initially and where they will move to. Its imperative (4) delays (E).

We condense our defensive shape
This shows them after they have moved into their new defensive positions. Player positioning is now different defensively but it doesn’t matter as long as we can create our defensive shape which we have. Players recover in straight lines or the shortest route back to goal; or to the ball.

How we press and recover and who does what, where and why?
Changes: Our Center back (4) is now a left wing fullback (3); our central defender (6) is a left center back (5); our left defender (5) is a central defender or deep defensive midfielder (6); our left back (3) is a center midfielder (8), our central midfield (8) is now defensive midfielder (6); our right wing fullback (2) is a right midfielder (7); our striker (9) is a number (10); our attacking midfielder (10) is in the wide left (11) position (and double teaming) and our wide left (11) is in the (9) position.

Changes in previous diagrams:
To recap on the previous defensive recovery set up which was our offensive set up initially:
Our Center back (4) is now a left fullback 3;
Our defensive midfielder (6) is now a left center back 5;
Our right center back (5) is the same (or a deep lying number 6 position);
Our linking midfielder (8) is a defensive midfielder 6;
Our left back (3) is a center midfielder 8,
Our striker (9) is now a number 10;
Our attacking midfielder (10) is in the wide left position 11 and double teaming;
Our wide left striker (11) is in the (9) central striker position;
Our right fullback (2) is in 7s wide striker position but tucking in;
Our wide right striker (7) is in right fullback 2s position.
How we press and recover and who does what, where and why?
Ball goes out of play, for example, the players then rotate back into their own positions; or any part of the game they have time to do this they must try to work back into their own positions. Here we are playing with the defensive midfielder (6) in behind the center backs but could also have him or her in front per the norm.

The Moral of this?
In developing and actively encouraging a team to play with incredible freedom and fluididity within the team framework set by the coach; we must also address what can go wrong defensively using this method of playing.
It can leave us vulnerable to a counter attack especially.
Through the freedom of movement players are often out of their own positions and may feel a little lost if we lose the ball as to where they need to go next?
Often; for example: a fullback will attack up and down the field making a 50 yard run but dreading the 50 run back to their position if we lose the ball.
If this is not addressed with the fullback; then that fullback may be less effective offensively; as the thought of all the recovery runs may put them off, plus it may also be too physically challenging for them over the course of a full game.
By showing here how players can compensate for this, how to cover for each other, how to save energy; it will therefore encourage them to continue with their offensive style knowing they know how best to defend if they lose the ball.
And then that PERCEIVED WEAKNESS in the system of play may in fact be transformed into a REAL STRENGTH of the team.
To make this work though we need a team of UNSELFISH PLAYERS PREPARED TO WORK AND HELP EACH OTHER.
COACHES SHOULD SET THESE SITUATIONS UP IN TRAINING TO SHOW THE PLAYERS WHO DOES WHAT AND WHEN.
ATTACKING SHAPE, WITH MANY INTERCHANGES, THEN STOP THE ACTION, THROW ANOTHER BALL INTO THE OPPONENTS; AND THEN HAVE THEM STAND STILL IN POSITION; GIVING OUR TEAM TIME TO SEE HOW THEY CAN POSITION DEFENSIVELY IMMEDIATELY THEY LOSE THE BALL.
ONCE THEY CAN SEE HOW TO DO IT THEN MAKE IT LIVE AGAIN; AND THEN LET IT GO FREE.

The 3 Team Transition Game for Attacking Players In and Around the Box - Training Center Exclusive
Three teams the outside team works with the inside attacking team. Great to teach both defending and attacking play. Teaches the mentality of transitional change. Developing Quick Play in and around the box. As soon as the team lose possession they must try to defend on the offside line and beyond, thus immediately pushing opponents away from the goal. Using the set up through the “numbers” to suit how we set our teams up.
1. Three teams the outside team works with the inside attacking team. Great to teach both defending and attacking play.
2. First team to score 2 goals stays on; the losing team goes off
3. Keep the score for number of wins per team
4. Transition game: Defending team wins the ball, they must pass to the outside team to then attack.
5. Teaches the mentality of transitional change.
6. Developing Quick Play in and around the box
7. As soon as the team lose possession they must try to defend on the offside line and beyond, thus immediately pushing opponents away from the goal
8. Using the set up through the “numbers” to suit how we set our teams up

Three team game: The Set Up
Constant Transitioning from attacking to defending as possession changes

Attacking Play
Quick break using the overlapping wingback (3)

Crossing behind the defense
Defenders recover, attackers pressure, (3) drives the ball behind the recovering defenders

Striker (9) moves AWAY from the ball: The Crespo
(9) Off the shoulder of (5) to receive Facing forward. Short and sharp movements

Check away and back across: The Crespo
(9) Off the shoulder of (5) who follows the run. (9) checks back into the space he created

Subtle movements by the striker to get free
(9) Checks back into space to receive to feet and side on to attack (5) 1 v 1

Opposite Run by (9): The Vialli Check
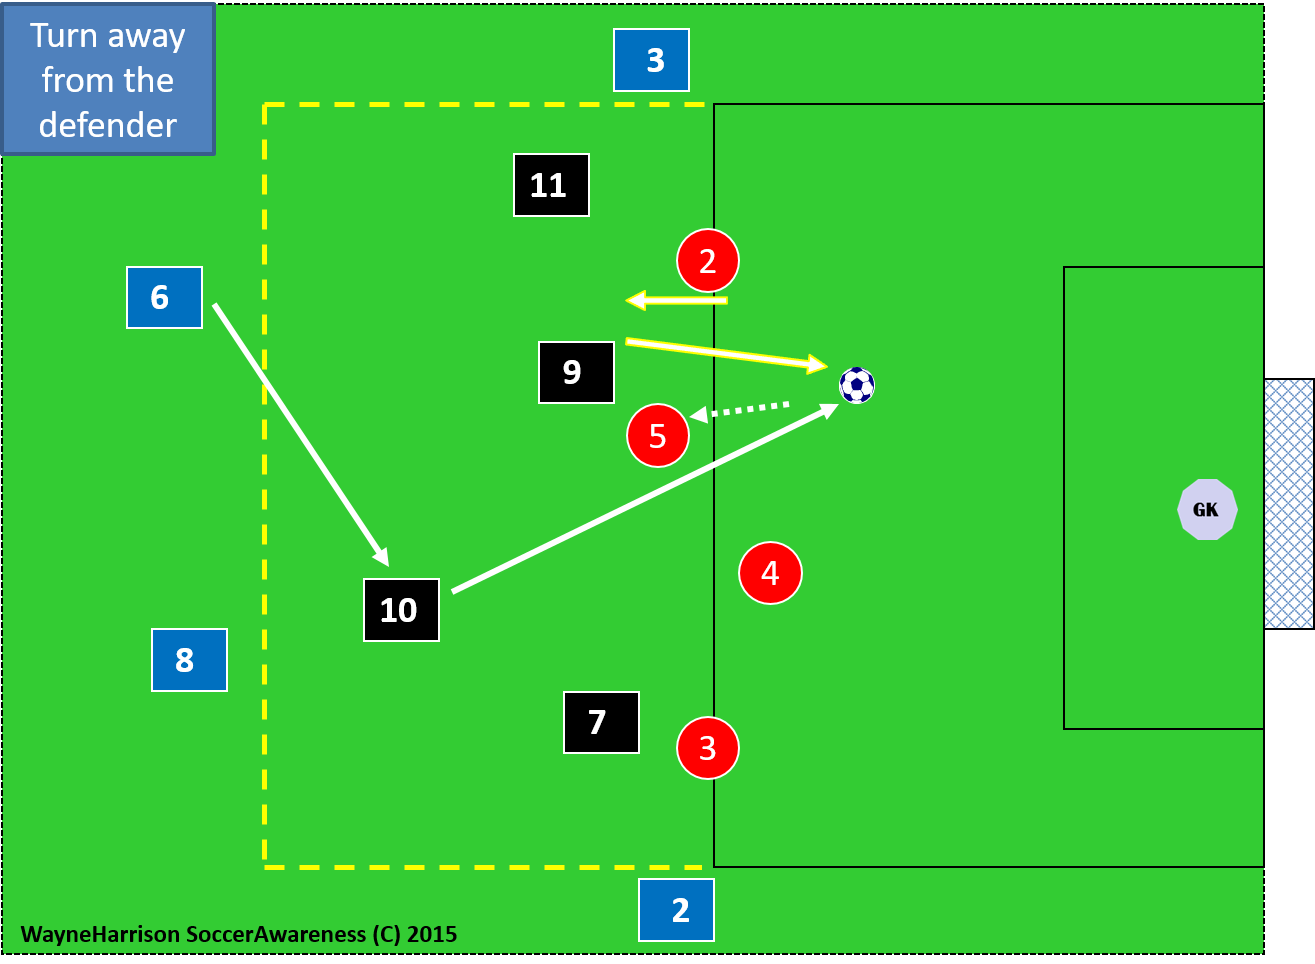
(9) Checks back into space to receive. to feet (5) stays tight, (9) spins back in
Opposite Run by (9): Del Piero Spin Away
(9) Checks back into space to receive. to feet (5) stays tight, (9) spins away and back in

Short to create space behind for another player
(9) Checks back into space to receive. to feet (5) stays tight, (11) cuts inside

Check to and back: The Vialli Check
(4) Tucks in to close the space as (5) gets tight. (9) reads the pass between (4) and (3)

Combination and Link Play
Round the corner pass from (9). (7) times the run between (3) and (4) to stay onside

1 v 1’s in and around the penalty box
Try to create 1 v 1 s for players to run at and commit opponents

Or creating give and go’s: short and sharp
The old 1- 2 is one of the best (and simplest) moves ever. Timing of pass and run vital

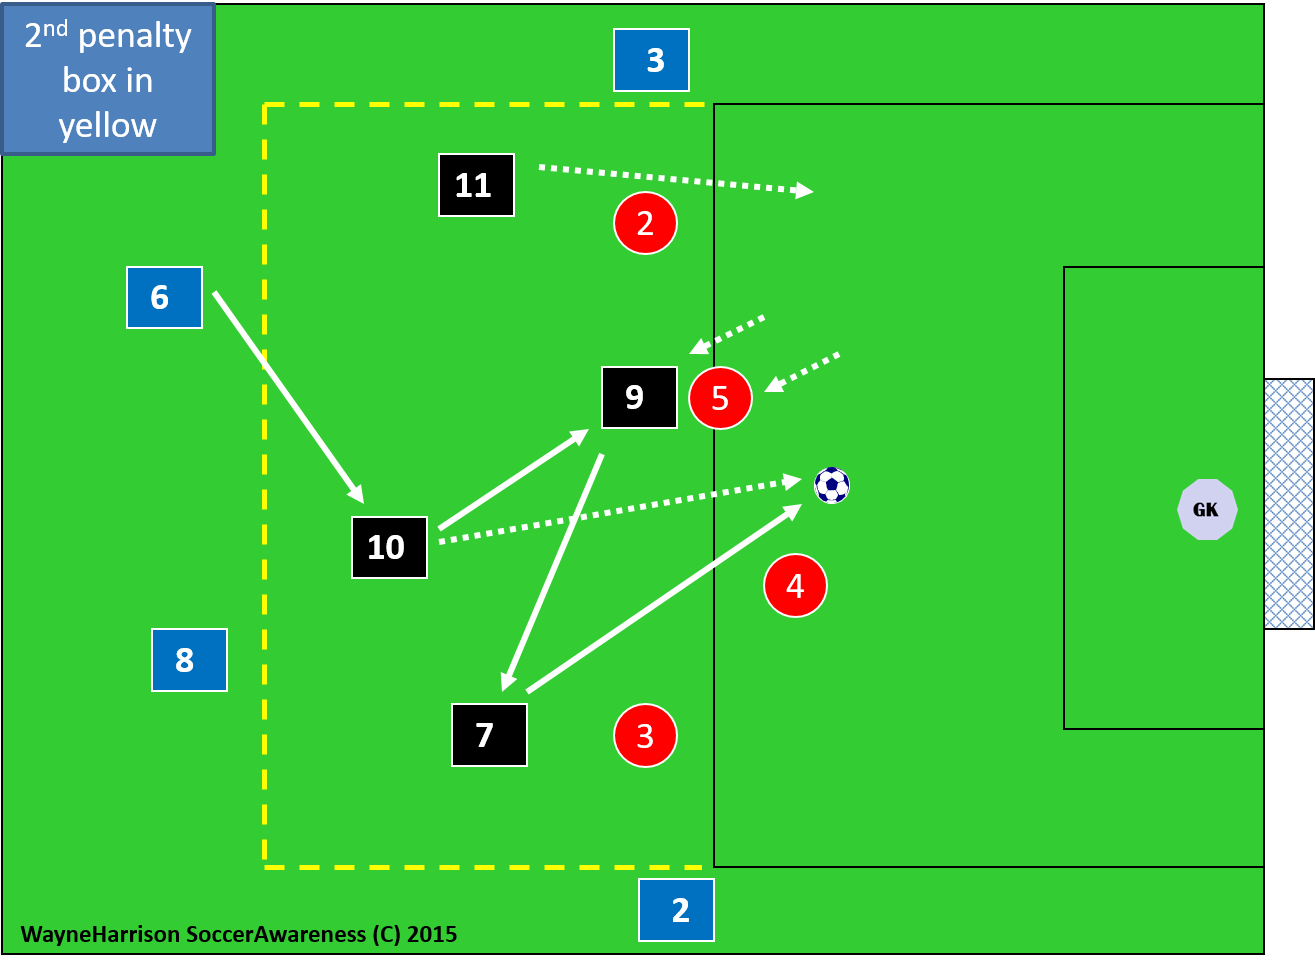
An Example: Creating THIRD MAN runs
(7) And (11) provide two options in behind the opponents back four
Creating THIRD MAN runs: another idea
(10) Starts the move and finishes it.

Blindside THIRD MAN runs
Players watch the ball go to (11) and maybe don’t see the run by (10) or (7)?

Keeper saves the ball and distributes quickly
Defenders now have the ball and play out to transition back

Now defenders are attackers
Defenders now have the ball and play out to transition back

Defenders win the ball and now Transition
A bad pass by (6). Defenders must pass to the outside and they then become the attackers

Transition Defending to Attacking
Good to teach the front four how to defend effectively

Compare to Pressing in the Attacking Third
Now (9) presses the ball like it is in the attacking third, all work together.

Defending Principles taught also
Attacking team give it away, defending team pass it out and get into position to attack

Defending Principles taught also
As the attacking team transition back, the defending team MUST push up also

Defending Principles taught also
Exaggerated; but Immediately the defending team must push up and leave opponents offside.

One Touch Mentality Training Ideas - Training Center Exclusive
Sessions in this post:
Space Rondos Using One Touch
Three Man Look, Pass, Move Without Pressure
Testing Players Awareness
Angle of Support Positioning
Checking To The Ball To Receive Away From Pressure
Sliding Rondos Using One And Two Touches
Awareness Rubber Neck Training with 5 Players
Awareness Session Passing and Movement Off the Ball
Competitive Awareness Numbers Game
Quick Play Session
Space Rondos Using One Touch
Passing and moving. Must be one touch and as fast as possible. A great drill for awareness on and off the ball. (B) passes to (A) then runs to the free cone the top right of the square. This one is easy to do on and off the ball.

Passing and moving. Must be one touch and as fast as possible. Here (B) passes to (A) and moved to the free cone. (A) passes to (C) and moves to the free cone. Observation must be away from the ball to see where the free space is BEFORE receiving the pass.
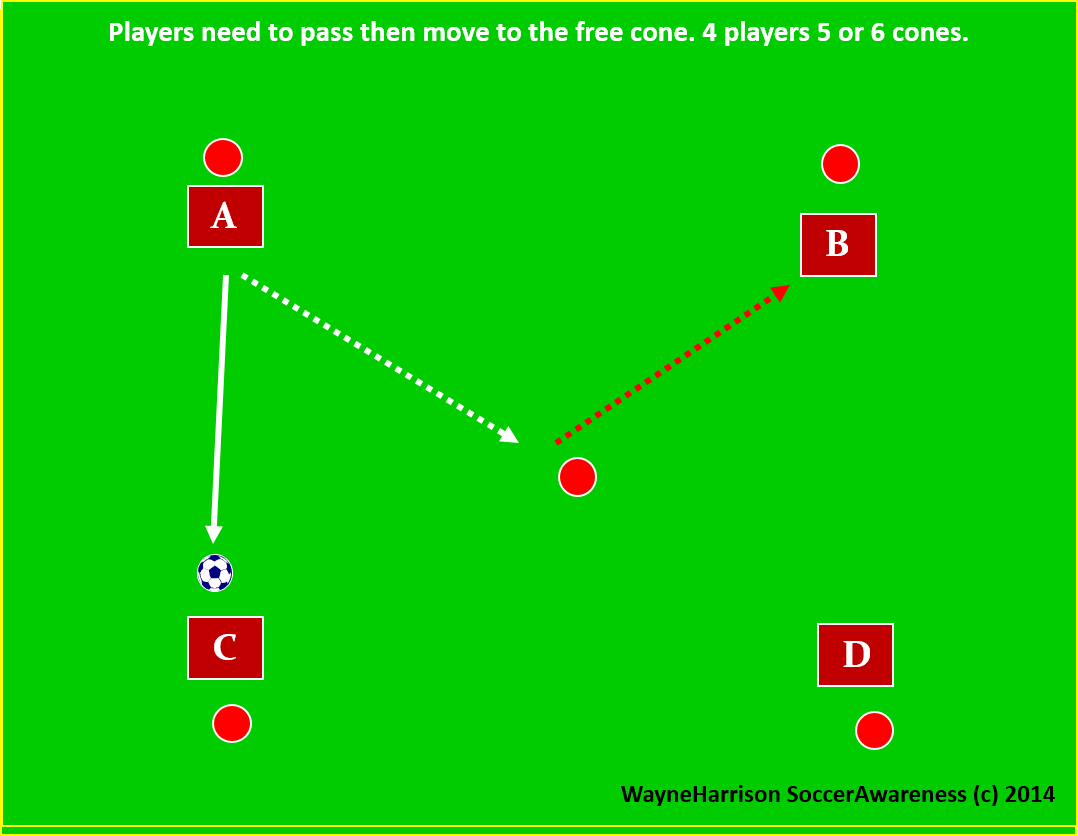
(B) Really MUST have good peripheral vision on this one as the free cone is the one directly behind now. (A) is the only player who moves off the ball as play is going on in this phase.

As (B) is passing, (D) and (A) have moved so (B) must be observing this as he or she is receiving the ball to therefore recognize where the free space. This requires not one but two looks. In fact the more looks the better if its possible in the short time span.

Originally as the pass was coming to (B) the free space was at the top left. With movement OFF the ball it has now become the bottom right due to the movements of (A) and (D) off the ball. Now the free space is in the middle.

(B) Really MUST have good peripheral vision on this one as the free cone is the one directly behind now. As a coach you are looking for players who pass them to assess the free cone / space afterwards and not before which will show up as a hesitation in movement by the passing player. We want them to pass and already be moving to the free space.

Three Man Look, Pass, Move Without Pressure

They allow a flow rate to happen regarding PASSING and SUPPORT and help players to develop CONFIDENCE and COMPOSURE on the ball. Development can be monitored and progression can be clearly judged and the coach can move the players onto the next level when they recognize the time is right. I have carefully developed the levels of progression of these sessions to ensure each level is addressed at the correct time.
1 PASSES TO 2
2 PASSES TO 3
Coaching Points
Look over shoulder before receiving (where you are passing to).
Body Stance – half turned (can see behind).
Support at an angle.
Save a touch – let weight of ball determine this- let it run across the body and move one touch.
Develop - Opposite player stays or closes the middle player down.
If closed down, middle player passes back to same.
If not closed the middle player turns and passes to opposite player.
Go through each progression in the order it is presented here, do one at a time and have each player practice it in the middle at every stage of the progressions.
Begin by passing the ball from (1) to (2) to (3) and back (2) Receives and turns and passes. Passing must be sharp and accurate, one or two touch.
You can receive with the furthest foot away from the passer and pass it with the nearest foot, or save a touch and move it one touch with the inside of the nearest foot or the outside of the furthest foot. Let the weight of the pass determine this, let it run across your body and move it one touch.
The player in the middle must open their body stance up by going side on so they can see what is behind them and it makes it easier to receive and pass the ball on.
Testing Players Awareness

The opposite outside player from the ball can decide to close down the middle player or stay away. If they close down then the middle player must pass the ball back to the player who passed it to them.
If they stay in position then the middle player passes the ball to them. This highlights if the player has looked to see where the other player is before receiving the pass. Put a passive defender in with the middle player to show how they run them off to check and lose them.

Angle of Support Positioning

Now working on the movement of the outside player to create a bigger angle to pass and receive the ball. Above (2) passes to (1) who moves the ball into space with a good first touch to then pass the ball back with a second touch.
The movement is shown below. Likewise (3) receives and moves the ball off at an angle and the cycle continues.

Look over the shoulder to see what’s behind, do this before receiving the ball not after. Position in the middle off at an angle to receive, this makes a triangular support position and opens up the field of vision. Once the ball has been passed on the middle player moves to the other side off at an angle again (can use cones to run to both sides). This forces the players to receive and pass with both feet.
Working on the middle player again, if they are marked in a game look to come short to receive the pass to get away from the defender

Develop:
Now encourage players to do a DOUBLE LOOK.
First when moving from one side to the other to see what is happening as the player is moving and then 2nd when as the player arrives in position.
Reason being as the player moves from one cone to the other the situation may have changed in the game itself so as the player arrives in position and just before the ball is played they do the 2nd look to update themselves MENTALLY on positioning of team mates, defenders and where the space is around them.
Checking To The Ball To Receive Away From Pressure
Moving short to receive the pass; in a game it is getting away from the defender to receive in space with time on the ball. Keep the angle wide so you can still receive the pass side on, if you move short but more central you will receive the ball more with your back to the play with less room to work the ball in.
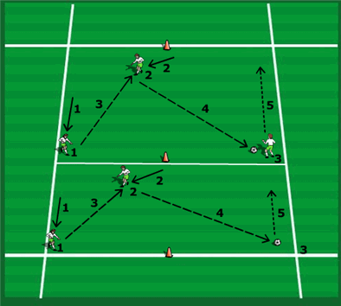

Checking Away Then Back To The Ball Away From Pressure

Develop by the middle player moving away from the ball to take a defender away from the space and then checking back to receive the pass in time and space.
With these movements the passer must be aware of the receivers movements to get the timing of the pass right. The receiver must be aware of how quickly the passer has control of the ball and is ready to pass it to get the timing of the run right (therefore always looking).
These movements in a game are dictated by how much time on the ball the passer has, if no time then coming short to receive the first pass, if time on the ball then the receiver can run a defender off the check and receive to feet.
OUTSIDE PLAYER MOVES TO CREATE AN ANGLE TO RECEIVE THE PASS

Now working on the movement of the outside player to create a bigger angle to pass and receive the ball. Above (2) passes to (1) who moves the ball into space with a good first touch to then pass the ball back with a second touch.
The movement is shown below. Likewise (3) receives and moves the ball off at an angle and the cycle continues.
Working on the middle player again, if they are marked in a game look to come short to receive the pass to get away from the defender.
Soccer Awareness Sliding Rondos Using One And Two Touches
Regular Rondos are great; and this one encourages players to rotate in and out as the ball is moved.
So always looking to change positions off the ball and every player gets the chance to be the PIVOT player.
Eventually ALL players on attack can move and interchange, outside to in, inside to out and outside to outside.
If defenders win the ball they try to keep it.
Sliding Rondos no rotational movement outside to inside
Defending players stay in for one minute then change with outside players. Very fast tempo playing ONE touch where they can. We must play into the central neutral pivot player as often as possible. Do this one with no movement or rotation of players to begin.

Sliding Rondos using with only the pivot player changing
Very fast tempo playing ONE touch where they can. Here (E) slides outside and (B) slides inside on the blindside of the ball and (D) makes a one touch pass to (C) who immediately passes to (B) to then pass to (A). Players must slide in and out as often as they can to keep the momentum going.

Sliding Rondos every player moving off the ball
Now we have movement off the ball in the 4 square as well as the pivot player. (C) passes to (B) the pivot player. Off the ball (E) has moved to (D) and (D) to (C) so (B) has to move to (E). (C) moves to be the pivot player. So (B) is passing to (A) but needs to scan around and behind to see where the free space is.

Finishing positions from the previous movements
Now the ball is with (A) and the cycle of passing and moving, on and off the ball continues.

Passing around the square
Can pass around the square also but challenge yourselves to work with the pivot player in the middle where defenders are.

Awareness Rubber Neck Training with 5 Players
Four FAST decisions to make here based on the movements of the outside players.
Testing the LOOK behind, early positioning of the feet and body of the testing player as the ball is arriving in the middle.
Developing Peripheral Vision from in front of and behind play
Equate to the Continuum

LOOK
Decision (Skill)
Positioning
Communication
Technique
Outside players can pass around to each other with the central receiving player (E) waiting to see what action is taken.

More difficult now because EVERY pass is accounted for in terms of (D) having to make a decision and going both ways.
(C) passes to (E). (E) has already checked behind both sides to see if anyone has closed them down. (B) has closed (E) down and pressed the ball (as mentioned previously no tackling just shadowing) so (E) must turn AWAY from (B) get their body between the ball and the player as a shield and turn and pass to (A).

So (E) has passed to (A). (B) recovers back as (A) passes back to (E). As (E) passes to (A), (E) must immediately look behind again both sides to both (C) and (D) to see their positions. This time (C) presses (E) so (E) must receive and turn AWAY from (C) and pass to (D).

Both (C) and (D) press (E) so now (E) must pass back to the opposite player (B). (B) waits for (C) and (D) to recover back then passes to (E). In the meantime (C) and (D) may be making a different decision which in turn Causes a different decision from (E).

(C) recovers back and (D) stays so now (E) must receive and turn and pass to (C). Always pass to the opposite player from the one who presses (E).

More difficult now because EVERY pass is accounted for in terms of (E) having to make a decision and going both ways.
(C) passes to (E). (E) has already checked behind both sides to see if anyone has closed them down. (B) has closed (E) down and pressed the ball (as mentioned previously no tackling just shadowing) so (E) must turn AWAY from (B) get their body between the ball and the player as a shield and turn and pass to (A).

Awareness Session Passing and Movement Off the Ball
1. Use one or two balls per team for passing and moving (or more). You can keep it interesting by changing the theme for each awareness session e.g. passing to feet or space, opposite colors, receiving and turning, one touch / two touch, 1-2’s, crossovers etc.
2. This workout is game specific and should particularly be used before actual games. Include stretches. 20 x 20
1. One team inside, one team outside. A ball is with each outside player to begin.
2. Pass to an inside player who receives and turns and finds another outside free player with a pass. Then look to receive from another outside player.

3. The outside player receives and moves the ball side to side until another inside player is free to receive a pass. This ensures all the players are working both inside the grid and outside it.
4. Change the practice to all soccer balls starting with the inside players. These players now look to pass and receive a give and go from an outside player.
5. Rotate the players so both teams have the chance to play in the middle of the grid. Move both teams to the middle; divide the grid into two with each team passing to their own team within their own grid area keeping teams separate to begin.
Changeover Session
Inside team a ball each, look to find a free outside team player and pass to them. Outside player brings the ball back in, inside player moves outside the zone waiting to receive a pass from someone else.
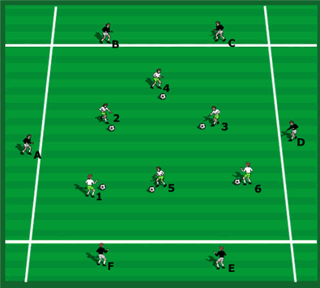
Set up second touch with a good first touch. Awareness of who is free to pass to. Work on a) first touch of outside player b) decision making of inside player in terms of when and where to pass and technique (quality) of pass.
The Coach can create conditions:
Get a turn in or dribble before passing.
All in (many) touches, 3 then 2 touches.
Play 1- 2 with inside player then go outside.
Do a crossover with outside player rather than make a pass.
Inside player passes to outside player and closes down quickly simulating a defensive movement, the receiver has to make a good first touch away from the pressure i.e. to either side of the pressuring player. It’s a good session because everyone is working but they get short intermittent rests, so maintaining quality.
Inside and Outside Passing and Receiving

Players rotate around inside the grid in a random way receiving the ball and passing it back using various techniques. Each technique is practiced for a minute then the outside players switch with the inside players. Each player should get lots of work on the ball working on relevant techniques.
Techniques to be practiced can include:
One touch passing, 1 – 2’s.
Two touch passing.
Headers.
Volleys.
Chest, trap, pass.
Chest, volley.
A Game Situation

Numbers team can only pass to numbered players on the outside. Letters teams the same only passing to lettered players on the outside.
Progression One: Play one v ones in the middle. Have it passive to begin the defending players shadow the attacking players as they receive and turn and move.
Make it competitive. A lot of receiving and turning under pressure can occur now in the playing area.
Progression Two: Have a 3 v 3 small sided game in the middle.
Rotate the players.
Improving awareness “before” receiving the ball through a simple numbers conditioned game
The numbers game FORCES the players to look before they receive by the very condition placed on them. There are 6 Players and only 1 ball to begin. Players must pass in sequence i.e. 1 passes to 2; 2 passes to 3; 3 to 4 and so on to 6 who passes to 1 and we begin again. You can have player’s static to begin as easy introductions to the theme then have them passing and moving. In a roster of 12 players 2 groups of 6 can do this in different areas separately to begin.
Player receives from the same person and passes to the same person each time. This develops great awareness of time, space and player positions. This is continuous work on and off the ball. Awareness of: where the player you receive from is and where the player you pass to is. Because of this players begin to anticipate the pass to them and where it is coming from. Also they must look to where it is going to (where is the player they are passing to?).

We are trying to create a situation where players are looking two moves ahead not just one. For instance as (1) is about to pass to (2), (3) should be looking to support (2) for the next pass already, looking two moves ahead before the ball leaves (1). Likewise, (2) should already know where (3) is to pass to.
Peripheral Vision Development results from this.
Develop: Use two balls then three balls at the same time. Start with a ball at (1) and (5) then at (1), (4) and (6).To keep the sequence going players must move the balls quickly with few touches hence their peripheral vision development improves dramatically. As soon as they have passed one ball off the next one is arriving so quick thinking is needed to make the correct decisions.
Coaching Points:
Awareness of where the player to receive from is before receiving the pass
Getting into position to help the passer make a successful pass
Awareness of where the player to pass to is before receiving the pass
Open Body position to receive the pass to enable a resulting one touch pass if necessary
Semi – Competitive Awareness Numbers Game: Passing in Sequence
Now have 2 teams passing separately 1 to 6 in “each team”, with a ball each team in the same area. The example shows the passing of the numbers team, of course players will be moving but for the simplicity of the idea I show it this way.
Develop: Count the number of passes each team get in a certain time frame adding a competitive element to the game. Who can get the highest number of passes made in a given time frame?

Emphasize:
Movement “off” the ball to open up angles for passes between other players.
Communication verbally between players to help them identify where they are; passing player can call who they are passing to, receiving player can ask for the pass.
Ensure players spread out throughout the area to have them playing both long and short passes.
Encourage fewer touches on the ball at each reception to move it around the field more quickly helping players develop good transitional play. The actual game is played so quickly now they have to develop this talent as well as having good individual dribbling and turning ball skills.
Peripheral Vision Development

WITH TWO TEAMS.
CHOOSE THE RIGHT PASS AT THE RIGHT MOMENT.
PLAYER RUNS OUTSIDE THE AREA.
PLAYER ON THE BALL MUST PASS TO THAT PLAYER AS SHOWN.
Working on peripheral vision “before” receiving the ball through the specific peripheral vision coaching game
This is a simplified set up to get initial understanding. Increase numbers as previously e.g. two teams of six. We started earlier with one ball and six players for example so each person on the ball had five choices of pass to make and that was easy.
Now we must identify one and only one pass and must try to make it. That pass is to the person who runs outside the zone. This player is the free player (unmarked). The session goes as follows and numbers are used only as a reference only, the players can pass to anyone, in any order, but always looking for that vital run by a player to the outside area:

Player (1) runs outside the area (perhaps after several passes within the zone).
Player (2) on the ball sees the run and must pass to (1).
As (1) is about to receive (as the ball is traveling to him or her) (3) moves into a position to support (1) showing anticipation and awareness.
(3) has already seen the run by (4) and passes. (4) Brings the ball back in and the game continues, (4) passes to (5) who has moved into position in anticipation and (5) passes to (6) who also has done the same. This is an indicator of how quickly players recognize the run and consequently make the pass.
Hence players are beginning to look one and two moves ahead of the ball. It doesn’t need to happen so quickly in terms of the next player running outside but it serves as an example.
The run can be likened to a penetrating run into the attacking third where the player hasn’t been picked up or tracked and is in a great position to attack and score if the passer sees them and makes that pass.
Coaching Points:
Decision: Movement of the player running out of the area to initiate the move
Observation of this movement or run by this player by the other players
Observation by the one player receiving the pass as this movement of a run outside the area is taking place
Decision by this player to make the one pass they need to the outside player
Quality of Passing: A one or two touch pass to the outside player for speed of action to show the run was spotted
Weight of pass to the next passing player so they have the choice of making a one touch pass if they have seen the run

Here we have two teams playing in the same area, player (5) passes to player (3). Player (2) as the ball is traveling runs outside the area, player (3) has to see this movement and make the next pass to that player. If (3) makes it with a one touch pass that is excellent as it shows they have seen the run as the ball is arriving and made the quickest pass possible to get the ball to (2). Player (2) then brings the ball back into play and the passing sequences start again.
Likewise player (E) on the other team passes to player (D), player (C) runs out of the area and the set up continues.
Warm Up for Quick Play
A ball each passing and moving playing 1 and 2 touches only. Avoiding the cones which represent opponents. Learning to position in the best space possible between cones.
The goal is to teach
playing in tight areas,
developing fast feet,
positioning off the ball
Developing a spinning head or rubber neck I call it
Defending condensing attacking spreading out
Teaching spacing and moving into passing lanes (between cones and between opponents) to get free

Quick Play
Restricted area to play in. Cones represent opponents so players must avoid passing close to them or positioning close to them. Blue cones the free players so always an overload.

Quick Play Adding Goals
Now a REAL GAME SITUATION. Keeping score making it competitive working between restricted number of touches and unlimited touches to test players peripheral vision and awareness.


A Transition Game Maintaining Shape and Balance Throughout the Team in a 9 v 9 - Training Center Exclusive
Building 9 v 9 team play up through various conditions of play
Players stay in their own thirds to establish team shape
Transition between thirds
9 v 9 rotation of players
Possible passing options
Overlap play from wide defenders
Introducing offside
Overload in attack to maintain possession
Transitions between thirds for defending team also
Working with four zones
Players stay in their own thirds to establish team shape
We start with 2 x 1-3-3-1-1 set ups. Players stay in their own zones initially until we get the game going.

Transition between thirds
An example: (6) bring the ball out and creates a 6 v 3 with the neutral player added also. Then a midfield player joins in the attacking third to create a 2 v 3 in there. Defending team players stay in their own zones.
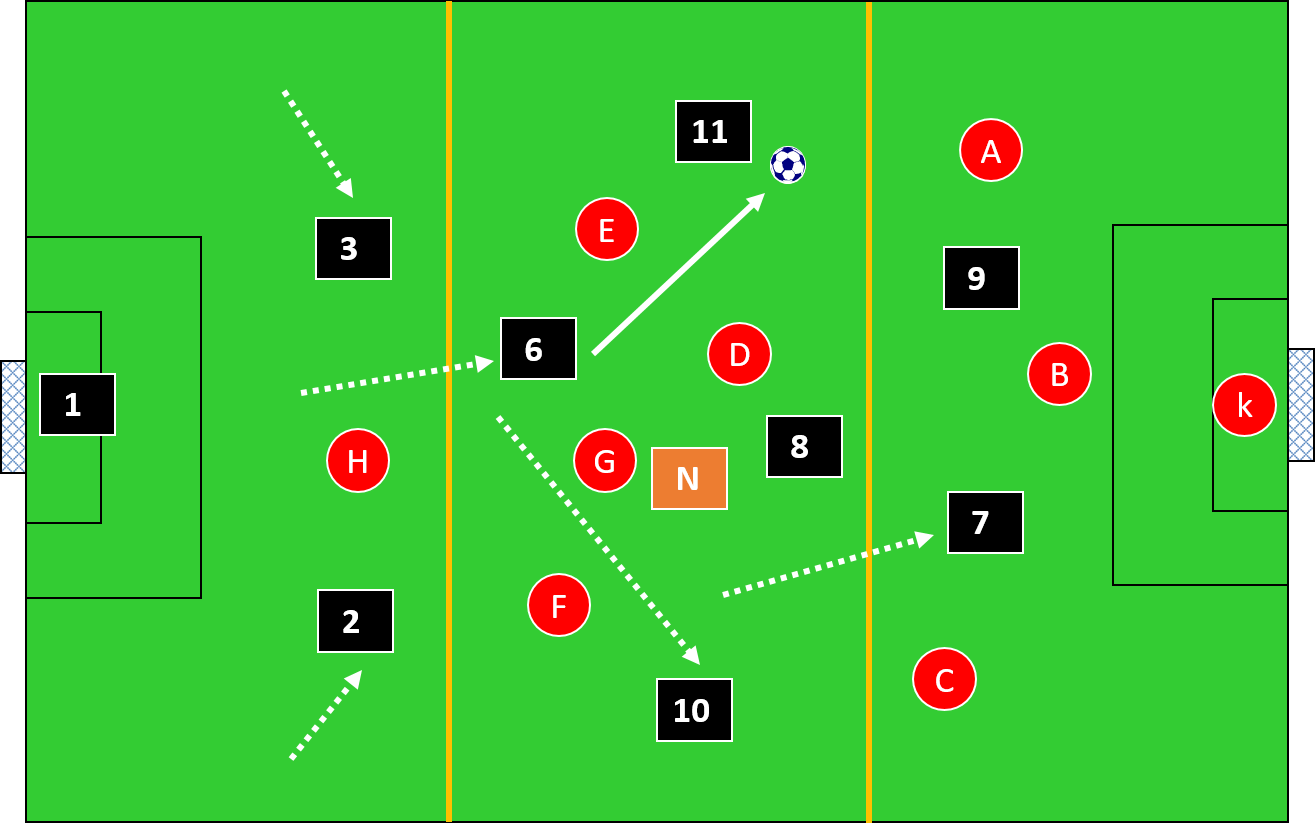
9 v 9 rotation of players
1. Players interchange between zones one at a time always returning to original set-up. Check the balance of the team with and without the ball. We have created a 5 v 3 in midfield zone with player (6) moving up.
2. If they lose possession players either drop back in or you can develop the clinic to include pressing to regain the ball. E.g. If you are losing the game go full high-pressure and PUSH three players into the attacking third, three PLUS A NEUTRAL PLAYER in the midfield third and two in the defensive third.

1. Condition – Can only score if all players are over the defensive third line so reinforcing keeping compact vertically.
2. Restrict number of touches on the ball if they are able to do so to encourage quick passing and movement and to improve the speed of decision-making.
3. Vary play by encouraging defenders to pass directly to the forwards; midfield players can then support them facing the opponent’s goal (easier to support rather than receiving and having to turn with the ball).
4. If you have problems making the session work with equal numbers then reduce the game to a 9 v 5 situation using one forward, one midfielder, two defenders and a keeper on the opponents team until the players are comfortable then go into the full workout.
Possible passing options
1. Player (8) on the ball. 4 possible options to pass forward e.g. to (7), (9), (10, (11) or (N) If can’t go forward because of pressure, can go to the side to (3) or (2) or back to (6), and the keeper to keep possession until the situation allows for a forward pass again (you won’t obviously get all these options to pass but it shows how it can work).
Caution – in attack, be aware of quick counter if opponents win the ball i.e. we have a 2 v 2 at the back.
2. Discussion – You can get so much work into this session, every time you look there may be a new situation to effect. Choose a theme and stick with it and when you have established it with the players, only then move onto another theme (you can again use the same set-up, as it is so flexible).

A Transition game maintaining shape and balance throughout the team
1. To ensure the players have a chance to build up the play from the back have a 3 v 1 overload at each defensive third to begin to session.
2. We are looking to be successful with offensive play building up from the back and this gives it a greater chance of success and thus the positive reinforcement of the players.
3. As they get better at this and gain success you can change it to a 3 v 2 situation so it is more difficult to achieve. Á 3 v 2 means a 9 v 9 situation with the players developing play but staying in their own third to emphasize team shape through the units.

Transitions between thirds
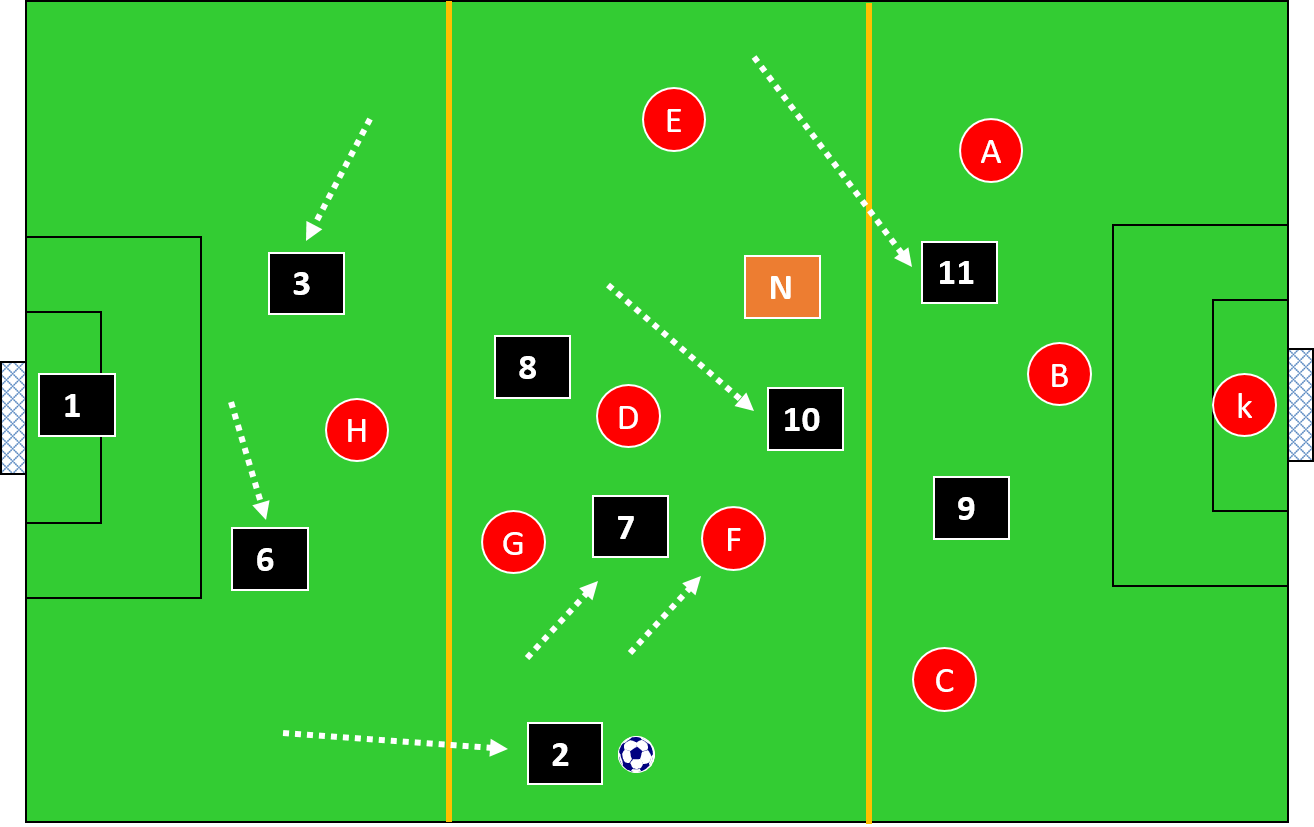
1. Now we are transitioning between thirds and as a defender changes the balance in midfield from a 3 v 3 into a 4 v 3, a midfielder then moves into the attacking third to change the balance from a 1 v 3 into a 2 v 3. (7) Clears the space for (2) to bring the ball forward. (6) And (3) cover across behind the field to support and be in a good position to cover should the move break down. This is clearing the space in front of the ball and filling in behind the ball.
2. (11) Makes a run into the attacking third to be another target for (2) to pass to. If the player can’t go forward and has to play it back ensure the players behind the ball get in positions where they are free to receive it and able to support the player on the ball.
Overlap play from wide defenders
1.Here a full back makes an overlap run to provide an option for (8) to pass to. (2) Passes to (8), (7) clears the space wide to run into for (2) by taking defender (F) inside, and (2) runs onto the return pass from (8). The overlap can occur also from the middle third into the attacking third.
2. Wide defenders need to be constantly encouraged to get into good wide receiving positions to take the ball forward into attacking areas of the field.
3. The fact that (G) can’t track the runner into the middle third yet during this progression helps highlight the importance of this kind of attacking run from a wide area.
4. Likewise, (8) may change the point of attack and (3) can make the overlap run from the other side and on the blind side of striker (G). (8) covers for (3).

Introducing offside
1. Develop – Have offside from the defensive third of the field. (8) Passes the ball forward and (3), (6) and the keeper push up. Striker (G) is left offside.
(8) Passes to,(2) who moves up from the defensive zone to the middle zone to support. This type of transition movement is important because it allows players to move freely between the zones knowing they will have a team mate covering for them. In terms of the opposition this rapid movement and transition makes it difficult for them to pick players up, to read what your team is doing..
2. This means defenders aren’t just defenders, midfielders aren’t just midfielders and attackers aren’t just attackers they work to help each other through the three units of the team and are free to mix the game up. This is total soccer played to encourage the free movement of players throughout the teams.

Overload in attack to maintain possession
1. Here (2) plays the ball to (8) and (7) makes a run off the ball to support in the attacking third. Transitions can depend on the stage of the game; if your team is chasing the game to score being a goal down then (7) would probably stay in the attacking third, not immediately return to help (8) in the middle third but keep an overload in the attacking third situation there but the basis of the session is to show how to maintain a balanced shape in your team.
3. Practice movement (switching) of strikers and midfield players to move defenders around (especially if they man mark), so play isn’t in straight lines all the time.

Transitions between thirds for defending team also
1. Progression – Have players able to transition back into zones from the attacking third to the midfield third, the midfield third to the defensive third. Defenders still cannot move between zones.
2. Develop – Now Allow defending players (as above) to track attacking players into the other zones. When this happens the above situation means the defender (B) follows the striker (9) going short creating space behind for another striker to move into or a midfielder to break forward into (in this case 7 and 11). Ultimately open the game up so the players have no boundaries to use for focus and see if they can work out how to keep that balance and shape on an open field of play.

Working with four zones
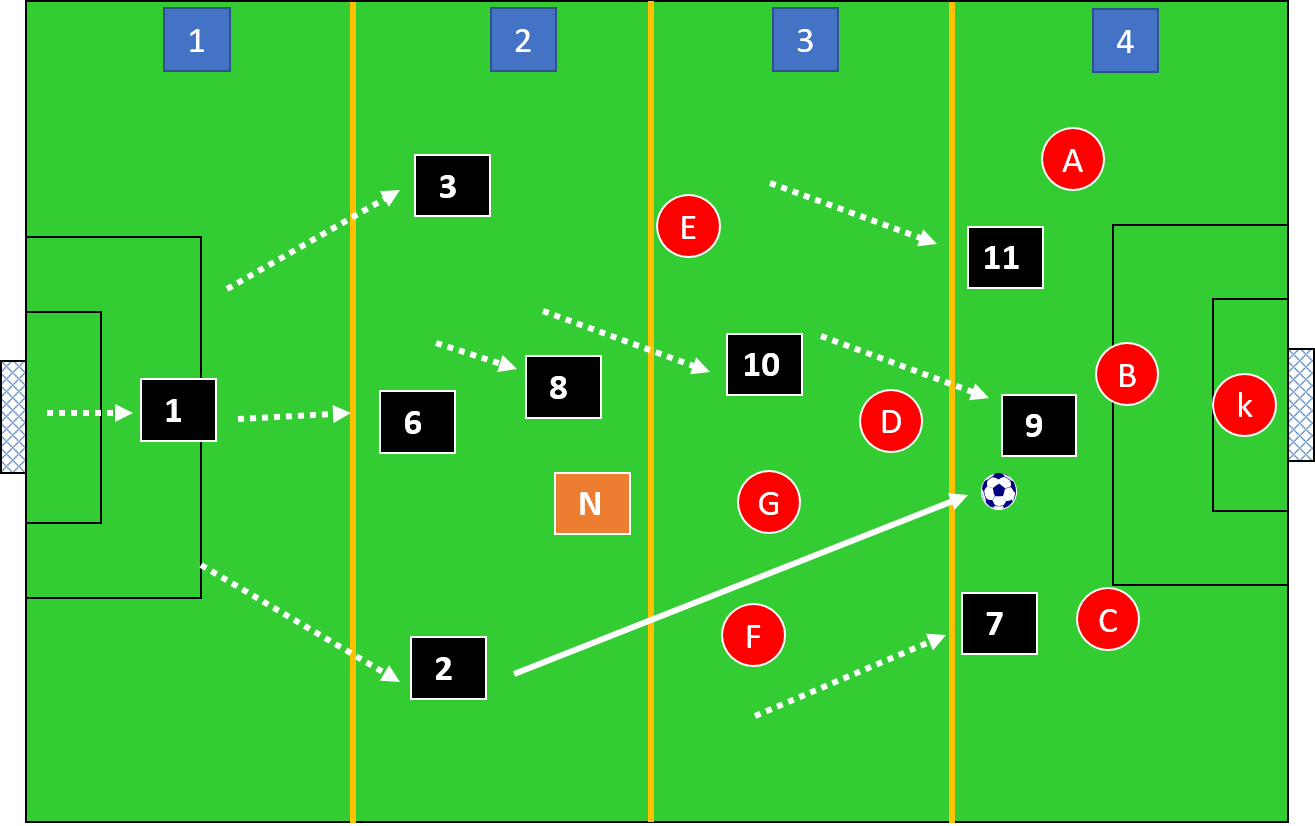
1. We have essentially four - thirds to play in. The players can only play in three of the four thirds at any one time.
2. This ensures movement up and down the field maintaining distances between units.
3. Players cannot enter zone 4 until the ball goes into zone 4.

Working with four zones
The ball has been played into zone 4. Here the numbers team has moved forward out of zone 1 and into zone 2 and the whole team has moved forward one zone. This helps them maintain distances between the units and does not allow the team to get too spread out either attacking wise or defensively.
Progression development from start to finish
Set up is as follows; the field is arranged in thirds; defending, midfield and attacking thirds. In the set up we have here we have a 3 v 1, a 4 v 4 + neutral player and a 1 v 3.
Warm up: Objective: 9 v 9 with composure zones to aid team play and individual player development
1. STAY IN OWN THIRD.
Players stay in their own thirds to get a feel for how to maintain shape and how to use width in attack. Spread out in possession in a 3 v 2 overload at the back in the defending third to create a situation where the players are available to receive the ball in space and pass it forward.
2. TRANSITION BETWEEN THIRDS
Players are allowed to transition between thirds but only one at a time. The defending team cannot move between thirds to track the attacking players. When the attacking team loses possession they then become defenders and must immediately drop back into the third they started in. The reason for dropping back and not trying to win it back there and then is because we are working on offensive play and want both teams to have the opportunity to build up play. Can run the ball in, pass it in, or pass it in to a runner from your own third.
3. OVERLAP PLAY FROM WIDE DEFENDERS
This particular type of movement is a very important one to develop in this session and the opportunities presented to do so will be numerous.
4. OFFSIDE FROM THE DEFENDING THIRD
Introduce offside in the final thirds at both ends of the field. This encourages teams to move up as the ball is played forward.
5. OVERLOAD IN ATTACK MAINTAINING POSSESSION
Here we have worked the ball into the attacking third and we leave an overload in this third to regain possession should it be lost. This may depend on the game situation where we are chasing the game being a goal down and have to take chances.
6. BACKWARDS BETWEEN THIRDS
All players to transition between thirds coming back as the initial movement, for example a striker may drop back into the middle third to receive. A midfielder may push on into the space the striker created by the movement.
7. TRANSITIONS OF DEFENDING PLAYERS
Allow defenders to track players into the other thirds they venture into. Now all players can move between thirds but still have it only one at a time. This helps highlight how to create space for someone else by the movement of players; a striker comes short, pulls a defender with them and space is created in the area they came from for another striker or a midfielder to move into to receive the pass.
8. FREE PLAY
Open the game up. See if players can maintain their shape without the help of the thirds, if they can transition between units but also keep their balance. Try a game in quarters to establish movement up and down as a team.
9. NUMBER OF TOUCHES RESTRICTION
Introduce a three, two then one touch restriction to see if the players can work more quickly and still gain success. This speeds up there decision making in the game. When it is one touch, condition it so they can take more than one touch (a pass may be so heavy they need two touches) but emphasize they use one touch if it is on to do so. This keeps it realistic.
10. CONCLUSION
We have developed the clinic from working in thirds (or quarters), introduced many progressions to
work up to letting the game go free and observing if the players can incorporate into the free game
situation, all they have learnt.
I would recommend using this clinic on a regular basis and set it up for the scrimmage that is usually done at the end of a coaching clinic session.

One Touch Give and Go Passing and Receiving Drill - Training Center Exclusive
The emphasis of this drill is on accuracy and weight of one-touch passing.
The following drill comes from the Soccer Awareness Training Center. Soccer Awareness Training Center provides unlimited access to Wayne Harrison's Soccer Awareness systems, training sessions, drills and more. Wayne's system helps develop world class youth soccer players and teams in a systematic and imaginative manner that guarantees performance at the highest level of competition. Whether you’re a beginning coach who needs help getting started or someone who wants to add some variety to their training sessions, the Soccer Awareness Training Center offers a wide variety of drills to choose from. Join Today
Emphasis: Accuracy and weight of one-touch passing
Set-up: 10 x 10 yard grid. 4-5 players per grid with one player designated as server. Two cones are placed at the mid-point of the grid. The server is positioned at the end of the grid with a supply of balls as shown. The remaining players begin at the opposite side of the grid.

Objective: The first player in line must jog forward towards the server. The server must pass (1) a ball to the player when he reaches the cones (midpoint of the grid). The player must attempt to return the ball accurately to the server with a one-touch pass (2). The next player in line begins the sequence immediately after the player in front has completed the pass. Play is continuous for a designated period of time.
Progression: Limit the server to one touch to increase the tempo of the exercise.
Coaching Points:
Lock the ankle with the toe slightly pointed up.
Non-kicking foot must be placed in line with the target.
Follow through and adjust the weight as necessary.


54 Pages
We want to stay with our own game plan as closely as possible; based on what we practice and to keep it simple for us; as we dictate to our opponents; and we impose OUR WAY on them.
But there will be many occasions where we must change the system of play and we may have to adjust to suit the opponents.
Here are some ideas for you to consider for your team starting with the 13313 and 14231 systems of play.