Welcome to the Soccer Awareness Coaches Corner. Browse through soccer drills, small sided games, tactical thoughts, full sessions and a variety of resources. Posts marked “Training Center Exclusive” are for members only.

Distribution from the Keeper and Playing Out from the Back Using the 3-1-3-3 - Training Center Exclusive
Here are 9 ways to distribute from the keeper and play out from the back. We owe it to the players to teach them this as Young as is possible.
I work on this initially practicing all ways to get out. Have opponents only intercepting passes to begin. Then let it go free. When opponents win it back we work on the defending team condensing and defending correctly.
If three or four ways to develop play are done very frequently then it becomes a subconscious decision to move into position so no decision making required as such.
I am a real purist at heart so this would be how I want my teams to play from the back. Ok its risky sometimes but to me we have to try it. We have to defeat the long ball from the keeper way of playing that to me is completely wrong to play. Using this method, what are we teaching the players? Boot it and hope you win the 2nd ball? Bad, sad and it makes me mad !!
We owe it to the players to teach them this as Young as is possible. So here we develop play from the back. I work on this initially practicing all ways to get out.
Have opponents only intercepting passes to begin. Then let it go free.
When opponents win it back we work on the defending team condensing and defending correctly.
So certain plays are recognized consciously first of all with particular CUES offering identification of these.
If three or four ways to develop play are done very frequently then it becomes a subconscious decision to move into position so no decision making required as such.
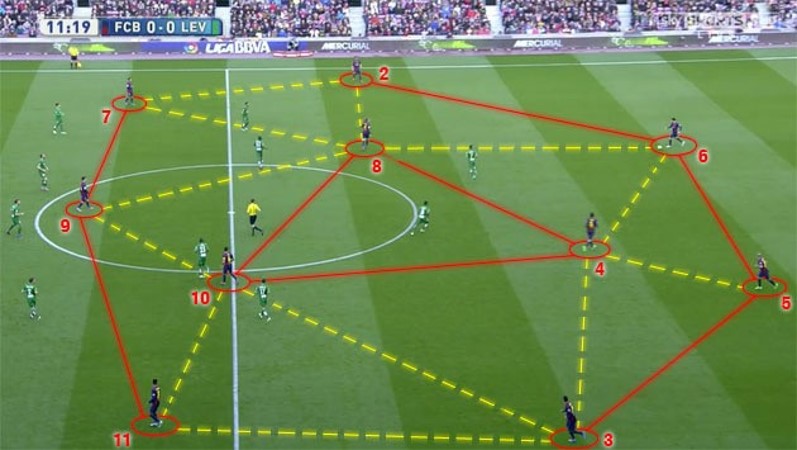
This is Barcelona: We are using different numbers but the principles are the same. At any one time this can be a 3-1-3-3; it looks more like a 3-3-1-3 here

Basically we do it with (4), (5) and (6) as the first three, (8) is the single player, (2), (3) and (10) the next line of three and finally (7), (9) and (11) as the front three. But players rotate within this system to create a distinctive angled possession STYLE within the system / formation.
Distribution from the keeper and Playing from the back in a 3-1-3-3
Perhaps use cones instead of actual players to practice to make it work initially and to gain confidence (better still use Mannequins). Attacking team work the ball to the coach and then work it back to the keeper, back and forth.

Distribution from the keeper and Playing from the back in a 3-1-3-3
Our starting position, the team is in defensive shape and ready to attack. A 7 v 4 makes it easy to get out, but decrease the number of opponents if necessary to gain success initially; or increase if too easy.

How to coach it: Getting the ball to the Coach (or use small goals if you prefer)
Our team building from the back get wide and long. We maintain possession passing up and down and can go back to the keeper and constantly start again; or give it to the coach.

The coach can give it to the attacking red team
Coach gives it to the attacking red team and the defending team (your team) must get back to defensive shape asap. Add more players if this is too easy to defend against.

The coach can give it back to the keeper to start again
Coach can pass it to the keeper, your team resorts back to defensive shape as the ball travels and then starts to build again with the ball

1. Distribution from the keeper using one attacking wing fullback
We attack down one side and we slide across with the back three to cover the spaces behind

2. Distribution through Both center backs or (6)
A simple starting position on distribution from the back using only those players in the immediate vacinity. A 3 v 2 at the back in our favor.

3. Distribution through Number (6) in a wide area
Now (6) breaks wide to receive the ball and escape being marked in the middle and switches with (4) and perhaps opponent (9) goes with (4). The same can happen with (6) breaking out to the right also replacing (5) who moves centrally.

4. Distribution from the keeper: One centre back breaks wide
(4) Stays tight, (6) stays central, (5) goes wide, (2) pushes on and we get out down one side. Opponents (9) and (10) stop our (6) and (4), (5) gets free to play out. Only 2 defending now so risky against a counter attack.

OR, (3) stays tight too (4) moves central, (6) takes (5)s place at the back, (5) goes wide, (2) pushes on and we get out down one side. Opponents (9) and (10) stop our (6) and (4), (5) gets free to play out. (2) becomes (7), (5) becomes (2). Three defending now.

5. Distribution from the keeper thru wingbacks
They push 3 up we get out through our wingbacks. Have opponents make different choices to force the keeper to make relevant decisions in training.

Distribution from the keeper through Both wing backs
We can start to add players and build the session up. Here we close off one side so the keeper has to recognize he cant go to (3) but can go to (2).

6. Distribution from the keeper thru central midfield rotation of (6) and (8)
(6) Clears the space and takes the opponents (8) with him and our (8) drops in free to start the attack. Can also be with (6) and (10).

7. Distribution through Both wing backs dropping back
Centre backs both push out quickly,. And they are tracked by the two strikers. This releases spaces behind them. Both wing backs drop back into those spaces to receive the ball.

8. Distribution through centerbacks getting free
Centre backs both push out quickly,. Opponent strikers press the wing backs and centre backs get free so can bring the ball out and attack. Wing backs fill their positions by rotation. (2) and (3) become centre backs and tuck in either side of (6). Also (6) and (8) tried to rotate to get out.

How it may look if we lose the ball and have to recover
We tried (6) and (8) rotation, also center backs and wingbacks rotated, then we lost the ball and this is how we recover with players in different positions but in the same defensive framework.

Distribution from the keeper and Playing from the back 11 v 11
Now in an 11 v 11. Our normal way to get out from the back. We should always try this initially if it is on to do so. Try to get out thru (4), (5) or (6).

Distribution from the keeper 11 v 11
Another way to get out thru one center back and one wingback and even (8). (6) fills (5)s position (4) fills (6)s and (3) fills (4)s

Another way to get out thru one center back (5) and (7). Wingback (2) tucks inside and may take opponents 11 with them to clear the pass for (7). A nice area to play into circled also.

They go 3 v 3 against us to stop us playing out of the back so we try to get out through (2) and (3). Otherwise we have to push up, condense and kick it long.

This takes lots of practice with the keepers to make this pass happen consistently.
They go 3 v 3 against us so we try to get out through (2) and (3). Otherwise we have to push up, condense and kick it long. They “may” see what we are doing and push 7 and 11 onto our wingbacks (2) and (3).

They push two players onto our wingbacks (2) and (3)
This outlet is now stopped.
So we have to change our team shape from “wide and long” to “short and tight” getting ready for the long kick from the keeper.

9. They have pushed onto our Wingbacks so this outlet is stopped; we have to go long as a last resort
This can still be EFFECTIVE: Now we condense as a team “short and tight”. Our (10) is good in the air so we hit him and we have a lot of players around him to win the 2nd ball. Of course opponents will readjust also. Its cat and mouse.

This can still be EFFECTIVE: Now we condense as a team “short and tight”. Our (10) is good in the air so we hit him and we have a lot of players around him to win the 2nd ball. Of course opponents will readjust also. Its cat and mouse.

We leave their 3 strikers offside.
Players can gamble for the flick on from (10). Players position behind, in front and alongside (10) so wherever the 2nd ball goes we have players to pick it up. WE ABSOLUTELY MUST get better at this. Obviously opponents will position better than this defensively; but you get the point.


9 v 9 Animation of Team Development using One Word Commands
Just a one-word signal can organize a defense, so everyone on the team knows what to do and reacts together as a unit. Also midfield players close by can react off the call too as can strikers. These One-word calls ensure everyone will know quickly and effectively what they should do as a unit and as a team. Hence the back players (and the keeper) can organize their movement as a unit (and therefore influence those in front of them) from Five VERY simple one-word commands. The momentum is triggered from the back and runs forward through the team to the strikers. We must have a very vocal and confident leader at the back organizing this and making the decisions.

Small Sided Third Man Run Games - Training Center Exclusive
Some of the best forward runs in soccer are deemed “third man runs” often made from a position that is blindside of the opponents. The third man run player can start the passing sequence; or not, but invariably they are on the end of a forward pass often beyond the back four of the opponents.
The set up in the first game is as it would be in the attacking shape of a 4-2-3-1, so you can take this small sided game to represent the 11 v 11 in a particular area of the field making the same types of plays. You can also use this for any team shape set up you might use in an 8 v 8 or 11 v 11. If you play with two striker s then play 7 v 7 and two up front for example or even change the shape behind.
*Membership Required
The set up is as it would be in the attacking shape of a 4-2-3-1, so you can take this small sided game to represent the 11 v 11 in a particular area of the field making the same types of plays.
You can also use this for any team shape set up you might use in an 8 v 8 or 11 v 11. If you play with two striker s then play 7 v 7 and two up front for example or even change the shape behind.
To begin to help provide a guide / signal for when to make the 3rd man run we have a CONDITIONED RULE: Every time the ball is passed BACKWARDS, another player must run forward and beyond the ball.
That would be the forward third man run we are encouraging; and the player receiving the back pass needs to see that run and make that pass.

Coaching Points:
Identifying the conditioned moment (a back pass) to make the run
Identifying the conditioned moment to make the pass
Timing; angle and weight of the pass off a previous pass back
Timing and angle of the run to receive the through ball
Encouraging more than one player making a forward run to increase the options
Scoring: To score the player has to receive the pass as he or she is over the end line within the end zone. Equate the first line on the end zone as the back four of the opponents so you are timing the run to beat the back four (or beat their offside with a run from deep).
Timing: Going too early with the run and they receive the pass in an offside position. Weight of pass is so important here also.
The ball is passed forward first, as soon as it is passed back that is the signal for a player; or players; to make forward runs beyond the ball and beyond the furthest forward player; if possible. Here (11) is the receiving player.

The third man run passing sequence can also be started and end with the same player such as here with (11) who plays forward to (9) who drops the ball back to (7) who plays the forward pass to (11) making the blindside run.

Here a run from a deeper position by (8). The ball goes back to (10) which is the signal for a forward run, and (8) makes the run into the space that (7) has created by coming inside and bringing the defender inside also. (8) Did not get beyond (9) initially but we still got the third man run in.

Here two players make third man runs beyond the ball so (7) has two options of a pass. This is even better.

1. The ball is played back to (10) off (11) who makes a forward run. When it was passed back (8) started the third man run. Because it was from very deep he had time to run a distance to meet the pass without being offside so there was time to pass to (9) and for (9) to receive and turn and pass the ball in.
2. Again timing is the essence of all this for it to work.
3. Being wide, (8) is in a great observational position and can watch the play as it builds up; and be able to make the right run at the right time.
Development:
1. Have a goal instead of an end zone so the outside end line is still the offside line representing the back four; but now you can finish on goal.
2. Initially have it where defenders cannot track the player once they are beyond the end line so they have a free run on goal to gain confidence in finishing without pressure.
3. Then allow defenders to track the run and tackle so increasing the pressure on the finisher.
4. Good for finishing one v one also with defenders tracking the player to pressure them.

Include goals as an end product
1. The inside thick end line represents the back four position of the opponents. We need to build the attack and once the ball is played back another player; or players; makes the third man run off the ball, in this case (8) and (11).
2. Set up like this you can have two teams working on the same theme.
3. If you want to relate it to playing against a back four you can bring your own back four in and set it up as such; as I have shown in the Phase of Play next.

Phase of play: focusing on movement and third man runs beyond the ball
You can Include the pass back condition to help the players identify the right movement to make the 3rd man forward run until they can do it without this condition.
1. Defending team win it they pass the ball into the small goals and we start again. You can keep score to keep it competitive. (7) Is a good option as he or she comes inside from the blind side of (3) who may be ball watching and see their run too late.
2. Here as the ball is played into (9); (10) and (7) start to make forward runs to offer two options behind the back four to pass into; and (11) plays the diagonal through ball to (7).
3. (8) Fills the space behind left by (10) and it could easily be a lay off from (9) to (8) to play the forward pass also.
4. DEVELOP: Bring in both fullbacks attacking so we add even more options of third man runs, especially when the wide players (7) and (11) cut inside to clear the space outside.

1. (11) has two options of a forward pass, choosing (10) in this case over (7).
2. In this case a ball over the top of the defense would be a great pass too; especially if the defense is focusing on the ball. For example (7) comes from the blind side of (3) as in the previous diagram. It could be a flatter run if it helps the timing.

1. It is easier for the third man run player to see the ball when it is coming towards them at an angle, such as in this diagram above (with the run of (7) here). (7) CAN SEE THE FULL BUILD UP HERE AND IT WILL HELP HIS OR HER TIMING.
2. If directly from behind the run (in 10’s case) then it is much harder to see when and where the pass is being made to get the timing and angle of the run correct, though it can still work with players with good awareness and peripheral vision..
FINALLY: Take out the condition of the run coming off another player passing the ball back. Now players must work it out for themselves when and where they make the runs beyond the opponents back four.
DEVELOPMENT: It also does not necessarily have to be from a back pass anymore, that was just a condition put in to ensure the runs were made initially in the practice. Players can still make third man runs off forward passes.

Here is an example of such a play. (9) Plays it forward to (7), (10) has already set off on the forward run to receive into the space created by (9) coming short to receive and dragging center back (4) to the ball also.
REMEMBER; all these diagrams are set up to show the attacking TEAM HAVING SUCCESS. It won’t be as easy in actual play but our aim / goal here is to develop a training plan to make it successful initially; and to give the players confidence in the execution of the idea.
In reality the fullback (2) should tuck in to fill the space as (4) goes short, leaving (11) free but he is not the danger, (10) is.
And / Or perhaps a midfield defending player (maybe (6) for example) will track (10)’s run to make it more difficult to have success but you will add that into the session after initial success; to really test the players. This third man run concept is particularly good when teams defend high against you so there is lots of space to run into behind the back four


Throw Ins in the Attacking Third - Training Center Exclusive
The best way to win the ball from a throw in; more often than not ; is for the opponents to throw it in. The best way to lose the ball from throw ins; more often than not ; is for US to throw the ball in. It sounds “back to front” but watch and see. Therefore, its very important to have pre meditated plans for throw ins, as must as for corners, free kicks wide and central or long, and how to defend from these set plays too.
This is a basic crossover move. The person who receives the throw to cross the ball starts their run second. (7) and (10) line up with (2). They look to cross over . All other players stay out of the immediate area.
This article is available for Training Center Members Only. Get more information about joining here.
Attacking Third: Cross Over: Throw Ins: A 2 Player Rotation: Start well apart
This is a basic crossover move. The person who receives the throw to cross the ball starts their run second. (7) and (10) line up with (2). They look to cross over . All other players stay out of the immediate area. One player makes the first move the other waits. The ball is thrown flat and FAST so it’s a continuous movement of run / throw / cross. (10) is Left footed and (7) is right footed (two footed players would be a bonus).

The SAME applies the other side of the field.
We are GUESSING Opponents will defend like this, nothing will be perfect for us.
(7) Moves towards (10) first . (7) Then blocks off (10)’s marker (3). Now (10) runs forward into the free space created by (7) to receive and cross the ball. (2) looks to throw to (10)’s original position in body stance to fool the opponents to then throw to (10) down the line.
A GREAT THROW IS VITAL, Low and fast into the path of (10).

As FEW TOUCHES on the ball as possible delivery EARLY.
(10) Moves FIRST towards (7). Then blocks off (7)s marker (4). Now (7) runs into the free space created by (10) to receive and cross the ball. As before (2) looks to throw to (7)s original position in body stance to fool opponents but throws to (7)s new position to cross the ball or even shoot at goal if in a favorable position..
A GREAT THROW IS VITAL, Low and fast into the path of (7).

Players MUST NOT get too close to the thrower. Leave big spaces to play in.
Getting TOO CLOSE Ruins the pre patterned play.
Attacking Third: The set up: (10) and (7) get close to each other then crossover runs
Ensure players do not get too close to the player taking the throw in. Space must be created in front of the thrower for players to be able to move into and receive the ball.
Timing of the throw, run, pass is the issue here, synchronicity is the key.
(7) and (10) are close to each other in their STARTING POSITIONS. 1 to 2 yards apart.

Players MUST NOT get too close to the thrower. Leave big spaces to play in.
Usually no one marks the thrower (But not always)
Getting TOO CLOSE Ruins the pre patterned play.
A GOOD throw is Paramount
Attacking Third: (7) and (10) crossover runs leave space in the middle for (6) to move into
Ensure players do not get too close to the player taking the throw in. Timing / ACCURACY of the throw, plus the runs and passes is the issue here, synchronicity is the key. Space must be created in front of the thrower for players to be able to move into and receive the ball.

Choices of (6)
Volley the ball behind defender (3) for our (7) to run onto
Play it back to the thrower who could be free.
Opponent (6) lets our (6) get free so; Receive and turn having already scanned what's on the other side of the field
Could be a volleyed pass in behind and over the top for (7) into the SPACE.
Attacking Third: END PRODUCT
Ensure players do not get too close to the player taking the throw in. Timing / ACCURACY of the throw, plus the runs and passes is the issue here, synchronicity is the key.
Space must be created in front of the thrower for players to be able to move into and receive the ball.
A GOOD throw is paramount.

Choices of (6)
Volley the ball behind defender (3) for our (7) to run onto
Play it back to the thrower who could be free.
Opponent (6) lets our (6) get free so; Receive and turn having already scanned what's on the other side of the field
(6) STAY OUT. Do not close your OWN SPACE. Then late and fast get free from (6).

A Rondo Overloading Players in the Zone 14 - Training Center Exclusive
A rondo can be applied on certain parts of the field of play that apply to the game. This exercise is based on the positioning of the players around Zone 14 (the zone in front of the opponents back 3 or 4 and their midfield).
Here we start the exercise off as a typical rondo and develop the idea to take it into the game situation. This example can be the shape within a 4-2-3-1 system of play. I have used this same set up many times in training to bring the ideas out in actual games with my U14 team. Certain moves become almost automatic as each player mentally knows what the other will do; before they do it. Especially good when teams defend deep against you and you have to open them up with imaginative movements OFF the ball. I love this session.
*Membership Required
A Game Situational Soccer Awareness Rondo
A rondo can be applied on certain parts of the field of play that apply to the game.
This exercise is based on the positioning of the players around Zone 14 (the zone in front of the opponents back 3 or 4 and their midfield).
Here we start the exercise off as a typical rondo and develop the idea to take it into the game situation.
This example can be the shape within a 4-2-3-1 system of play.
I have used this same set up many times in training to bring the ideas out in actual games with my U14 team. It works; we ended up ranked 5th in the USA developing these as well as many other moves.
Certain moves become almost automatic as each player mentally knows what the other will do; before they do it.
And that is in a 1-3-3-1-3 system of play also (which is the attacking team shape of the 1-4-2-3-1 anyway).
Especially good when teams defend deep against you and you have to open them up with imaginative movements OFF the ball. I love this session.
An Attacking Team Shape Rondo
2 v 2. (8) and (10) keep the ball away from (6) and (8). They can use outside players as support and play two touches for speed of play. Defenders try to keep the ball if they win it

An attacking Team shape drill with interchanges
Players move in and out on the attacking team to confuse opponents. This is so much more than a typical possession game with players on the outside as each player moves based on the 4-2-3-1

Add wing backs and add a defender
A very attacking way to play now with wing backs included so more options of movement and interchange OFF the ball to further confuse opponents.

An attacking Team shape drill with interchanges
Add Wing backs (2) and (3). Introduce another defender to increase the pressure. Make it a 2 v 3 against in the middle. Players can rotate on the blind side of the ball

Make it a 4 v 2 against on the inside
As we get good at this increase the difficulty inside of Zone 14. Now its a 4 v 2 against so (8) and (10) have to work harder to find open passing lanes to play in and we need to ensure teammates interchange with them to increase the difficulty for the defenders also.

Phase of Play: Movements in the Attacking Third
The set up as a Start Position. We are looking at rotation between the players in a positional sense. Shadow play to begin. Coach can determine certain moves to begin then players invent them for themselves

Phase of Play: Movements in the Attacking Third in a 4-2-3-1
After movement. If defenders are marking them and tracking their runs then this can cause great confusion. Here we have a 4 player rotation.

A Four Player Rotation
After movement. If defenders are marking them and tracking their runs then this can cause great confusion. Here we have a 4 player rotation.

Wing backs in
Introduce Wing Backs and now we have 6 or 7 players attacking and moving around changing positions to attempt to confuse the opposition.

Phase of Play: Movements in the Attacking Third
Show each rotation in 2’s, 3 and 11, 2 and 7, 9 and 10 and so on. A lot of interchanging positions that will set a big challenge to the defenders rather than; as often happens; players run up and down in straight lines which is easy to defend against..

Phase of Play: Movements in the Attacking Third
End Product of all the movements. A lot of interchanging positions that will set a big challenge to the defenders rather than as often happens players run up and down in straight lines which is easy to defend against.

Defenders in to make an 8 v 7 Phase of Play
Introduce OPPONENTS and show how your players movements OFF the ball will affect them.

Positioning in what I call “NO MANS LAND”
You want defenders to have to “second” guess who will mark (2) and (11) as they cut inside so they position BETWEEN (A) and (B) and (C) and (D). Defenders (A) and (D) have a choice track inside or stay wide? To reiterate we want (2) and (11) to position in the spaces between the fullbacks and center backs. Creating 2 v 1’s.

Phase of Play: Example of a Play
(9) Short; defender (C) tight, space behind for (2) to run in to the receive the pass and be in on goal. Defenders (A) and (D) have a choice track inside or stay wide? We want (2) and (11) to position in the space between the fullbacks and center backs. Creating 2 v 1’s.


Positional Possession Areas to Create Superiority - Training Center Exclusive
This game and its many progressions are designed to get the most out of the thinking processes of the players. Many mental challenges to overcome and learn from. In the game players must develop the ability to be calm under pressure, to be confident to receive the ball in tight spaces and to have the confidence of teammates to give the ball to you under pressure. Players need to develop their ability to look ahead of the ball even more, to assess options and make decisions even faster because the time on the ball is even more restricted than usual.
This article is available for Training Center Members Only. Get more information about joining here.
This game and its many progressions are designed to get the most out of the thinking processes of the players. Many mental challenges to overcome and learn from. In the game players must develop the ability to be calm under pressure, to be confident to receive the ball in tight spaces and to have the confidence of teammates to give the ball to you under pressure. Players need to develop their ability to look ahead of the ball even more, to assess options and make decisions even faster because the time on the ball is even more restricted than usual.

Overloading Players in the Zone 14 eBook - Training Center Exclusive
Teams may work out that we are good at playing penetrating passes and making great runs in behind them so the way to try to stop this is to defend deep. If they defend deep we need a tactical solution to counter this. This presentation gives you ideas on how to do this and play initially IN-FRONT of the opponents back four.
Teams may work out that we are good at playing penetrating passes and making great runs in behind them so the way to try to stop this is to defend deep.
If they defend deep we need a tactical solution to counter this.
This presentation gives you ideas on how to do this and play initially IN-FRONT of the opponents back four.
Bayern Munich and Barcelona are very good at this, both motivated and taught by Pep Guardiola.
We can do it at our age level just as effectively.
We can practice this in a tight area, with the relevant players in their usual positions in the attacking third and just play possession.
Soccer Awareness Training Center Members can download this 11 page eBook for free below. Now a member? See all the benefits of joining here. Try a monthly membership for free.

7 v 7 Animation of Team Development Using One Word Commands - Training Center Exclusive
This is just A WAY to play 7 v 7, there are various other ways to do it. Just a one-word signal can organize a defense, so everyone on the team knows what to do and reacts together as a unit. Also midfield players close by can react off the call too as can strikers. These One-word calls ensure everyone will know quickly and effectively what they should do as a unit and as a team. We must have a very vocal and confident leader at the back organizing this and making the decisions.
This article is available for Training Center Members Only. Get more information about joining here.
This is just A WAY to play 7 v 7, there are various other ways to do it. 1Just a one-word signal can organize a defense, so everyone on the team knows what to do and reacts together as a unit. Also midfield players close by can react off the call too as can strikers. These One-word calls ensure everyone will know quickly and effectively what they should do as a unit and as a team. Hence the back players (and the keeper) can organize their movement as a unit (and therefore influence those in front of them) from Four VERY simple one-word commands. The momentum is triggered from the back and runs forward through the team to the strikers. We must have a very vocal and confident leader at the back organizing this and making the decisions.

5 Phases of Play for 1-3-1-3-1 at 9 v 9 - Training Center Exclusive
This is a very simple way to show how the team movement works. The main theme is movement OFF and often AWAY from the ball. Players position OFF the ball based on: The best spaces, the opponent's positions, their own teammates positions, the position of the ball. These are ALL EXAMPLES of what “might / could” happen. Players can interchange positions as we develop the play. We offer great dynamics and fluidity to the players to allow them to express themselves on the field.
With this we can show the discipline also involved when we lose the ball and we recover back or press high. Teams will develop their style of play within these frameworks, it will never be as picture perfect as this due to the nature of the game, it is more just a guiding framework. How we do it per team it can be determined by the level of play.
This article is available for Training Center Members Only. Get more information about joining here.

Introduction to the 5 Phases of Play for 1-3-1-3-1 at 9 v 9
This is a very simple way to show how the team movement works. The main theme is movement OFF and often AWAY from the ball. Players position OFF the ball based on: The best spaces, the opponent's positions, their own teammates positions, the position of the ball. These are ALL EXAMPLES of what “might / could” happen. Players can interchange positions as we develop the play. This is an introduction to this presentation.
This is an introduction to the presentation on the 5 Phases of Play for 1-3-1-3-1 at 9 v 9. Join the Training Center and view the full presentation here.


Rotating Shadow Strikers and Teammates In and Around Zone 14 - Training Center Exclusive
This presentation shown through animations looks at the effective use of Zone 14 and the various uses of shadow strikers.
Zone 14 is located outside the penalty area. It is a factor to differentiate successful and unsuccessful teams because it provides the most assists in the game. The most effective way to use zone 14 is to make a forward pass into the penalty area from there. Moreover, the attacking play should be quick. The possession in zone 14 should not be more than 8 seconds. Not looking at the build up; but rather; focusing on the final pass into Zone 14.
In my opinion, the best way is to attack through zone 14 first as it is more effective. If they can’t penetrate through the central attacking area, then they attack the wide areas. Phase 3 shows how we overload Zone 14 with inverted runs by wide players to OUTNUMBER opponents CENTRALLY. This is the key.
This article is available for Training Center Members Only. Get more information about joining here.




Playing a 5-4-1 and Counter Attacking with Opponents Defending High
In this presentation, we are playing a 1-5-4-1 (1-3-4-3) defending deeper and Counter Attacking. This strategy can be used when your team is winning but under immense pressure. Your focus is on defending then counter attacking. You can also experiment playing this way for an educational experience. Lastly, we look at the timing of various run so as not to be offsides.
*Membership Required
This strategy can be used when your team is winning but under immense pressure. Your focus is on defending then counter attacking. You can also experiment playing this way for an educational experience.
Playing a 1-5-4-1 (1-3-4-3) defending deeper and Counter Attacking
We play a solid defense shape. We do not press them in the attacking third unless we are sure we can collectively win the ball. WE DEFEND DEEP AND PRESS CLOSE TO THE HALF WAY LINE..

Let them play in their own third or half: We shadow them
Often opponents are used to being pressed and like to play through teams. They will find it difficult to play without pressure as there is no space to play forward into with the other team being very compact.

As the ball travels we travel too
The ball is moved right to left by them. We also move right to left and shadow the ball.

They are attacking and are high up the field
They give the ball away and they are high at the back. We immediately counter behind them in numbers. We time the runs so as not to be offside. The player on the ball must be able to IMMEDIATELY see the opportunity and the 4 up front must EXPECT the ball in behind so no coming short to receive.
TIMING OF THE RUNS AND THE PASS ARE ESSENTIAL HERE.

Poor Timing of runs to be offside when opponents defend HIGH
Game Situation: We win possession but the front three run straight forward often before the delivery is even made so we are always OFFSIDE.
Here is a typical example of how we DON'T beat the offside trap, timing of runs and timing of pass is out of sync and we miss great opportunities. Watch (10)’s head and see if it is up or down; and hence seeing the pass or not.
The passer (10) may need another touch to control then play the through pass. This means the attackers must wait and time their run due to this.

Pressing high if we are close enough otherwise we drop off
Game Situation: Even though our method in this situation is to defend deep players must be able to identify when the opportunity arises where they can change the method to pressing, such as this. All good education.
If we lose it but are STILL Close to the ball; we can press quickly.

If not close enough and they are very good at playing out of the back we drop off and get compact
We can’t get close so we DROP and get VERY TIGHT as a team.

If we press and are not close enough collectively THEY WILL PLAY THROUGH US
Being caught doing both pressing and dropping at the same time. This happens a lot in teams where there is no planning or communication A big gap between attack and defensive and too much space in between.
We press but not quickly enough and they pick us off and play through us. (7) and (11) Must help us defensively. Now we have 5 players the wrong side of the ball.

Getting wide players (7) and (11) in ACROSS the line of the back four
Game Situation: Quick counter attacking
They give the ball away they are high at the back. We immediately counter behind them in numbers. We time the runs so as not to be offside. The player on the ball must be able to IMMEDIATELY see the opportunity and the 4 up front must EXPECT the ball in behind so no coming short to receive.


Playing Diagonal balls to get in behind opponents
Diagonal balls are less predictable to anticipate for defenders plus the ball goes “away” from the keeper. If over hit a straight pass will go through to the keeper and we lose possession.
They give the ball away they are high at the back. We immediately counter behind them in numbers. We time the runs so as not to be offside. The player on the ball must be able to IMMEDIATELY see the opportunity and the 4 up front must EXPECT the ball in behind so no coming short to receive.


Playing Diagonal balls from “center backs” to get in behind opponents
We time the runs so as not to be offside. The player on the ball must be able to IMMEDIATELY see the opportunity and the 3 or 4 up front must EXPECT the ball in behind so no coming short to receive.

Beat the Offside Trap with a 3rd man run from deep
Game Situation: Opponents press up VERY fast from the back, our front three come out with them To stay onside. Our midfielder (10) makes a forward run from deep to beat the offside trap.
This is a GREAT way to beat the opponents pressing up offside trap and unless the opponent player (G) marking (10) tracks them its very difficult to stop this from working.

Playing with PATIENCE to play Diagonal balls to get in behind opponents
Game Situation: We have possession we pass at the back and keep the ball and DRAW out the opponents to press us. Short, short, short; then long.
Opponents are “drawn out” to leave space behind them in their own half.. We are patient waiting for the right moment to play the long quality ball in behind them.

Getting striker (9) in with a “Channel run”
Striker (9) runs across the center back from one to the other without going offside then cuts across the 2nd center back to receive in behind. (7) stays wide to keep (B) wide and open up the inside space.

Getting striker (9) in with an OFF the Shoulder Run
Striker (9) runs across the center back without going offside then cuts across the center back to receive in behind. (11) stays wide to keep (C) wide and open up the inside space between the center back and fullback.

Wide player (7) cuts inside to open up space for wing back (2)
We time the runs so as not to be offside. The player on the ball must be able to IMMEDIATELY see the opportunity and the 3 or 4 up front must EXPECT the ball in behind so no coming short to receive. Watch (4)’s head and see if it is up or down and hence seeing the pass or not.


Pressing in the Attacking Third - Training Center Exclusive
Practice regaining possession in the attacking third of the field using the press. As a last resort we can kick the ball long as opponents prevent us building out the back. We can turn this into an advantage but the correct positioning of the players around where the ball is going must be addressed. Position all around the receiving player and try to out number the opposition in the immediate area. Teams often think if they have possession of the ball through the keeper they must spread out but in this case it is the opposite which should happen and they must condense around where the ball is being delivered.
*Membership Required
Defending in the Attacking Third
Start Position 1 - (6)’s pass is too heavy and it goes behind defender (3), attacking (8) and (7) close down and show inside, (9) pushes on to cover the back pass to the keeper.
All players take their positions of support off the FIRST pressing player.

First pressing player MUST get the angle of approach correct
Immediate pressing player (7) MUST press correctly. Often the first pressing player allows the defender to escape too easily by pressing at the wrong angle.
It is a small distance to make the pressing angle mistake but a big difference in winning the ball back or not. Here defender (3) can clear the ball wide even kick it out of play to give his or her team time to get reorganized as shown.

Showing INSIDE to our strongest pressure
Defender (3) May get turned or end up facing back, either way show inside.
Pressurizing player (7) forces the player on the ball inside towards the support players not outside. Inside means if we gain possession it’s a short route to get a cross or shot on goal. Show outside and if the defending team are under pressure the player on the ball can kick it out of play and give them time to reorganize plus there is no chance of an immediate cross or shot if we win it back in a very wide area.
(8) and (7) close down show inside, (9) closes the keeper to prevent the back pass, (2) (11), (8) and (6) close spaces down close to the ball, (3), (5) and (4) push up but still leave distance from the opponent strikers in case the ball can be played in behind them. Organization – Work with pressing player, support player, then cover players, then defenders and keeper (individual, unit, and team).

First pressing player MUST get the angle of approach correct: Pressing outside
Not as good as pressing to force inside but (2) could regain possession (by positioning to suit (7)’s new pressing position) based on a bad pass by defender (3) or if (3) does kick the ball out of play we get a set play at least.
(9) Can’t get across quickly enough to force (3) inside so has to force (3) outside. The rest of the team can adjust across also to condense the spaces down the side of the field to help win back the ball. Players furthest away from the ball are aware of their immediate opponent but mark spaces rather than players. For example (11) moves across the field and leaves opponents defender (2) alone because (9)‘s position prevents defender (3) from being able to pass to defender (2).
Players mark in advance of their opponents, filling in the spaces where the ball is likely to be played into (example 2’s positioning).

How to position and regain possession from the long kick by our keeper
As a last resort we must kick the ball long as opponents prevent us building out the back.
We can turn this into an advantage but the correct positioning of the players around where the ball is going must be addressed.
Have a pre-conceived player to kick the ball too (our best header up front).
Position all around the receiving player and try to outnumber the opposition in the immediate area.
Teams often think as they have possession of the ball through the keeper they must spread out but in this case it is the opposite which should happen and they must condense around where the ball is being delivered
We try to play out the back but are pressed to prevent it
This can still be EFFECTIVE: Now we condense as a team “short and tight”. Our (10) is good in the air so we hit him and we have a lot of players around him to win the 2nd ball. Of course opponents will readjust also. Its cat and mouse.

How NOT to set up to win the second ball
Our team is spread out and not in positions to win back the ball immediately. We must press upwards the half way line first. Team most likely to win the second ball in this set up are the opponents.

How we should set up to have the best chance to regain possession
This can still be EFFECTIVE: Now we condense as a team “short and tight”. Our (10) is good in the air so we hit him and we have a lot of players around him to win the 2nd ball. Of course opponents will readjust also. Its cat and mouse.

We leave their 3 strikers offside
Players can gamble for the flick on from (10). Players position behind, in front and alongside (10) so wherever the 2nd ball goes we have players to pick it up. WE ABSOLUTELY MUST get better at this. Obviously opponents will position better than this defensively; but you get the point.

Opponents win the header but we are positioned well to win the second ball even though they won it first
Opponents win the first ball with a header clear. We are positioned so as to be able to win the next ball.


1-4-2-3-1 System of Play in Detail
Part 2 of our Game Strategies Series: This is a more in-depth look at the 1-4-2-3-1 System of Play
*Membership Required
Playing the 1-4-2-3-1 and staying this way with more detail
This is the defending team shape (defending start position) of a 1-4-2-3-1.

Attacking Shape
This is the attacking team shape (attacking “start position”) is 1-3-3-1-3.

Overload in Zone 14
This is the attacking team shape now a or 1-3-1-3-3 or 1-2-3-2-3 depending on the moment. This can also be the attacking team shape we change to when we are chasing a game perhaps losing 1-0 and wanting to be more positive in attack. So this now would be the start position.

Interchanging Positions in Attack
A lot of interchanges between positions in attack. If we lose the ball, we have to be tuned into being defensively concentrated and disciplined.

Defensive Discipline
If we cannot win the ball back quickly, we can alternatively drop into a compact defensive unit. Perhaps (9) can try to delay the opponents attack until we get into our best defensive set up.

Regaining Possession very close to THEIR goal so immediate high pressing as a team. A Full Team Press from back to front.
We must press up from the back too leaving opponents offside; should they get a chance of a counterattack. First pressing player should stop the attempted forward pass. Defenders must decide in a split second which course of action they take.


1-3-3-1-3 System of Play in Detail
Part 3 in our Game Strategies Series: This is a more in-depth look at the 1-3-3-1-3 System of Play.
*Membership Required
This is part 3 of our Game Strategies Series.
How Chile Played under coach Marcelo Bielsa
One of the National teams to play this way was Chile with Marcelo Bielsa in 2010. This was the basic set up which can be seen as a 1-3-1-3-3 or a 1-3-3-1-3 or 1-3-diamond-3 (1-3-1-2-1-3). Pep Guardiola formerly of BARCELONA experiments with Bayern Munich at times using this system philosophy; as well as other systems of play also now; so with this in mind I believe it is time to discuss this method of play in full; as top coaches like him start to look at how it works. Guardiola is one of the top managers in the world of soccer and at the same time is a great admirer of Bielsa so I believe it is time to look at this system of play that both employ. Perhaps this is the future of Soccer?

How Bayern Munich sometimes Play under Pep Guardiola
Note the fullbacks / WING BACKS OF Bayern tuck in to overload the center and middle of the field (Thiago and Lahm).
One can also have these two players touchline wide when in possession to spread out the midfield and open up spaces between opponents to play through.
The same can apply to right and left center backs breaking touchline wide also so we have 3 players in wide areas on both sides of the field in possession of the ball.

Staying this way with More Detail
This is the defending team shape (defending start position) of a 1-3-3-1-3. The positioning of the wing fullbacks defensively is somewhat alien to most set ups in other formations and you must explain and show in detail to your players how this works and why.

The players in our system of play
This is the attacking team shape (attacking “start position”) for a 1-3-3-1-3. Zone 14 is the area between the opponents back three or four and their midfield..

This is the attacking team shape now possibly a 1-2-3-2-3 depending on the moment. This can also be the attacking team shape we change to when we are chasing a game perhaps losing 1-0 and wanting to be more positive in attack. So this now would be the start position.

Changing the team shape if we lose the ball from the attacking set up
Let's say we passed the ball forward and lost it on the edge of the opponents penalty area. Immediately both fullbacks tuck inside to offer to fill central spaces and overload the area. (7) presses INSIDE towards (9) and (10).
Always try to force the ball INSIDE in the attacking and middle thirds to where our numbers are.

Forcing the ball inside to our strength in numbers
Even in a wide position, based on the pressing player (7) showing the ball inside both wing fullbacks tuck inside because the ball is being forced into the central areas.

Forcing the ball wide and adjustment of defenders
(7) Cannot get positioned quickly enough to force the ball inside so forces wide and this means some adjustment behind him or her for the right wing fullback and the right center back especially.
NOTE: (2) and (5) positional changes.

Interchange and rotation
Movements up front have been effected creating a diamond of support for striker 9 who becomes 10 and so on. These movements will be described in much more detail later.

Potential interchange movements
Great rotation between players should cause a lot of confusion in the opponents defending set up. We can establish some set routines initially using a situation to set it off (6 gets the ball to feet with time for example). Like a set play in open play to teach the players simply.

A preferred Phase Five when losing the ball: A Full Team Press
We may press up from the back too leaving opponents offside; should they get a chance of a counterattack. Defenders must decide in a split second which course of action they take.

Just a one-word signal can organize a defense, so everyone on the team knows what to do and reacts together as a unit. Also midfield players close by can react off the call too as can strikers. These One-word calls ensure everyone will know quickly and effectively what they should do as a unit and as a team. Hence the back players (and the keeper) can organize their movement as a unit (and therefore influence those in front of them) from Five VERY simple one-word commands. The momentum is triggered from the back and runs forward through the team to the strikers. We must have a very vocal and confident leader at the back organizing this and making the decisions.