Welcome to the Soccer Awareness Coaches Corner. Browse through soccer drills, small sided games, tactical thoughts, full sessions and a variety of resources. Posts marked “Training Center Exclusive” are for members only.

Throw Ins in the Attacking Third - Training Center Exclusive
The best way to win the ball from a throw in; more often than not ; is for the opponents to throw it in. The best way to lose the ball from throw ins; more often than not ; is for US to throw the ball in. It sounds “back to front” but watch and see. Therefore, its very important to have pre meditated plans for throw ins, as must as for corners, free kicks wide and central or long, and how to defend from these set plays too.
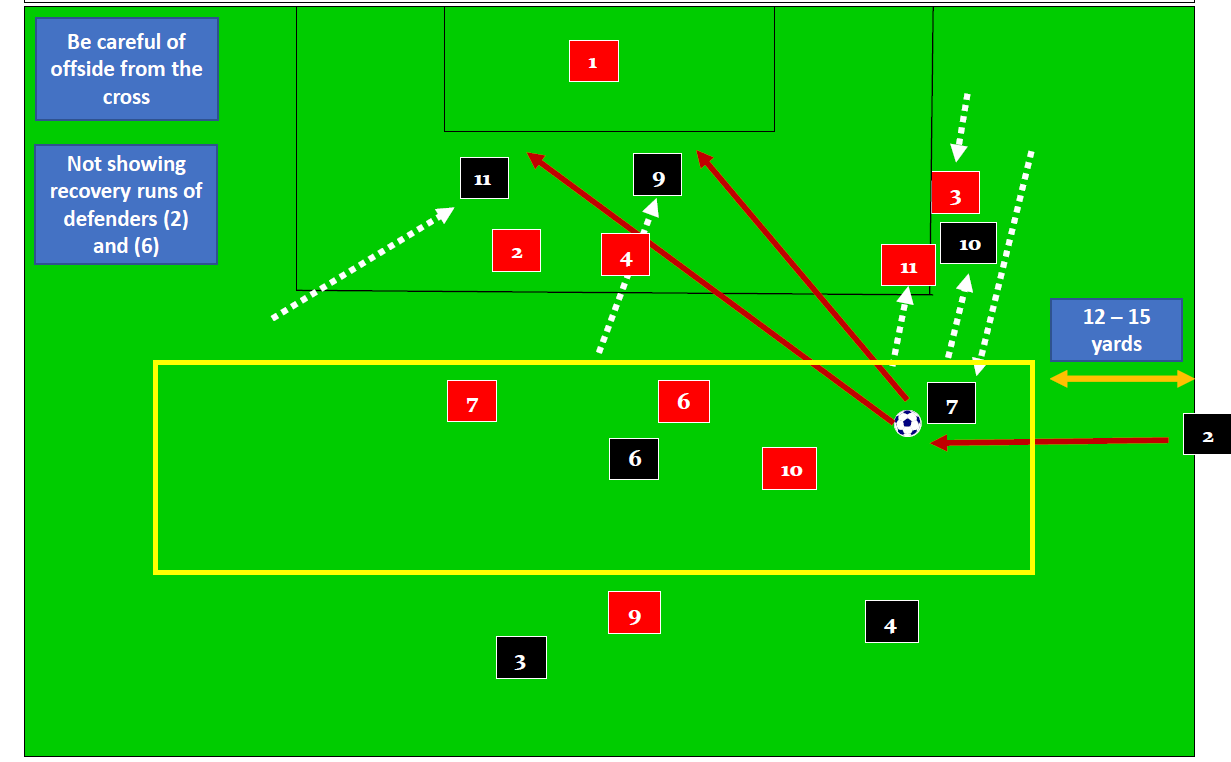
This is a basic crossover move. The person who receives the throw to cross the ball starts their run second. (7) and (10) line up with (2). They look to cross over . All other players stay out of the immediate area.
This article is available for Training Center Members Only. Get more information about joining here.
Attacking Third: Cross Over: Throw Ins: A 2 Player Rotation: Start well apart
This is a basic crossover move. The person who receives the throw to cross the ball starts their run second. (7) and (10) line up with (2). They look to cross over . All other players stay out of the immediate area. One player makes the first move the other waits. The ball is thrown flat and FAST so it’s a continuous movement of run / throw / cross. (10) is Left footed and (7) is right footed (two footed players would be a bonus).

The SAME applies the other side of the field.
We are GUESSING Opponents will defend like this, nothing will be perfect for us.
(7) Moves towards (10) first . (7) Then blocks off (10)’s marker (3). Now (10) runs forward into the free space created by (7) to receive and cross the ball. (2) looks to throw to (10)’s original position in body stance to fool the opponents to then throw to (10) down the line.
A GREAT THROW IS VITAL, Low and fast into the path of (10).

As FEW TOUCHES on the ball as possible delivery EARLY.
(10) Moves FIRST towards (7). Then blocks off (7)s marker (4). Now (7) runs into the free space created by (10) to receive and cross the ball. As before (2) looks to throw to (7)s original position in body stance to fool opponents but throws to (7)s new position to cross the ball or even shoot at goal if in a favorable position..
A GREAT THROW IS VITAL, Low and fast into the path of (7).

Players MUST NOT get too close to the thrower. Leave big spaces to play in.
Getting TOO CLOSE Ruins the pre patterned play.
Attacking Third: The set up: (10) and (7) get close to each other then crossover runs
Ensure players do not get too close to the player taking the throw in. Space must be created in front of the thrower for players to be able to move into and receive the ball.
Timing of the throw, run, pass is the issue here, synchronicity is the key.
(7) and (10) are close to each other in their STARTING POSITIONS. 1 to 2 yards apart.

Players MUST NOT get too close to the thrower. Leave big spaces to play in.
Usually no one marks the thrower (But not always)
Getting TOO CLOSE Ruins the pre patterned play.
A GOOD throw is Paramount
Attacking Third: (7) and (10) crossover runs leave space in the middle for (6) to move into
Ensure players do not get too close to the player taking the throw in. Timing / ACCURACY of the throw, plus the runs and passes is the issue here, synchronicity is the key. Space must be created in front of the thrower for players to be able to move into and receive the ball.

Choices of (6)
Volley the ball behind defender (3) for our (7) to run onto
Play it back to the thrower who could be free.
Opponent (6) lets our (6) get free so; Receive and turn having already scanned what's on the other side of the field
Could be a volleyed pass in behind and over the top for (7) into the SPACE.
Attacking Third: END PRODUCT
Ensure players do not get too close to the player taking the throw in. Timing / ACCURACY of the throw, plus the runs and passes is the issue here, synchronicity is the key.
Space must be created in front of the thrower for players to be able to move into and receive the ball.
A GOOD throw is paramount.

Choices of (6)
Volley the ball behind defender (3) for our (7) to run onto
Play it back to the thrower who could be free.
Opponent (6) lets our (6) get free so; Receive and turn having already scanned what's on the other side of the field
(6) STAY OUT. Do not close your OWN SPACE. Then late and fast get free from (6).

5 Phases of Play for 1-3-1-3-1 at 9 v 9 - Training Center Exclusive
This is a very simple way to show how the team movement works. The main theme is movement OFF and often AWAY from the ball. Players position OFF the ball based on: The best spaces, the opponent's positions, their own teammates positions, the position of the ball. These are ALL EXAMPLES of what “might / could” happen. Players can interchange positions as we develop the play. We offer great dynamics and fluidity to the players to allow them to express themselves on the field.
With this we can show the discipline also involved when we lose the ball and we recover back or press high. Teams will develop their style of play within these frameworks, it will never be as picture perfect as this due to the nature of the game, it is more just a guiding framework. How we do it per team it can be determined by the level of play.
This article is available for Training Center Members Only. Get more information about joining here.

Introduction to the 5 Phases of Play for 1-3-1-3-1 at 9 v 9
This is a very simple way to show how the team movement works. The main theme is movement OFF and often AWAY from the ball. Players position OFF the ball based on: The best spaces, the opponent's positions, their own teammates positions, the position of the ball. These are ALL EXAMPLES of what “might / could” happen. Players can interchange positions as we develop the play. This is an introduction to this presentation.
This is an introduction to the presentation on the 5 Phases of Play for 1-3-1-3-1 at 9 v 9. Join the Training Center and view the full presentation here.


Team Shape Development in 9 v 9 - Training Center Exclusive
Here we show how team shape changes from defending to attacking to then how we start to interchange and rotate players. Distances between defending and attacking are bigger than most think. Players learn how to add fluidity and freedom to team play in terms of their offensive movements and how to compact themselves when defending.
Using the 1-3-3-1-1 is a progressive move to playing the 1-3-3-1-3 in the 11 v 11 hence I am starting with this formation at 9 v 9.
*Membership Required
Subscribe to the Soccer Awareness Training Center to get access to all premium Training Center Exclusive articles.
Here we show how team shape changes from defending to attacking to then how we start to interchange and rotate players.
Distances between defending and attacking are bigger than most think.
Players learn how to add fluidity and freedom to team play in terms of their offensive movements and how to compact themselves when defending.
Using the 1-3-3-1-1 is a progressive move to playing the 1-3-3-1-3 in the 11 v 11 hence I am starting with this formation at 9 v 9.
Team shape from defending to attacking in 1-3-3-1-1
Defensive shape is at the red triangle cones. Attacking shape at yellow triangle cones. Player (6) represents center backs (4) or (5) and player (8) can also represent (6) in their roles in an 11 v 11.

Team shape attacking in 1-3-3-1-1
Defensive shape is at the red triangle cones. Attacking shape at yellow triangle cones.

Team shape from defending to attacking in 1-3-2-3
Defensive shape is at the red triangle cones. Attacking shape at yellow triangle cones. Player (6) represents center backs (4) or (5) and player (8) can also represent (6) in their roles in an 11 v 11.

Team shape attacking in 1-3-2-3
Defensive shape is at the red triangle cones. Attacking shape at yellow triangle cones.

Combinations Movements to Teach
Now center back (6) brings the ball out of defense and central midfielder (10) drops in to cover. Wingbacks (2) or (3) could also drop in to cover (6).

More complex Combinations Movements to Teach
(3) Has several options of a pass in-front of the ball. These are now very advanced movements that the players can practice with or without the ball.

A Cut inside and an overlap by a wing back
Start simply with this two player rotation. (11) cuts inside, this is the CUE for (3) to overlap.

Covering for the attacking fullback (3)
(11) Cuts inside to clear the space for (3).(8) Drops in to cover for (3).
(10) may also drop in to Cover for (8) if necessary in case we lose it and the other team counter attack..





Composure Zones to Aid Team Play and Individual Development in a 9 v 9 - Training Center Exclusive
An easy introduction to teaching players to develop play from the back without the pressure they would get in a game situation. Builds confidence and composure in the players and you can increase the pressure as they improve.
Overload at the back. Striker can’t encroach into the 10-yard composure zone. Defenders pass ball across under no pressure until one is free to run it out, attackers can now try to win it back. Defenders can take the ball back into the composure zone for safety and this encourages spreading out and playing from the back. Be patient, keep possession; go forward at the correct moment.
*Membership Required
As an easy introduction to teaching players to develop play from the back without the pressure they would get in a game situation.
Builds confidence and composure in the players and you can increase the pressure as they improve.
Overload at the back. Striker can’t encroach into the 10-yard composure zone. Defenders pass ball across under no pressure until one is free to run it out, attackers can now try to win it back. Defenders can take the ball back into the composure zone for safety and this encourages spreading out and playing from the back. Be patient, keep possession; go forward at the correct moment.

A Transition game maintaining shape and balance throughout the team in a 9 v 9
Building 9 v 9 team play up through various conditions of play
Players stay in their own thirds to establish team shape
Transition between thirds
9 v 9 rotation of players
Possible passing options
Overlap play from wide defenders
Introducing offside
Overload in attack to maintain possession
Transitions between thirds for defending team also
Working with four zones
Players stay in their own thirds to establish team shape
We start with 2 x 1-3-3-1-1 set ups. Players stay in their own zones initially until we get the game going.

Transition between thirds
An example: (6) bring the ball out and creates a 6 v 3 with the neutral player added also. Then a midfield player joins in the attacking third to create a 2 v 3 in there. Defending team players stay in their own zones.

9 v 9 rotation of players
1. Players interchange between zones one at a time always returning to original set-up. Check the balance of the team with and without the ball. We have created a 5 v 3 in midfield zone with player (6) moving up.
2. If they lose possession players either drop back in or you can develop the clinic to include pressing to regain the ball. E.g. If you are losing the game go full high-pressure and PUSH three players into the attacking third, three PLUS A NEUTRAL PLAYER in the midfield third and two in the defensive third.

1. Condition – Can only score if all players are over the defensive third line so reinforcing keeping compact vertically.
2. Restrict number of touches on the ball if they are able to do so to encourage quick passing and movement and to improve the speed of decision-making.
3. Vary play by encouraging defenders to pass directly to the forwards; midfield players can then support them facing the opponent’s goal (easier to support rather than receiving and having to turn with the ball).
4. If you have problems making the session work with equal numbers then reduce the game to a 9 v 5 situation using one forward, one midfielder, two defenders and a keeper on the opponents team until the players are comfortable then go into the full workout.
Possible passing options
1. Player (8) on the ball. 4 possible options to pass forward e.g. to (7), (9), (10, (11) or (N) If can’t go forward because of pressure, can go to the side to (3) or (2) or back to (6), and the keeper to keep possession until the situation allows for a forward pass again (you won’t obviously get all these options to pass but it shows how it can work).
Caution – in attack, be aware of quick counter if opponents win the ball i.e. we have a 2 v 2 at the back.
2. Discussion – You can get so much work into this session, every time you look there may be a new situation to effect. Choose a theme and stick with it and when you have established it with the players, only then move onto another theme (you can again use the same set-up, as it is so flexible).

A Transition game maintaining shape and balance throughout the team
1. To ensure the players have a chance to build up the play from the back have a 3 v 1 overload at each defensive third to begin to session.
2. We are looking to be successful with offensive play building up from the back and this gives it a greater chance of success and thus the positive reinforcement of the players.
3. As they get better at this and gain success you can change it to a 3 v 2 situation so it is more difficult to achieve. Á 3 v 2 means a 9 v 9 situation with the players developing play but staying in their own third to emphasize team shape through the units.

Transitions between thirds
1. Now we are transitioning between thirds and as a defender changes the balance in midfield from a 3 v 3 into a 4 v 3, a midfielder then moves into the attacking third to change the balance from a 1 v 3 into a 2 v 3. (7) Clears the space for (2) to bring the ball forward. (6) And (3) cover across behind the field to support and be in a good position to cover should the move break down. This is clearing the space in front of the ball and filling in behind the ball.
2. (11) Makes a run into the attacking third to be another target for (2) to pass to. If the player can’t go forward and has to play it back ensure the players behind the ball get in positions where they are free to receive it and able to support the player on the ball.

Overlap play from wide defenders
1. Here a full back makes an overlap run to provide an option for (8) to pass to. (2) Passes to (8), (7) clears the space wide to run into for (2) by taking defender (F) inside, and (2) runs onto the return pass from (8). The overlap can occur also from the middle third into the attacking third.
2. Wide defenders need to be constantly encouraged to get into good wide receiving positions to take the ball forward into attacking areas of the field.
3. The fact that (G) can’t track the runner into the middle third yet during this progression helps highlight the importance of this kind of attacking run from a wide area.
4. Likewise, (8) may change the point of attack and (3) can make the overlap run from the other side and on the blind side of striker (G). (8) covers for (3).

Introducing offside
1. Develop – Have offside from the defensive third of the field. (8) Passes the ball forward and (3), (6) and the keeper push up. Striker (G) is left offside.
(8) Passes to,(2) who moves up from the defensive zone to the middle zone to support. This type of transition movement is important because it allows players to move freely between the zones knowing they will have a team mate covering for them. In terms of the opposition this rapid movement and transition makes it difficult for them to pick players up, to read what your team is doing..
2. This means defenders aren’t just defenders, midfielders aren’t just midfielders and attackers aren’t just attackers they work to help each other through the three units of the team and are free to mix the game up. This is total soccer played to encourage the free movement of players throughout the teams.

Overload in attack to maintain possession
1. Here (2) plays the ball to (8) and (7) makes a run off the ball to support in the attacking third. Transitions can depend on the stage of the game; if your team is chasing the game to score being a goal down then (7) would probably stay in the attacking third, not immediately return to help (8) in the middle third but keep an overload in the attacking third situation there but the basis of the session is to show how to maintain a balanced shape in your team.
2. Practice movement (switching) of strikers and midfield players to move defenders around (especially if they man mark), so play isn’t in straight lines all the time.

Transitions between thirds for defending team also
1. Progression – Have players able to transition back into zones from the attacking third to the midfield third, the midfield third to the defensive third. Defenders still cannot move between zones.
2. Develop – Now Allow defending players (as above) to track attacking players into the other zones. When this happens the above situation means the defender (B) follows the striker (9) going short creating space behind for another striker to move into or a midfielder to break forward into (in this case 7 and 11). Ultimately open the game up so the players have no boundaries to use for focus and see if they can work out how to keep that balance and shape on an open field of play.

Working with four zones
1. We have essentially four - thirds to play in. The players can only play in three of the four thirds at any one time.
2. This ensures movement up and down the field maintaining distances between units.
3. Players cannot enter zone 4 until the ball goes into zone 4.

Working with four zones
The ball has been played into zone 4. Here the numbers team has moved forward out of zone 1 and into zone 2 and the whole team has moved forward one zone. This helps them maintain distances between the units and does not allow the team to get too spread out either attacking wise or defensively.

Progression development from start to finish
Set up is as follows; the field is arranged in thirds; defending, midfield and attacking thirds. In the set up we have here we have a 3 v 1, a 4 v 4 + neutral player and a 1 v 3.
Warm up: Objective: 9 v 9 with composure zones to aid team play and individual player development
1. STAY IN OWN THIRD.
Players stay in their own thirds to get a feel for how to maintain shape and how to use width in attack. Spread out in possession in a 3 v 2 overload at the back in the defending third to create a situation where the players are available to receive the ball in space and pass it forward.
2. TRANSITION BETWEEN THIRDS
Players are allowed to transition between thirds but only one at a time. The defending team cannot move between thirds to track the attacking players. When the attacking team loses possession they then become defenders and must immediately drop back into the third they started in. The reason for dropping back and not trying to win it back there and then is because we are working on offensive play and want both teams to have the opportunity to build up play. Can run the ball in, pass it in, or pass it in to a runner from your own third.
3. OVERLAP PLAY FROM WIDE DEFENDERS
This particular type of movement is a very important one to develop in this session and the opportunities presented to do so will be numerous.
4. OFFSIDE FROM THE DEFENDING THIRD
Introduce offside in the final thirds at both ends of the field. This encourages teams to move up as the ball is played forward.
5. OVERLOAD IN ATTACK MAINTAINING POSSESSION
Here we have worked the ball into the attacking third and we leave an overload in this third to regain possession should it be lost. This may depend on the game situation where we are chasing the game being a goal down and have to take chances.
6. TRANSITION BACKWARDS BETWEEN THIRDS
Allow players to transition between thirds coming back as the initial movement, for example a striker may drop back into the middle third to receive. A midfielder may push on into the space the striker created by the movement.
7. TRANSITIONS OF DEFENDING PLAYERS
Allow defenders to track players into the other thirds they venture into. Now all players can move between thirds but still have it only one at a time. This helps highlight how to create space for someone else by the movement of players; a striker comes short, pulls a defender with them and space is created in the area they came from for another striker or a midfielder to move into to receive the pass.
8. FREE PLAY
Open the game up. See if players can maintain their shape without the help of the thirds, if they can transition between units but also keep their balance. Try a game in quarters to establish movement up and down as a team.
9. NUMBER OF TOUCHES RESTRICTION
Introduce a three, two then one touch restriction to see if the players can work more quickly and still gain success. This speeds up there decision making in the game. When it is one touch, condition it so they can take more than one touch (a pass may be so heavy they need two touches) but emphasize they use one touch if it is on to do so. This keeps it realistic.
10. CONCLUSION
We have developed the clinic from working in thirds (or quarters), introduced many progressions to
work up to letting the game go free and observing if the players can incorporate into the free game
situation, all they have learnt.
I would recommend using this clinic on a regular basis and set it up for the scrimmage that is usually done at the end of a coaching clinic session.

A Transition Game Maintaining Shape and Balance Throughout the Team in a 9 v 9 - Training Center Exclusive
Building 9 v 9 team play up through various conditions of play
Players stay in their own thirds to establish team shape
Transition between thirds
9 v 9 rotation of players
Possible passing options
Overlap play from wide defenders
Introducing offside
Overload in attack to maintain possession
Transitions between thirds for defending team also
Working with four zones
Building 9 v 9 team play up through various conditions of play
Players stay in their own thirds to establish team shape
Transition between thirds
9 v 9 rotation of players
Possible passing options
Overlap play from wide defenders
Introducing offside
Overload in attack to maintain possession
Transitions between thirds for defending team also
Working with four zones
Players stay in their own thirds to establish team shape
We start with 2 x 1-3-3-1-1 set ups. Players stay in their own zones initially until we get the game going.

Transition between thirds
An example: (6) bring the ball out and creates a 6 v 3 with the neutral player added also. Then a midfield player joins in the attacking third to create a 2 v 3 in there. Defending team players stay in their own zones.

9 v 9 rotation of players
1. Players interchange between zones one at a time always returning to original set-up. Check the balance of the team with and without the ball. We have created a 5 v 3 in midfield zone with player (6) moving up.
2. If they lose possession players either drop back in or you can develop the clinic to include pressing to regain the ball. E.g. If you are losing the game go full high-pressure and PUSH three players into the attacking third, three PLUS A NEUTRAL PLAYER in the midfield third and two in the defensive third.

1. Condition – Can only score if all players are over the defensive third line so reinforcing keeping compact vertically.
2. Restrict number of touches on the ball if they are able to do so to encourage quick passing and movement and to improve the speed of decision-making.
3. Vary play by encouraging defenders to pass directly to the forwards; midfield players can then support them facing the opponent’s goal (easier to support rather than receiving and having to turn with the ball).
4. If you have problems making the session work with equal numbers then reduce the game to a 9 v 5 situation using one forward, one midfielder, two defenders and a keeper on the opponents team until the players are comfortable then go into the full workout.
Possible passing options
1. Player (8) on the ball. 4 possible options to pass forward e.g. to (7), (9), (10, (11) or (N) If can’t go forward because of pressure, can go to the side to (3) or (2) or back to (6), and the keeper to keep possession until the situation allows for a forward pass again (you won’t obviously get all these options to pass but it shows how it can work).
Caution – in attack, be aware of quick counter if opponents win the ball i.e. we have a 2 v 2 at the back.
2. Discussion – You can get so much work into this session, every time you look there may be a new situation to effect. Choose a theme and stick with it and when you have established it with the players, only then move onto another theme (you can again use the same set-up, as it is so flexible).

A Transition game maintaining shape and balance throughout the team
1. To ensure the players have a chance to build up the play from the back have a 3 v 1 overload at each defensive third to begin to session.
2. We are looking to be successful with offensive play building up from the back and this gives it a greater chance of success and thus the positive reinforcement of the players.
3. As they get better at this and gain success you can change it to a 3 v 2 situation so it is more difficult to achieve. Á 3 v 2 means a 9 v 9 situation with the players developing play but staying in their own third to emphasize team shape through the units.

Transitions between thirds
1. Now we are transitioning between thirds and as a defender changes the balance in midfield from a 3 v 3 into a 4 v 3, a midfielder then moves into the attacking third to change the balance from a 1 v 3 into a 2 v 3. (7) Clears the space for (2) to bring the ball forward. (6) And (3) cover across behind the field to support and be in a good position to cover should the move break down. This is clearing the space in front of the ball and filling in behind the ball.
2. (11) Makes a run into the attacking third to be another target for (2) to pass to. If the player can’t go forward and has to play it back ensure the players behind the ball get in positions where they are free to receive it and able to support the player on the ball.

Overlap play from wide defenders
1.Here a full back makes an overlap run to provide an option for (8) to pass to. (2) Passes to (8), (7) clears the space wide to run into for (2) by taking defender (F) inside, and (2) runs onto the return pass from (8). The overlap can occur also from the middle third into the attacking third.
2. Wide defenders need to be constantly encouraged to get into good wide receiving positions to take the ball forward into attacking areas of the field.
3. The fact that (G) can’t track the runner into the middle third yet during this progression helps highlight the importance of this kind of attacking run from a wide area.
4. Likewise, (8) may change the point of attack and (3) can make the overlap run from the other side and on the blind side of striker (G). (8) covers for (3).

Introducing offside
1. Develop – Have offside from the defensive third of the field. (8) Passes the ball forward and (3), (6) and the keeper push up. Striker (G) is left offside.
(8) Passes to,(2) who moves up from the defensive zone to the middle zone to support. This type of transition movement is important because it allows players to move freely between the zones knowing they will have a team mate covering for them. In terms of the opposition this rapid movement and transition makes it difficult for them to pick players up, to read what your team is doing..
2. This means defenders aren’t just defenders, midfielders aren’t just midfielders and attackers aren’t just attackers they work to help each other through the three units of the team and are free to mix the game up. This is total soccer played to encourage the free movement of players throughout the teams.

Overload in attack to maintain possession
1. Here (2) plays the ball to (8) and (7) makes a run off the ball to support in the attacking third. Transitions can depend on the stage of the game; if your team is chasing the game to score being a goal down then (7) would probably stay in the attacking third, not immediately return to help (8) in the middle third but keep an overload in the attacking third situation there but the basis of the session is to show how to maintain a balanced shape in your team.
3. Practice movement (switching) of strikers and midfield players to move defenders around (especially if they man mark), so play isn’t in straight lines all the time.

Transitions between thirds for defending team also
1. Progression – Have players able to transition back into zones from the attacking third to the midfield third, the midfield third to the defensive third. Defenders still cannot move between zones.
2. Develop – Now Allow defending players (as above) to track attacking players into the other zones. When this happens the above situation means the defender (B) follows the striker (9) going short creating space behind for another striker to move into or a midfielder to break forward into (in this case 7 and 11). Ultimately open the game up so the players have no boundaries to use for focus and see if they can work out how to keep that balance and shape on an open field of play.

Working with four zones
1. We have essentially four - thirds to play in. The players can only play in three of the four thirds at any one time.
2. This ensures movement up and down the field maintaining distances between units.
3. Players cannot enter zone 4 until the ball goes into zone 4.

Working with four zones
The ball has been played into zone 4. Here the numbers team has moved forward out of zone 1 and into zone 2 and the whole team has moved forward one zone. This helps them maintain distances between the units and does not allow the team to get too spread out either attacking wise or defensively.

Progression development from start to finish
Set up is as follows; the field is arranged in thirds; defending, midfield and attacking thirds. In the set up we have here we have a 3 v 1, a 4 v 4 + neutral player and a 1 v 3.
Warm up: Objective: 9 v 9 with composure zones to aid team play and individual player development
1. STAY IN OWN THIRD.
Players stay in their own thirds to get a feel for how to maintain shape and how to use width in attack. Spread out in possession in a 3 v 2 overload at the back in the defending third to create a situation where the players are available to receive the ball in space and pass it forward.
2. TRANSITION BETWEEN THIRDS
Players are allowed to transition between thirds but only one at a time. The defending team cannot move between thirds to track the attacking players. When the attacking team loses possession they then become defenders and must immediately drop back into the third they started in. The reason for dropping back and not trying to win it back there and then is because we are working on offensive play and want both teams to have the opportunity to build up play. Can run the ball in, pass it in, or pass it in to a runner from your own third.
3. OVERLAP PLAY FROM WIDE DEFENDERS
This particular type of movement is a very important one to develop in this session and the opportunities presented to do so will be numerous.
4. OFFSIDE FROM THE DEFENDING THIRD
Introduce offside in the final thirds at both ends of the field. This encourages teams to move up as the ball is played forward.
5. OVERLOAD IN ATTACK MAINTAINING POSSESSION
Here we have worked the ball into the attacking third and we leave an overload in this third to regain possession should it be lost. This may depend on the game situation where we are chasing the game being a goal down and have to take chances.
6. BACKWARDS BETWEEN THIRDS
All players to transition between thirds coming back as the initial movement, for example a striker may drop back into the middle third to receive. A midfielder may push on into the space the striker created by the movement.
7. TRANSITIONS OF DEFENDING PLAYERS
Allow defenders to track players into the other thirds they venture into. Now all players can move between thirds but still have it only one at a time. This helps highlight how to create space for someone else by the movement of players; a striker comes short, pulls a defender with them and space is created in the area they came from for another striker or a midfielder to move into to receive the pass.
8. FREE PLAY
Open the game up. See if players can maintain their shape without the help of the thirds, if they can transition between units but also keep their balance. Try a game in quarters to establish movement up and down as a team.
9. NUMBER OF TOUCHES RESTRICTION
Introduce a three, two then one touch restriction to see if the players can work more quickly and still gain success. This speeds up there decision making in the game. When it is one touch, condition it so they can take more than one touch (a pass may be so heavy they need two touches) but emphasize they use one touch if it is on to do so. This keeps it realistic.
10. CONCLUSION
We have developed the clinic from working in thirds (or quarters), introduced many progressions to
work up to letting the game go free and observing if the players can incorporate into the free game
situation, all they have learnt.
I would recommend using this clinic on a regular basis and set it up for the scrimmage that is usually done at the end of a coaching clinic session.

A “Comfort Zone” Developing Width in Play in a 9 v 9
Objective: To Encourage Players To Use Width And Offer An Area To Play Without Pressure
The following is part of Soccer Awareness eBook: Tactical Thoughts on the Development of the New 4 v 4, 7 v 7 and 9 v 9 Game Sizes.
This eBook shows how these different size games can be taught and also shows different systems of play that might be useful to you.
The idea I am trying to cultivate is to find a pattern of development that goes from 4 v 4 to 7 v 7 all the way through 9 v 9 to 11 v 11 that educates the players VERY EARLY on how to ultimately play the 11 v 11, a common thread running right through the book. Click Here to Buy the Book
OBJECTIVE: TO ENCOURAGE PLAYERS TO USE WIDTH AND OFFER AN AREA TO PLAY WITHOUT PRESSURE
Theme: Developing Width in attack
A perfect Introduction to this idea so players are free to receive in wide areas. If a player breaks wide into the outside channel on either side of the field and is in possession of the ball this player cannot be tackled. Defenders are not allowed into the channel.
The players on the team in possession of the ball can run the ball into the channel or have it passed to them into the channel. Allow only 4 seconds in the free wide area.
This condition plants the seed in the mind of the players to immediately play with width when in possession. Numbers for this game can be 4 v 4 and upwards. Our offensive team shape to begin. Four players give us width in attack.
Develop: The wide areas can be used to practice certain moves the players have been taught, especially at the younger ages where they need to be able to practice them without pressure. This allows for them playing in a game but also doing the move without pressure.
Coaching Points:
Create space wide when in possession of the ball
Building play from the back
Using width to attack
Developing Overlap runs
Development of the Theme
Build the theme up very simply to ensure immediate understanding and success.
No opposition at first so 9 v 0.
Small numbers (e.g. 9 v 3): Passive opposition (jockey the player only)
Small numbers (e.g. 9 v 5): Passive opposition (Can only Intercept the passes not tackle
9 v 9 but again passive opposition
9 v 9 full game with wide FREE ZONES for the team you are training.
When you feel the players are ready have a full blown 9 v 9 game and have it for both teams at the same time going both ways.
Ensure all players on your roster are involved in the attacking team theme development initially so everyone benefits and understands what you are teaching and why you are teaching it.
To Encourage players to use width and play without pressure

This is the basic set up of the attacking shape of a 9 v 9 in the 3-3-1-1 formation. Emphasis is on the theme of exploiting the wide areas of the field by setting the free zone “Condition.”
A Small number of defenders added

Bring a small number of defenders in as passive opposition who can only Intercept not tackle. So we have here a 9 v 5 set up.
Get the rest of this session and more in the Soccer Awareness eBook: Tactical Thoughts on the Development of the New 4 v 4, 7 v 7 and 9 v 9 Game


Attacking Team Shape And Off The Ball Movement For 9 v 9
Use this session to work on team shape, movement in wide areas, use of one word commands and more in a 9 v 9 set-up playing a 3-1-3-1 system.
Wayne Harrison was the Technical Director for Youth for the Al Ain Football and Cultural club in the United Arab Emirates in the Middle East. In his time in Charge the youth teams won SEVEN National Champions at Youth Professional Level in the United Arab Emirates in 2 years. The most successful professional academy in the country. 6 Finishing Championship Runners up. The academy was Voted the Top Professional Academy in the UAE by Marco Monte of Inter Milan the Consultant for the Abu Dhabi Sports Council in 2011. Also beating teams such as Inter Milan, Valencia, Atletico Madrid and Raja of Morocco in tournaments at U15 and U16.
Here is the second example of some Coaching Clinics he taught to the 40 plus full time coaches he oversaw; all entirely relevant to what is being taught today.
Contents:
- Passing And Moving Warm Up
- Defensive Team Shape
- Attacking Team Shape
- Coordinated Movements In Wide Areas
- Shadow Play Rehearsal
- High Pressure On The Ball
- Low Pressure On The Ball
- Team Shape Defensive Positions
- A Comfort Zone Game Developing Width In The Play
- Using Four Zones To Teach Team Depth In A 9 V 9
- One Word Commands For Team Shape And Movement
Session Plan Preparation And Progressions
- 9 A Side Playing A 3-1-3-1 System
- Two shapes with cones attacking and defending (exaggerate this difference) have them run through this a few times. Different colored pinnies
- Warm up: pass and move through the attacking team shape, standing still to receive, then coming to receive and pass; and then checking away to check back, but with everyone moving through the team with several balls going. Two touches. Now give and go at each station
- Now one ball and 9 players passing through the team with the coaches commands as to where the ball should go. Players stay on the cones in their positions
- Now movement forward through the field and scoring on goal in a shadow play
- 2nd ball for defensive team shape (using the defending cones as a guide as to where to recover to)
- You can have an offside line as a guide; even though no offside (to keep the distances between units correct)
- Encourage the full use of width
- Use whistle to signal the players to pass backwards
- Can bring in the wide players to let fullback’s get forward (visual cue when the center midfielder gets the ball). We do not do this at all in games
- Bring in opponents: increasing the numbers as we improve until eventually a 9 v 9. Defenders win it pass to coach, then recover into defensive set up and play from keeper again
- Show when their striker is pushed up and offside, let him go when we have the ball and we push up and leave him (ok they win it play a long ball and score, so what)
- Show areas where the ball is and who has it as to what we do at the back. for example, we have it, we push up and leave them behind us; as soon as they win it we drop back immediately to pick them up. the distance the ball travels if they try a long ball gives us time to recover
- They have it in their defending third, we press and stop the delivery, so we push players up, especially if we win possession
- We have possession moving forward so we all move forward as a team and maintain distances between units
- We have possession in the attacking third (even if they leave someone behind us) and tell the keeper to be the sweeper; encourage to push up to the half way line at all times
- Play a game with half way line rule (all players over the half way line before they can score)
- Emphasize as we push up and have possession, in their half we outnumber them because they may have one or two cheaters behind us, so we could be 8 v 6
- Emphasize when we win the ball defending short and tight, keep immediate possession with low risk play to give us time to get wide and long when we attack and change our shape from defending to attacking.
- Can do 4 zones so all players have to be in three zones only (except keeper). set this up first. can explain this idea at the end when we have a game
PASSING AND MOVING WARM UP

- Pass and follow in the team shape. You can do this for any team size, 6 v 6, 8 v 8, 9 v 9 or 11 v 11
- Change the routines.
- Several balls going at once and everyone moving.
- Develop: Have players check to the ball to receive.
- Develop: Have players check away to check back to the ball.
- Play one and two touch.
- This is getting the players to check and receive the pass. Check away to come back into the space created.
- Follow the pass, lots of repetition. Two touch plays, receive and move the ball into space with a turn with one touch and pass with the second touch.
- Pass to the back foot of the player or behind them to move them. Player receiving can point to where they want the pass to go.
- Develop: Give and go, 1-2 with the player passing to you.
- Pass with the outside of the front foot.
- Now playing give and go’s, to develop the play and get lots of touches for all the players.
- So (1) passes to (2) who checks to an angle to receive, (2) passes back to (1) who has checked off at another angle to receive, who passes into the path of (2) running towards (3) to pass to (3) and the cycle continues AT EACH STATION.
- Players pass and run to the next position.
- Several balls should be going at once and everyone is moving.
- Try different shapes with the players.
Make sure players check off at angles to receive the pass so they are side on and can go forward, to the side, and back with a run or a pass. You can start play from the keeper.
DEFENSIVE TEAM SHAPE

ATTACKING TEAM SHAPE FOR 9 v 9

Players transition from a defensive shape to an attacking shape on the coach’s command.

COORDINATED MOVEMENTS IN WIDE AREAS

Wide players cut inside to create space outside for fullbacks to overlap or to receive to their feet running at the defense.
Have the players pass the ball around and then when it arrives at (6) that is the VISUAL CUE for the coordinated movements wide to make it easier for the players to understand when and where to make the runs.

These two diagrams show both sides going at the same time but realistically it is better that one goes only to ensure we have stability at the back should the move break down.
When we go to an 11 v 11 with this system of play both fullbacks can go; as will be shown. So, we are preparing the players for these types of movements at a younger age so when they progress to the 11 v 11 they are already educated and trained in this.
SHADOW PLAY REHEARSAL

Here the coach could dictate the movements to help the players more easily understand what to do. So, he could instruct the players to pass from (4) to (3) to (6) to (10) to (7) to (9) to shoot on goal. At the same time, he will have shown the players the interchanging movements to make to ensure this phase of play is developed correctly.
Once the players are comfortable with this they can then make their own movements and own decisions on where and when to pass.
HIGH PRESSURE ON THE BALL

Here (11) has pressure on the ball. (A) Cannot pass the ball forward, and this allows (2), (3) and (4) to push up to the half way line and condense the play from the back. Leave the opponents in an offside position (even though we do not play offside at 9 v 9).
If (2), (3) and (4) take their defensive shape off (C) and (B) and drop back then our team shape is wrong in this situation.
HIGH PRESSURE

Let’s say (9) is close enough to close (D) as the ball travels to him. This is the BEST SOLUTION if it is possible to implement it quickly. High pressure close to the opponent’s goal may result in a quick shot on goal on regaining possession.
High pressure like this also saves a lot of recovery runs for the rest of the team, instead they push up and close down the spaces in front of them and do not worry about the ball in behind them because the delivery has been stopped by (11) and (9) at the source.
LOW PRESSURE

Here, just as an example (because (9) would or should have closed down (D) already) we have (D) free and as the ball is played to him there will then be no pressure on the ball, so the opponents can play it forward. As the ball is travelling (2), (3) and (4) have to anticipate long balls to unmarked (B) or (C) that are free. Practice: “When and where to Drop”
By the time the ball arrives forward they should have enough time to recover back into position. The rest of the team can use this situation of a long forward pass to recover back too for the next phase on play.

TEAM SHAPE DEFENSIVE POSITIONS

Players drop back into position to avoid the ball being played in behind them.

Here we have possession and are moving forward and (6) has passed to (10) who is now in a shooting position.
Use a CONDITION that the team cannot score unless all the team (expect the keeper) are over the HALF WAY LINE. This teaches the team to push up from the back; as if they score the goal is disallowed if they are not up over the half way line. This also trains any defenders you may have who mentally switch off and do not push up or are just lazy to do the right thing and get up as a unit.
As they move to the 11 v 11 game and offside is applied, this will be a good education, IN ADVANCE for them on pushing up and leaving players offside and forcing them to work back (something strikers do not like to do).
A COMFORT ZONE GAME DEVELOPING WIDTH IN THE PLAY

GAME OBJECTIVE: TO ENCOURAGE PLAYERS TO USE WIDTH AND OFFER AN AREA TO PLAY WITHOUT PRESSURE
- If a player breaks wide into the outside channel on either side of the field and is in possession of the ball this player cannot be tackled. Defenders are not allowed into the channel.
- The players on the team in possession of the ball can run the ball into the channel or have it passed to them into the channel.
- This condition plants the seed in the mind of the players to immediately play with width when in possession. Numbers for this game can be 3 v 3 and upwards.
- Our offensive team shape to begin. Four players give us width in attack.
Develop: The wide areas can be used to practice certain moves the players have been taught, especially at the younger ages where they need to be able to practice them without pressure. This allows for them playing in a game but also doing the move without pressure.
Coaching Points:
- Create space wide when in possession of the ball
- Building play from the back
- Using width to attack
- Developing Overlap runs

Both fullbacks (2) and (3) push forward. They interchange with the wide attacking players (7) and (11). (7) And (11) cut inside forming an offensive three in attack with (9).
This is a big overload from both sides of the field so (6) needs to sit in and cover for this should the opponents win possession and counter attack.
Players make movements off each other. Overlapping fullback (2) Gets the ball and has options in front of him, he can play a team mate in or run the ball to get into a crossing position.
Alternatively it could be the fullbacks (2) and (3) cutting inside and the midfield players (7) and (11) staying wide.

An alternate way to play is have both fullbacks break wide initially to offer to receive the pass in the buildup.
Once the side to attack down has been established we can then have our opposite side players adjust as shown, (11) still attacking but (3) dropping back in to cover in case of a counter attack. This gives more freedom to (6) to support the attack.
Here we see the continued movements of the players in the attacking phase of play. We are compact from the back as the players move up the field to get up to the half way line as their guiding position.
INTRODUCE OPPONENTS

Introduce 5 players to give an overload for the team you are coaching to give them the opportunity to have initial success.
Opponents can only “shadow” the outside players and cannot enter the outside comfort zone.
Players can only stay outside in the channel with the ball for a few seconds then must make their move inside either passing it in or dribbling it in or it becomes too false a set up.
Building the session up using an overload situation to gain success.
Gradually increase the number of opponents until you finish with a 9 v 9 game situation. Building the numbers up as opponents should ensure a progressive situation where each stage of development is successful.
USING FOUR ZONES TO TEACH TEAM DEPTH IN A 9 v 9

DEFENSIVE TEAM SHAPE: The team maintains its shape by only occupying three of the four zones.
Short and tight. If we are ultra defensive and playing low pressure it may be only two zones we occupy.

OFFENSIVE TEAM SHAPE: Now we have our offensive shape and the team pushes up with them all still in three out of four zones (except the keeper).
Wide and Long.



ONE WORD COMMANDS FOR TEAM SHAPE AND MOVEMENT

Just a one-word signal can organize a back four defense so everyone knows what to do and reacts together as a unit. Also, midfield players close by can react off the call too.
One-word calls ensure everyone will know quickly and effectively what they should do as a unit and as a team.
Hence the back players (and the keeper) can organize their movement as a unit (and therefore influence those in front of them) from five one-word commands. The momentum is triggered from the back and runs forward through the team to the strikers.

Game situation
The Opponents have the ball and pass it back towards their own goal for example or we pass the ball forward maintaining possession.
The coach can move around the field with a ball and the team can take their shape from that also.
All the movements are without a ball to begin.
Here in the game the players move up the field only up to perhaps five yards in distance (it may be only one or two yards), edging out waiting to see if we win the ball then they can apply the OUT call.
Also it can be when we pass it forward and move up as a team.
Units move up together maintaining the same distance between each other. They move up a short distance then reassess the situation (and reorganize) depending where the ball is.
If it goes back again (we force them to play it back as a team) we can move a short distance up again.
If they pass it a long distance back then as the ball travels back we travel forward too and it can be the OUT call instead (see next slide).

Game situation
We have the ball and have played it forward into the attacking third for example and kept possession (or not, maybe just played it behind the opponent’s defense and it takes time for them to get the ball and turn and pass it forward again). It can be a big movement forward of the team.
At Practice: The coach can move around the field with a ball and the team can take their shape from that also.
The team sprint out together on the OUT word until you say sit or stop in the practice, they then stop moving and sit down and you assess their spacing between players and between the three units.
As they get good at this, speed up the commands until they are moving around the field quickly and efficiently with correct spacing. Eventually you can say the different words and all they do is stand still not sit on the stop command (in practice) so you can move them around the field at a faster pace working the transitions.

Game situation
Holding the line at the back of the defense and staying in the same place. The back defenders neither drop nor push up. This could be when the opponents have the ball but there is pressure on the ball so can’t play it forward.
The two opponents are included to show how this situation works; you wouldn’t necessarily use them in this practice though it may help the players to understand it better. This is a tricky situation to identify for the players and relies on good officiating plus positive direction from the player in charge.
This can occur even if the opponents have the ball and are facing forward with it but the defending pressing player or players prevent the forward pass effectively.
Decisions have to be instant here.
Our team lets the opponent’s strikers run off side. Players can also use the UP call too in this one, just pressing a little to work the opponents’ strikers if there is pressure on the ball to prevent the forward pass. This makes it even more obvious the opponents have run offside as the distance between them and the back four is greater.

Game situation
They have the ball and are moving forward with it playing left to right; we are playing right to left.
Here the team drop back together recovering back to the goal.
Again, it isn’t all black and white here as to when this happens but a situation could be when they have the ball and are moving forward and there is no pressure on the ball so the player on it can pass it forward and maybe in behind our back players for their strikers to run onto.
To avoid this we drop back as a team behind the ball but in the game the closest player would go to the opponent on the ball delaying the forward pass to allow others more time to drop and get back behind the ball.
For ease of practice to highlight the movement here we work all the players together to get the point across.
More attention to detail shows that you can break the situation down further to the player on the ball facing forward;
- Do they have their head up and hence can see a forward run and play the ball in quickly and therefore the back four must drop, or:
- Has the player got the ball at their feet and are facing forward still but their head is down and hence they do not see a potential run and in fact delay the forward pass long enough for us to actually DROP; HOLD the line or even press up with the UP call.
This delay may just give enough time to the closest player to the ball on our team to be able to apply pressure and thus stopping the forward pass.
Another variable, if the furthest striker is alongside the deepest defender, if that defender recognizes the moment quickly enough then that player can push up and play offside (and call UP) even with the opponent facing forward and ready to pass.
We rely on good officials to catch this!!

Game Situation
Here the opposition has played the ball into a very wide area and we all move across the field.
Slide can be used when the opponents are taking a goal kick so there are players around the area where the ball is to be kicked.
Moving across the field, don’t take it literally at 90 degrees it could be diagonally in a game (45 above) but for our practice you could have them moving across the field like this just to get the idea across.
In the game the ball may have been passed wide in the opponent’s possession and we move across the field as a team to close all the spaces around the ball to try to win it back.

Ultimately move the players around the field with the various commands keeping them in motion. You can introduce other players to pass or run the ball around the field and they must adjust off where the ball is. The team can only intercept passes not make tackles as we want them to move around the field off the ball.
Once they intercept it they can attack the goal and try to score as a reward. Introduce this method into an 11 v 11 game situation as the final progression.
USING ALL COMMANDS
The team need to learn that the shout is SLIDE one second; then within a moment it changes to UP (maybe they passed it back), and within another moment the call is DROP (as they line up to pass it forward), then it may be the OUT call within another second or two because we won the ball and passed it forward quickly giving us valuable time to get out.
Train the players to be able to makes these decisions quickly and effectively, offer lots of situations where this happens and have them practice it.
Mistakes are expected, so we must correct them, and the time to make them and correct them is in training.




The Roles and Responsibilities of Each Player in 9 v 9
Here we are looking at players 1, 2, 3, 6, 7, 8, 9; 10 and 11 of the 11 v 11 and we will look at them in this particular formation of 1-3-3-1-1. You could of course use different formations at 9 v 9 but I'm basing it on this one because it’s closer to the set up of the 11 v 11 so it transitions easily into it.
The following is a preview of Soccer Awareness eBook: Tactical Thoughts on the Development of the New 4 v 4, 7 v 7 and 9 v 9 Game Sizes.
This 407 page eBook shows how these different size games can be taught and also shows different systems of play that might be useful to you. Run with them as you may and of course come up with your own solutions too as that is what coaching is all about. I have introduced the use of RONDOS to initially aid the development of players for the game situation. Click Here to Buy the Book
Here we are looking at players 1, 2, 3, 6, 7, 8, 9; 10 and 11 of the 11 v 11 and we will look at them in this particular formation of 1-3-3-1-1. You could of course use different formations at 9 v 9 but I'm basing it on this one because it’s closer to the set up of the 11 v 11 so it transitions easily into it. You could argue also of course that it depends which 11 v 11 you use as to how it transitions; which would also be correct. But then if we evaluated every permutation then this book would be a 1000 pages long but I will at least offer two examples with a back 3 and a back 4!
So I am working off the fact this will transition into a 1-3-3-1-3 or a 1-4-2-3-1 because the 1-3-3-1-3 is the attacking shape of the 1-4-2-3-1 anyway (that’s another book of which I have two written to explain each formation also). Now (2) And (3) have (7) and (11) in front of them to help both in defense and in attack. We want them to get up and down the field as our wide outlets and building relationships with each other, (2) two with (7) and (3) with (11).
(6) Can still be compared to center backs (4) and (5) in their roles though in a more attacking minded way in the way I believe we can play. (6) is also STILL playing a more characteristic Number (6) role as in the 11 v 11 team. (8) Is like a link midfield player and (10) is the shadow striker in behind (9) the central striker in a truer sense of the word than at 7 v 7. In this set up the shadow striker has perhaps slightly less defensive duties than the shadow striker in the 7 v 7 did due to the positioning and higher number of players on the team.
Defensive positioning is more in front (8) than beside of (8) as it would be in the 7 v 7. (9) Plays the traditional striker role. We have previously covered the roles of 1, 2, 3, 6, 8, 9, and 10 in the 7 v 7 and their roles are very similar to the 9 v 9 so we will just address the wide players (7) and (11) and some pertinent relationships between players in the 9 v 9.
Team shape from defending to attacking in 3-3-1-1 preparing for a back three at 11 v 11
Defensive shape is at the red triangle cones. Attacking shape at yellow triangle cones.

Team shape attacking in 3-3-1-1 preparing for a back three at 11 v 11
Defensive shape is at the red triangle cones. Attacking shape at yellow triangle cones.

Team shape from defending to attacking in 4-3-1 getting prepared for a back four at 11 v 11
Defensive shape is at the red triangle cones. Attacking shape at yellow triangle cones.

Team shape attacking in 4-3-1 getting prepared for a back four at 11 v 11
Defensive shape is at the red triangle cones. Attacking shape at yellow triangle cones.

The Roles of (7) and (11)
Technical:
- Speed with the ball
- Control of the ball - first control – great first touch
- Crossing Ability – cross with pace: on the ground or by air, with a curve out of the reach of the goalkeeper and between the goalkeeper and defenders. Where to Cross can depend on the position of goalkeeper, defenders and attackers (to the near post, to the far post, the pull back, beyond the far post)
- Also dribbling inside and outside to shoot at goal or to cross
- Passing ability
- Scoring - balls on the floor - balls in the air
Tactical: In Possession
- With ball - speed control with the ball
- Positioning- always in a position to receive, open stance, and facing towards the goal, and as open as possible
- Know how to choose (when and where) - Cross, 1 to 1 dribble; when to pass, when to shoot.
- Understanding of when and where to break outside to inside.
Tactical: Out of Possession
- Orientation: Movement off the ball - to attack - to defend
- Communication - with their peers and with respect to the opponent
- Attitude to close spaces as a team player
- Ability to press and hold the position.
Psychological
- Disciplined and responsible - make the field as large (and deep) as possible
- Orientation. Will work for the team - on offense - on defense: close spaces and prevent deep passes
- Confidence - Create actions for goals - Passing and crossing
Physical
- Speed - in short, medium and long distance - technical in speed (with great coordination)
- Endurance
- Change of pace - be able to play at three different speeds.
- Ability in Passing and Crossing; Dribbling; Shooting ability; Heading Ability.
ATTACKING (55%)
Depending on the way the coach plays the 4-2-3-1 the types of players in these roles may be quite different team to team. A more defensive minded coach may use defensive midfield players here, an attacking coach may choose wingers here which would produce totally different effects with the same system. Or, the coach may pick certain players in these positions based on what the opponents will play like.
A big part of the switch is the role of the wide players. Rather than stay wide (which would hamper the ability of the full-backs to get forward), they narrow and become almost a conventional front three with the lone striker (9). This has the effect of narrowing the opposition defense, as their natural markers (full-backs) follow them into the centre.
Tactical Understanding / Game Intelligence: So, wide players must be comfortable drifting into the centre of the field and coming inside not just being skilled going outside and crossing as is the traditional role of the wide player. Therefore they must be better all round players than the traditional wide player (whether it be a defensive minded or attacking minded player, now it is best if they can be good at both).
Of course, this opens up a huge amount of space on the flanks, which the full-backs can exploit. This presents a further problem for the defending team, as their wide midfield players are suddenly charged with almost a solely defensive job. If the attacking full-backs get to the byline and the defending wide midfielders track them all the way, the defending team will end up with something approaching a flat back six.
Opposites: An added advantage is a right footed player who can play on the left and cut inside and have a good shot, and vice versa. They attack the fullback inside, and they have an advantage from this as they cut inside onto their strongest foot and inside against the fullback’s weakest foot; attacking the left backs right foot; and the right backs left foot.
Shooting and Crossing: having the ability to shoot on goal. Traditional wide players usually are good at crosses and tended to stay wide, the modern wide player has to be better at so many more skills than previous generation’s of players. So; they need the ability to stay wide and cross the ball and the ability to cut inside and shoot at goal.
DEFENDING (45%)
Understanding: Must defend in front of their respective fullback and develop a defensive relationship with them. This player can defensively cover for the fullback attacking. Must have a good tactical understanding to be able to combine with his fullback and know when and where to cover for him; when the fullback breaks forward.
Recovery: Recovery runs are vitally important for this player in this system of play. When recovering they can become a part of a defensive four in midfield.
1 v 1: Must be good at 1 v 1 defending
The relationship between (9) and (10)
ATTACKING:
They must develop a good understanding of movement off the ball to compliment each other. Interchanging of positions can cause much confusion in the opponents defense; and so they have to develop good mutual timing of this movement.
Angled positions off each other will help them in a supporting capacity.
At the same time they will link up together and form a formidable unit of two.
Generally (10) is positioned behind (9) but it can be the reverse at different moments in the game to confuse defenders.
DEFENDING:
They can help each other by pressing as a unit high up the field. Better to work as a pair if it is possible with early pressing of opponents with the reward of winning the ball in an area they can often shoot immediately on goal.
The relationship between (7), (9) and (11)
ATTACKING:
When we attack these three form a three pronged attack. The 1-3-3-1-1 becomes a 1-3-1-1-3 and often the two wide attackers tuck in to support the central striker (9), they may do it at the same time, to form a three; or, depending on which side of the field the ball is on, one will tuck in to form a two pronged attack. These three may interchange to confuse the defenders they are playing against.
They need a good understanding of how to work as a three and also a two, and when to tuck in and when to stay wide.
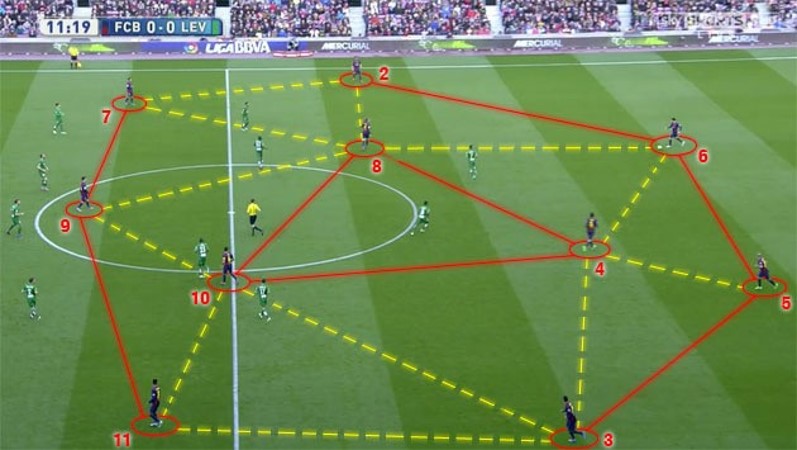
Barcelona again show this perfectly with the interchanges of Messi, Suarez and Neymar with no real set positions for any of them, they have the freedom to interchange and move around which makes it very difficult for each defender to know who to pick up.
DEFENDING:
The central striker (or whoever is filling that role at the time between the three strikers) must be the first line of defense.
Usually the two wide attacking players drop back to form a midfield three with the central midfielder (8) and tuck back into a 3-3-1-1 defensive team shape.
There again when the time is right they will press as quickly as possible wherever the ball is.

Pre-Meditated Patterns of Play: Building from the Back in a 9 v 9
9 v 9 is at the younger ages; and not wanting to baffle them with science too early; we will choose far fewer ways to build out from the back than we do at 11 v 11. But we will establish patterns of play they can learn to do that are very simple; but also very effective when done correctly; and we will change the boot ball mentality many clubs follow; and teach the game correctly without fear of failure.
Please watch your games and ask yourself:
- How many times does your team try to build out of the back?
- How many times do they play Boot-Ball from back to front?
9 v 9 is at the younger ages; and not wanting to baffle them with science too early; we will choose far fewer ways to build out from the back than we do at 11 v 11.
But we will establish patterns of play they can learn to do that are very simple; but also very effective when done correctly; and we will change the boot ball mentality many clubs follow; and teach the game correctly without fear of failure.
Mistakes will occur when we build from the back because we are taking risks, but that's okay, players will learn from them.
Yes, it's much safer to boot it long to the fast striker to run and score but that teaches exactly nothing for the long term development of our players; plus all that the midfielders and defenders get out of are stiff necks from watching the ball go over their heads from back to front.
The striker gets all the glory but it means nothing; and as they get older; long term the one who suffers the most is ultimately the striker who learnt absolutely nothing but "running fast or dribbling in a straight line."
As the players get older, defenders are faster, stronger and more cleaver. The fast dynamic striker is no more. So let's teach the game correctly now; for everyone to succeed. I want EVERY player to learn, improve and succeed. That includes the striker as much as anyone. Good strikers are worth their weight in gold but they have to be trained correctly like everyone else.
You can skip to the bottom of this page to download a pdf of this presentation.
Distribution from the keeper and Playing from the back
We use the numbers we would use in an 11 v 11: 1, 2 , 3 , 6, 7, 8, 9, 10, and 11.
If we are beyond needing to do shadow plays we can start with an overload for us to train to pass out from the back so we have initial success. As we improve we can make it a 9 v 9 and an actual game situation. Here we start with a 9 v 5.
We are not saying these will work all the time and we will make mistakes. Sometimes we will get them wrong. Sometimes the opponents will work out what we are doing and stop us. And sometimes it will work great. But they WON'T work if we don't try them and just boot it long and play safe.

Perhaps use cones instead of actual players to practice in a shadow play to make it work initially and to gain confidence (better still use Mannequins).
1. Developing play from the back in a 9 v 9 through the Center backs / Wing backs
Now (3) breaks wide to receive the ball and escape being marked in the middle. The same can happen with (2) breaking out to the right also with (6) who stays central.

We must ALWAYS try first of all to play out from the back. The ABSOLUTE last resort is for the keeper to kick it long. This is Great preparation for playing the 11 v 11 and developing the game from the back. Players must spread touchline wide both sides to offer up the largest spaces to play in as they can. Keeper has 3 choices here and the ball must be passed on the ground for ease of reception.
2. Distribution from the keeper thru Wide Midfielders/ Strikers
They push 3 up we get out through our wide strikers. Have opponents make different choices to force the keeper to make relevant decisions in training. Here we would NOT try to develop play through the back three players as each one is marked. Therefore we go to the next line of attack to get out.

3. Rotation of wide players to get free
Here a simple rotation between (3) and (11) opens up a passing lane for (11). Opponent (D) follows our (3). If (D) stays then we don't pass to (11) but rather try something else.

Introducing 2 player rotations like this is important as we can eventually make this happen all over the field of play. The sooner they learn this the sooner it is embedded in their soccer DNA.
4. Rotation of wide players to get free
Here a simple rotation between (11) and (3) opens up a passing lane for (3). Opponent(D) stays in the space (11) runs into so perhaps (3) can get free?

5. Distribution from the keeper through a central midfielder rotation
They push 3 up we get out through a rotation with (6) and (8). Have opponents make different choices to force the keeper to make relevant decisions in training.
(6) Sprints forward and takes his or her marker with them, in this case (B). This opens up space where (6) originally was for (8) to drop in unopposed to be free to start the play. In this if we do it quickly enough (8)’s marker may not see it in time and (8) will get free.

6. Inverted runs inside by Wide Midfielders/ Strikers
They push 3 up we get out through our wide strikers. Have opponents make different choices to force the keeper to make relevant decisions in training. Here we would NOT try to develop play through the back three players as each one is marked. Therefore we go to the next line of attack to get out. Buildup to 9 v 9.

7. Rotation of front players
Here a simple rotation between (9) and (10). (9) goes towards the ball and brings defender (A) with him or her. (10) pushes on into the central space created. If (A) lets( 9) go and stays centrally then we can pass into (9)’s feet to receive and turn.

Various rotations practiced at the same time
Here we make opponents make different choices b your movements OFF the ball to force the keeper to make relevant decisions in training.
Potential Off the ball movements.
- (6) And (8) interchange so (8) gets free to receive. (B) tracks (6).
- (2) And (7) rotate and (C) tracks (2) leaving (7) free to receive.
- (11) Takes defender (E) wide then cuts inside with an inverted run to receive in open space and free of (E)
- (3) Runs wide to the touchline and defender (D) runs to mark him or her, this opens up a passing lane inside for the keeper to pass to (11) as shown.
- (9) Goes short to receive and takes defender (A) with them leaving (10) filling the space left free to receive as shown.

Subscribe to our email newsletter below to download a pdf of this presentation.
Just a one-word signal can organize a defense, so everyone on the team knows what to do and reacts together as a unit. Also midfield players close by can react off the call too as can strikers. These One-word calls ensure everyone will know quickly and effectively what they should do as a unit and as a team. Hence the back players (and the keeper) can organize their movement as a unit (and therefore influence those in front of them) from Five VERY simple one-word commands. The momentum is triggered from the back and runs forward through the team to the strikers. We must have a very vocal and confident leader at the back organizing this and making the decisions.