Playing in 5 Corridors and 3 Zones Using the 3-3-1-3 for Attacking and Defending Team Shape

Playing in 5 Corridors and 3 Zones Using the 3-3-1-3 for Attacking and Defending Team Shape

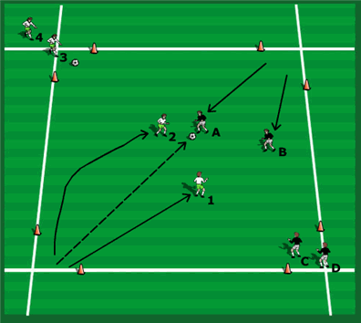
Using Corridors is a great way to work out individual and collective field positioning as a team both offensively and defensively and it also gives players real a “focal point” to work off. We use “Corridors” width wise and then introduce “Zones” lengthwise later. These “focal points of reference” I believe are a great way to really teach players to understand the differences between attacking and defending team shapes both widthwise and lengthwise. A great session to help players identify positional variations, the 4 lines are used as a clear guide widthwise.

Read More

Defensive Pressing to Push Up Without Touching the Ball

Defensive Pressing to Push Up Without Touching the Ball

This is a great session to teach the players and shows how they can push opponents back even when THE OPPONENTS have the ball. We will try to push them back without even touching the ball ourselves. We start on the edge of our box we try to get our back three up to the half way line. Set Conditions will help us do this to start the process off.

Read More

How to Teach Freedom of Movement for the 4-2-3-1

How to Teach Freedom of Movement for the 4-2-3-1

Attacking and Defensive Positioning; and Covering for Each Other in Brief

To play such a fluid and imaginative style of play as we do; where players are offered such freedom offensively all over the field; there is always a "weakness" to this we need to address. In this case we look at the defensive consequences for which we need to cover and correct. 

Read More

The 6 Second Transition Game

The 6 Second Transition Game

Teams are at their most vulnerable in terms of losing the ball, in the first few seconds after gaining possession. It is this transition period that we are looking at, both in terms of winning the ball back quickly and then keeping it. The key is the first six seconds after losing the ball. In this game when a team loses possession they have 6 seconds to win the ball back (the coach counts this out).

Read More

Quick Transition Directional Play Promoting Passing and Movement Off the Ball

Quick Transition Directional Play Promoting Passing and Movement Off the Ball

This session improves quick decision making, tight control because the spaces are small to play in, and thinking in advance due to the switch in direction of the play. You can also work on the defending players.


Read More

Why Man Marking is good to use in practice even if you don’t defend that way in a game situation

Why Man Marking is good to use in practice even if you don’t defend that way in a game situation

In the game players must develop the ability to be calm under pressure, to be confident to receive the ball in tight spaces and to have the confidence of teammates to give the ball to you under pressure.To be good at this takes time and practice and many sessions where constant pressure is applied in the training environment hence why man marking games can be so productive.

Read More

A Simple Explanation on How to Defend as a Team in 11 v 11

A Simple Explanation on How to Defend as a Team in 11 v 11

Playing in 5 Corridors widthwise to help define the positioning of players. Also playing in 3 thirds from goal to goal lengthwise (lets call these ZONES FOR CLARITY). Here we have a good balance with players positioning at angles to each other. Must get the team into 2 thirds only, except for the keeper, both offensively and defensively.

Read More

When to Close in Wide and Central Areas

When to Close in Wide and Central Areas

This session covers when and when not to close down in wide and then central areas. The practice develops into an 11 v 11 game situation, still working with the defending team. The coach serves to the opponents in different locations on the field and the team needs to try to win the ball back individually and collectively.

Read More

Pressure: When, Where and How as a Unit in the Attacking 1/3rd

Pressure: When, Where and How as a Unit in the Attacking 1/3rd

The majority of goals in the game of soccer are results of mistakes and most mistakes occur when players are put under pressure, especially in dangerous areas.  When you are attacking and you lose possession your first goal should be to regain possession.  You will be surprised the number of times your opponent will give the ball away in front of the goal when your team closes them down in an organized fashion. 

Read More

Four Color Cone Defending Drill

Four Color Cone Defending Drill

Four cones, red, blue, yellow and white, coach calls different colors players have to adjust side to side to get there quickly. 5 to 6 seconds each pair. Defenders are now shifting quickly and against the movement of the attacker when the attacker decides to shift the ball one way or the other. Only do it for 5 or 6 seconds because in games defenders only stay down there like this for that time period generally. How quickly can they do it?

Read More

A Game Situation for 1 v 1 Defending

A Game Situation for 1 v 1 Defending

Divide the teams up into two 3 v 3 games with teams attacking the short side lines to score a goal. Play with one ball then two balls so there is some 1 v 1’s and also some support play. Then they attack the long sides as targets making it a little harder to defend successfully.

Read More

A Short and Simple Explanation on How to Defend

A Short and Simple Explanation on How to Defend

Attacking: Based on the 5 corridors width-wise we want all 5 corridors to have players in them. 

Based length–wise we want a maximum of 2 of 3 zones filled; with the exception of the keeper.

Defending: Based on the 5 corridors width-wise we want a maximum of 3 corridors filled with players preferably 2.5 if possible.

Based length-wise we want a maximum of 2 of 3 zones filled preferably the whole team is condensed into 1.5 zones or at most half a field.

Read More